

Employee Web Guide
Your self-service portal — time, leave, access and equipment
Contents
- 1 Signing in
- 2 Finding your way around
- 3 Dashboard
- 4 My workplace
- 5 Your shifts
- 6 Your time report
- 7 Vacations — balance, requests, calendar
- 8 Access
- 9 Equipment
- 10 My teams
- 11 Notifications
- 12 Settings — profile, security & privacy
- 13 Common questions
HR.Click · Employee Web GuideUsing the portal
1Signing in
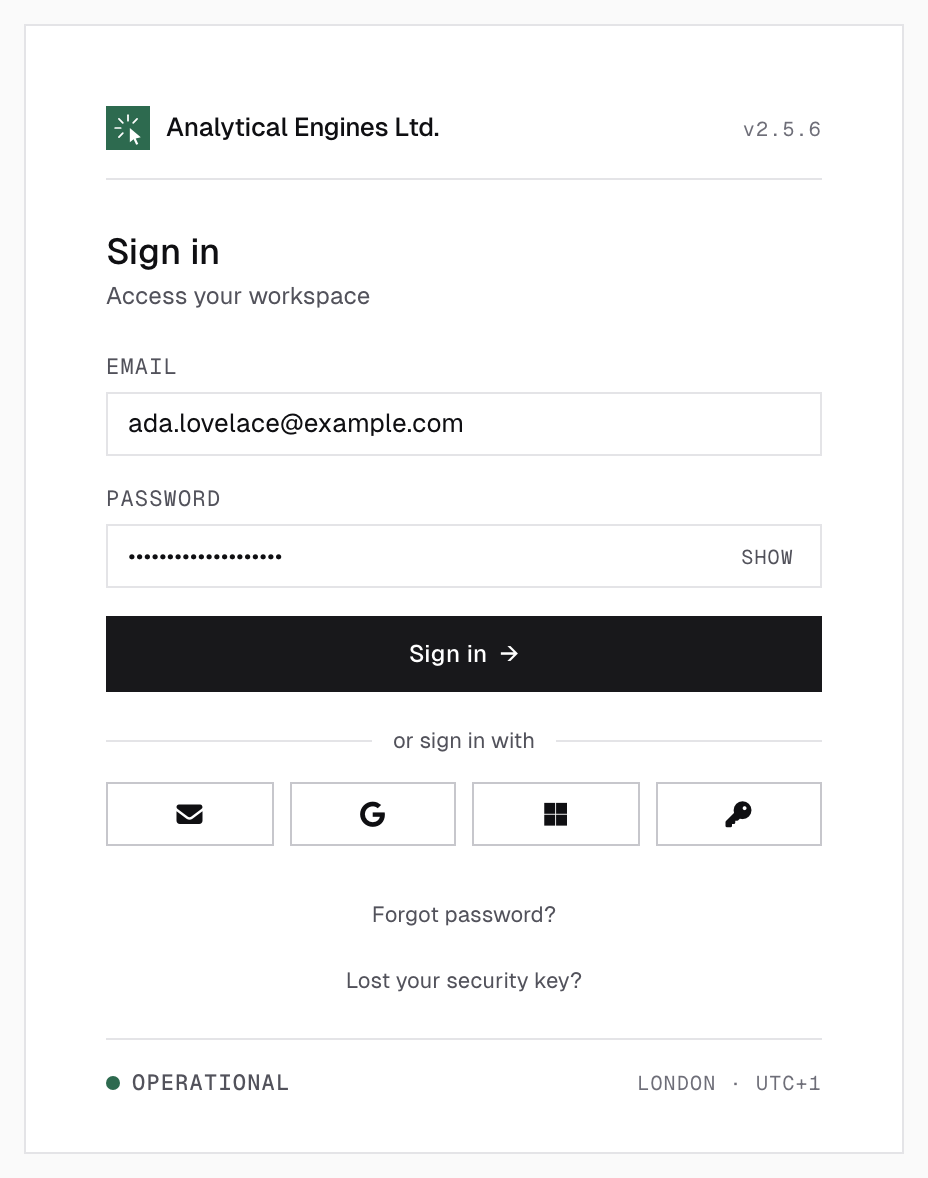
Open your company’s HR.Click address (e.g. https://yourcompany.hr.click) and sign in with your work e-mail and password. Depending on what your company has enabled, you may also see:
- Magic link (envelope icon) — enter your e-mail and receive a one-time sign-in link. The link works for 15 minutes.
- Google / Microsoft — sign in with your company account.
- Passkey (key icon) — sign in with your fingerprint, face or security key, once you have registered a passkey in Settings (section 12).
Forgot your password? Use Forgot password? under the form — you’ll get a reset link by e-mail. Five wrong attempts lock sign-in for 15 minutes.
2Finding your way around
Everything lives in the left sidebar:
| Item | What it’s for |
|---|---|
| Dashboard | Today at a glance — your status, hours, balance (section 3). |
| My workplace | Who’s around: teammates, who’s on leave, birthdays, work anniversaries, office news (section 4). |
| Shifts | Your work schedule — shown only if your company schedules you in shifts (section 5). |
| Time report | Your worked hours, day by day, with exports (section 6). |
| Vacations | Your leave balance, requests and the team calendar (section 7). |
| Access | Systems you can use, and requesting new access (section 8). |
| Equipment | Company equipment you hold, and requesting more (section 9). |
| My teams | Your team and teammates — shown only if you belong to a team (section 10). |
| Profile | Your own record as HR.Click holds it — position, team, office, tenure, balance. Read-only (section 12). |
| Settings | Your profile fields, language, security and privacy (section 12). |
| Notifications | Your inbox — the number badge shows unread items (section 11). |
- Jump to… (top bar, or press ⌘K / Ctrl K) — type to jump to any page.
- Language — the switcher in the top bar changes the interface language instantly.
- Your profile card sits at the bottom of the sidebar — click the avatar to Sign out, or use the palette icon to switch the theme (Auto / Light / Dark).
Pages like user management, approvals or terminals belong to managers and administrators. If a page from this guide is missing for you (e.g. My teams), it simply doesn’t apply to your account yet.
If your work isn’t time-tracked, Dashboard and Time report are hidden for you altogether and My workplace is where you land after signing in — sections 3 and 6 then don’t apply. You can see which way it is set in Settings → Profile → Time tracking.
3Dashboard
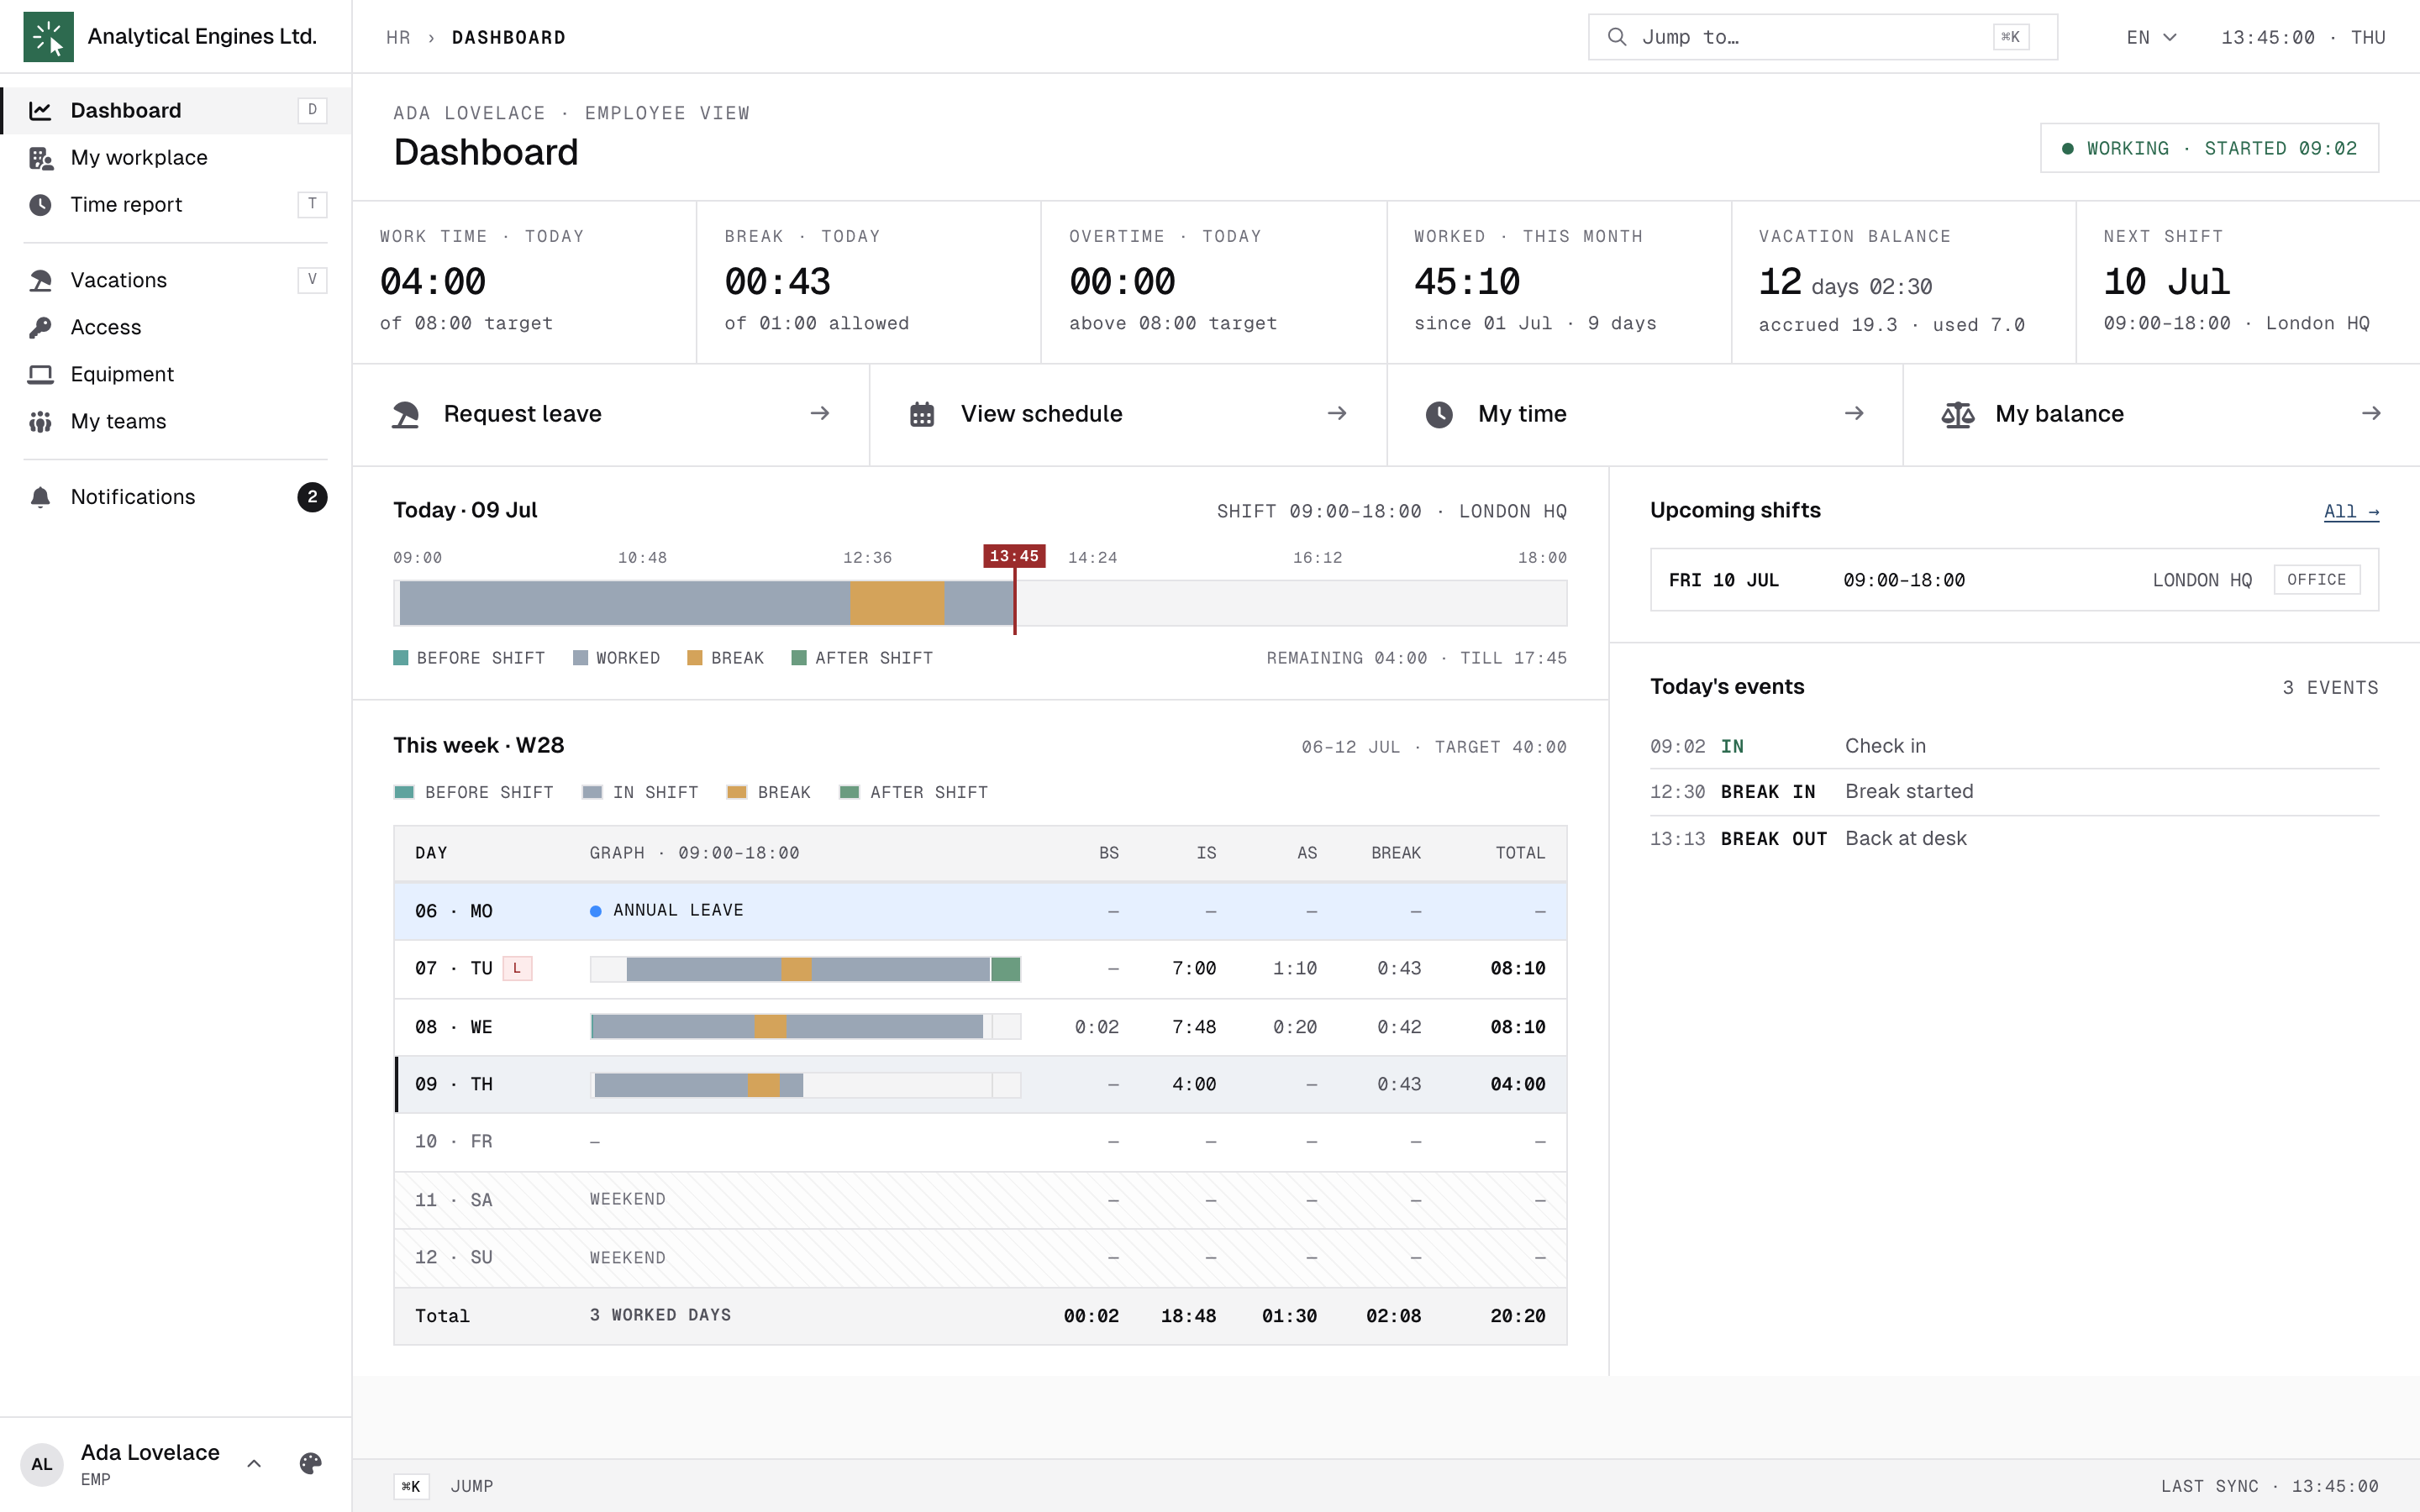
The dashboard answers “how is my day going?”:
- Status pill — WORKING / ON BREAK / OFF, with your start time. It follows your check-ins live.
- Check-in buttons — if your administrator has enabled it, clock in, take a break or clock out right next to the status pill, no need to leave the dashboard (section 6 has the details).
- Today’s numbers — work time (against your daily target), break time, overtime, this month’s total, and your current vacation balance.
- Quick actions — one-click shortcuts: Request leave, My time, My balance.
- Today — a timeline bar of your day: worked stretches, breaks, and (hatched) any logged time still awaiting confirmation.
- This week — the same per-day table you’ll meet in the Time report (section 6).
4My workplace
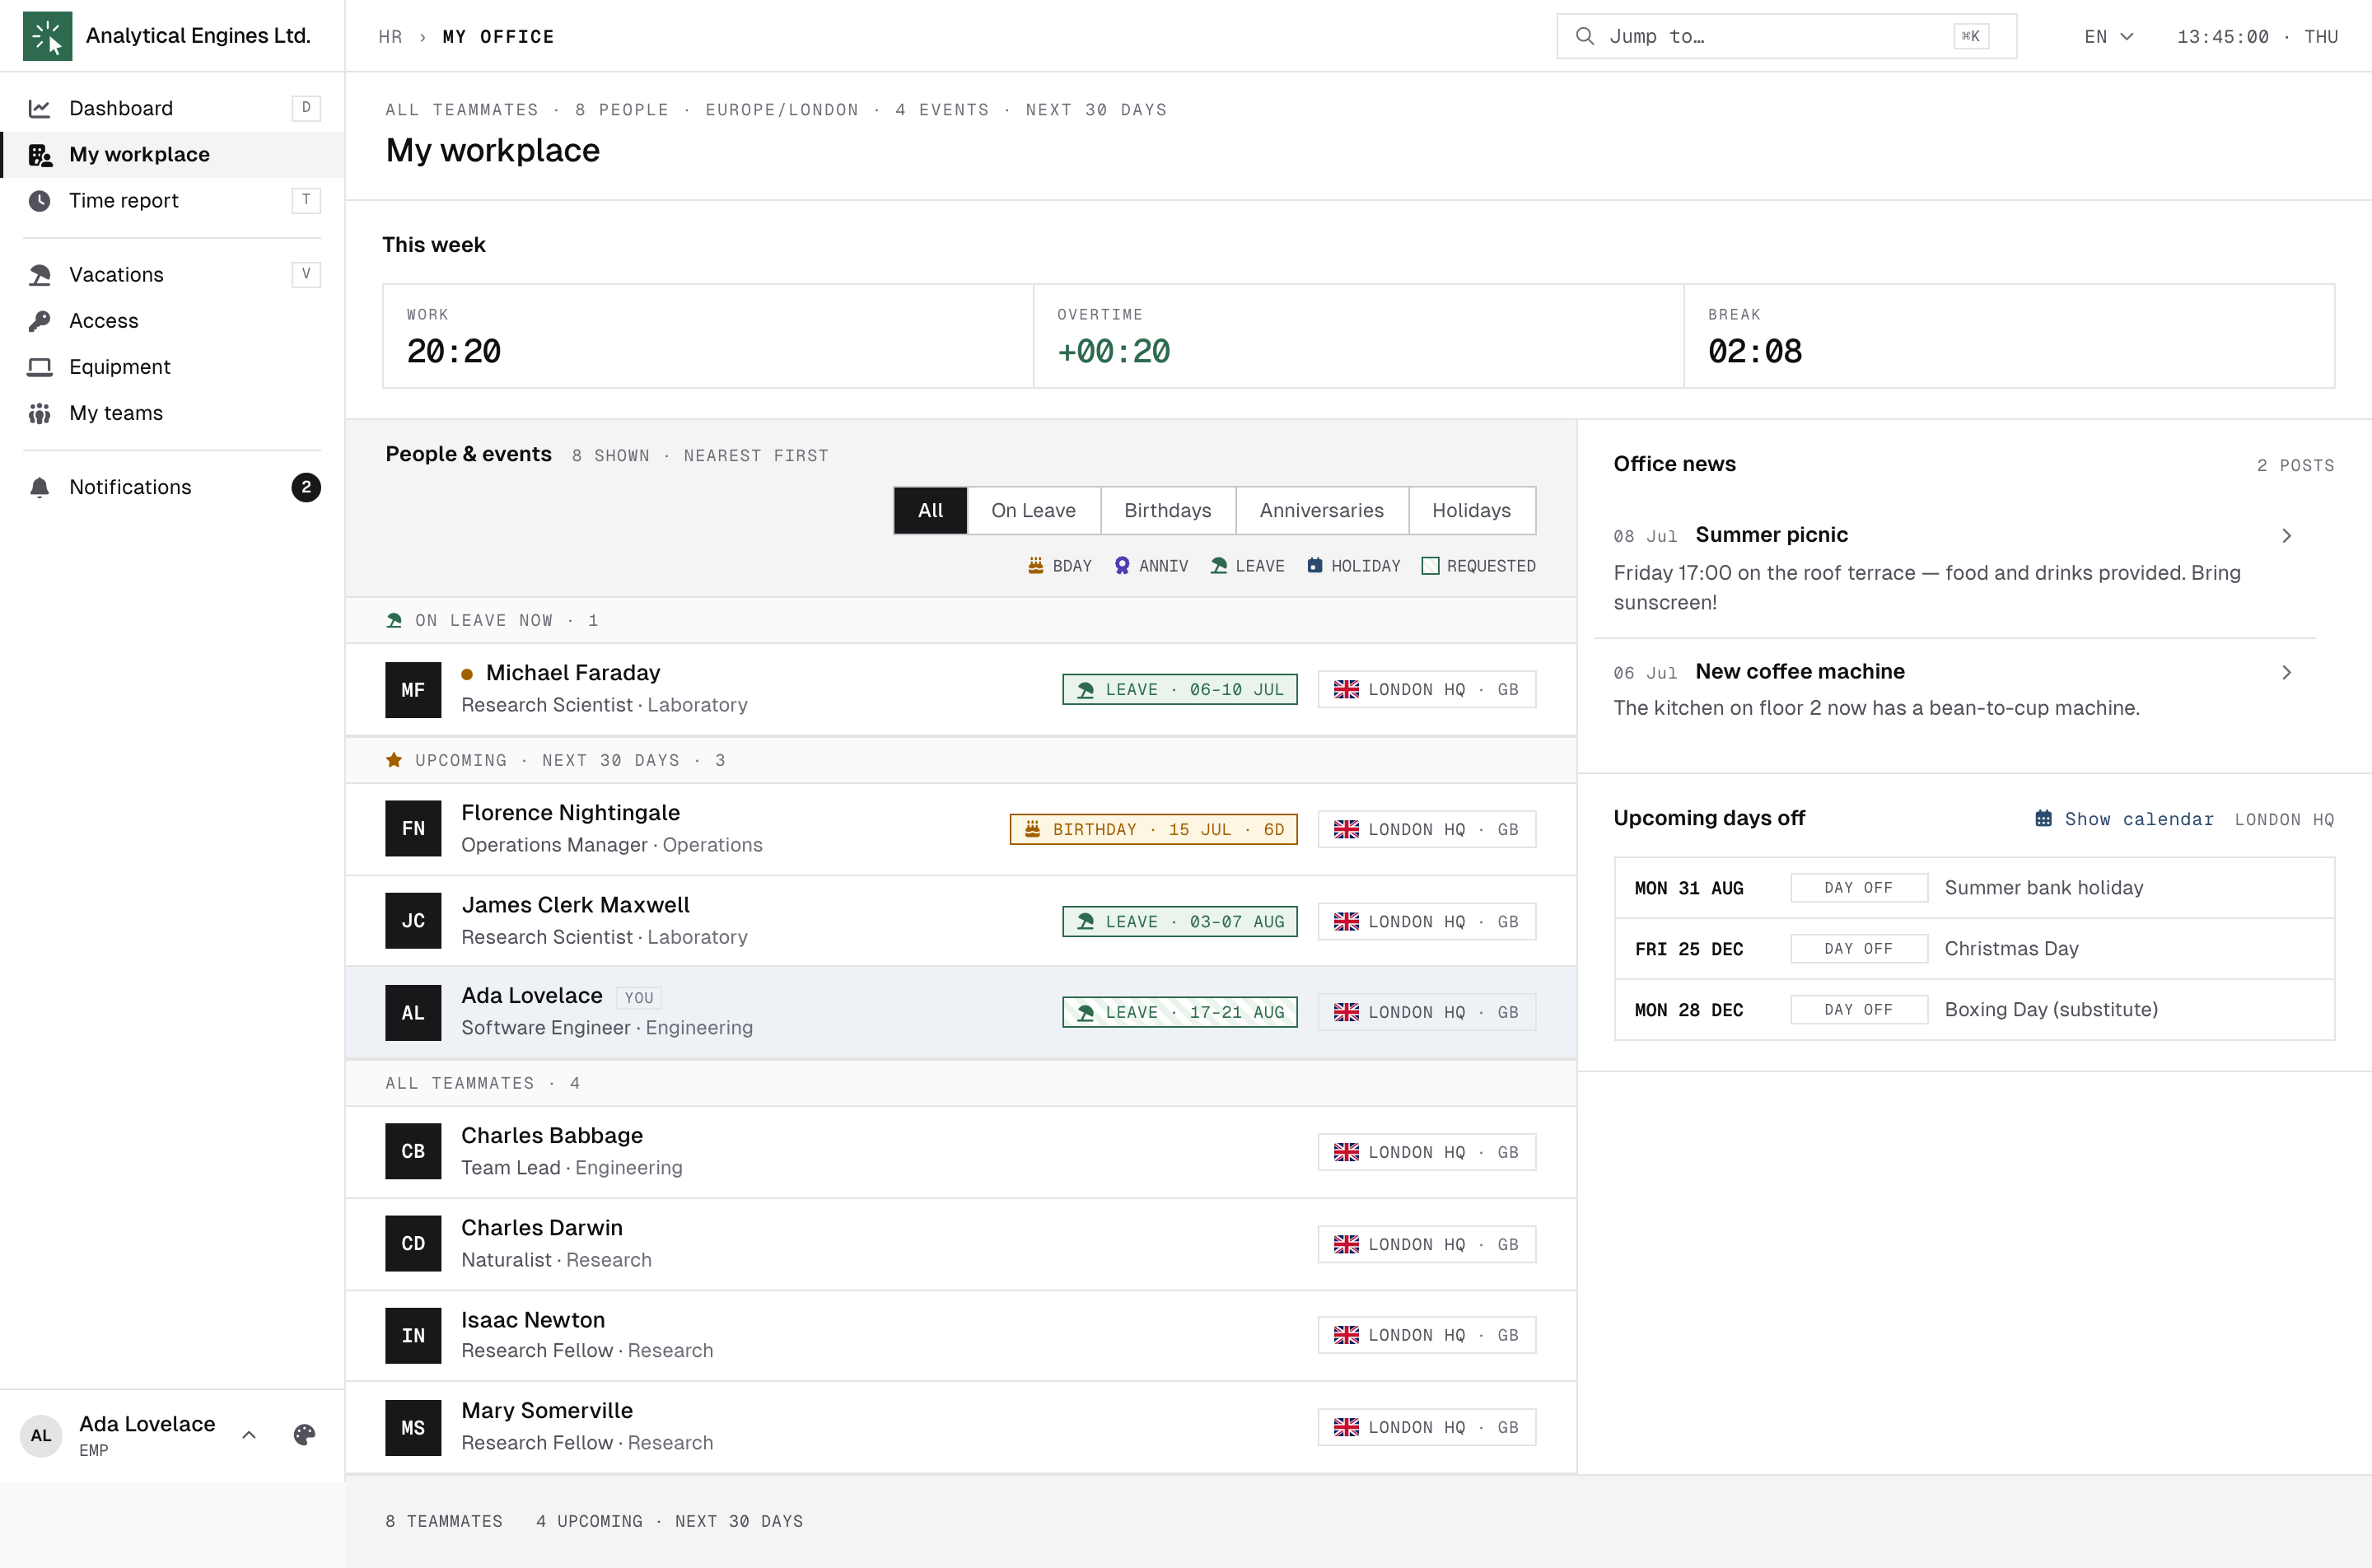
My workplace is the “who’s around” page:
- This week — your own work / overtime / break totals for the current week.
- People & events — teammates grouped as On leave now, Upcoming (next 30 days) and All teammates, with chips for birthdays (BDAY), work anniversaries (ANNIV), approved leave (a requested-but-unapproved leave shows hatched) and holidays. Filter by team, or show only the event kinds you care about.
- Holidays in other offices — what is closed elsewhere in the company, so you know before you write to a colleague abroad.
- Office news — announcements addressed to your office; click a post to read it in full.
- Upcoming days off — public holidays and special days for your office, with a link to the full office calendar.
5Your shifts
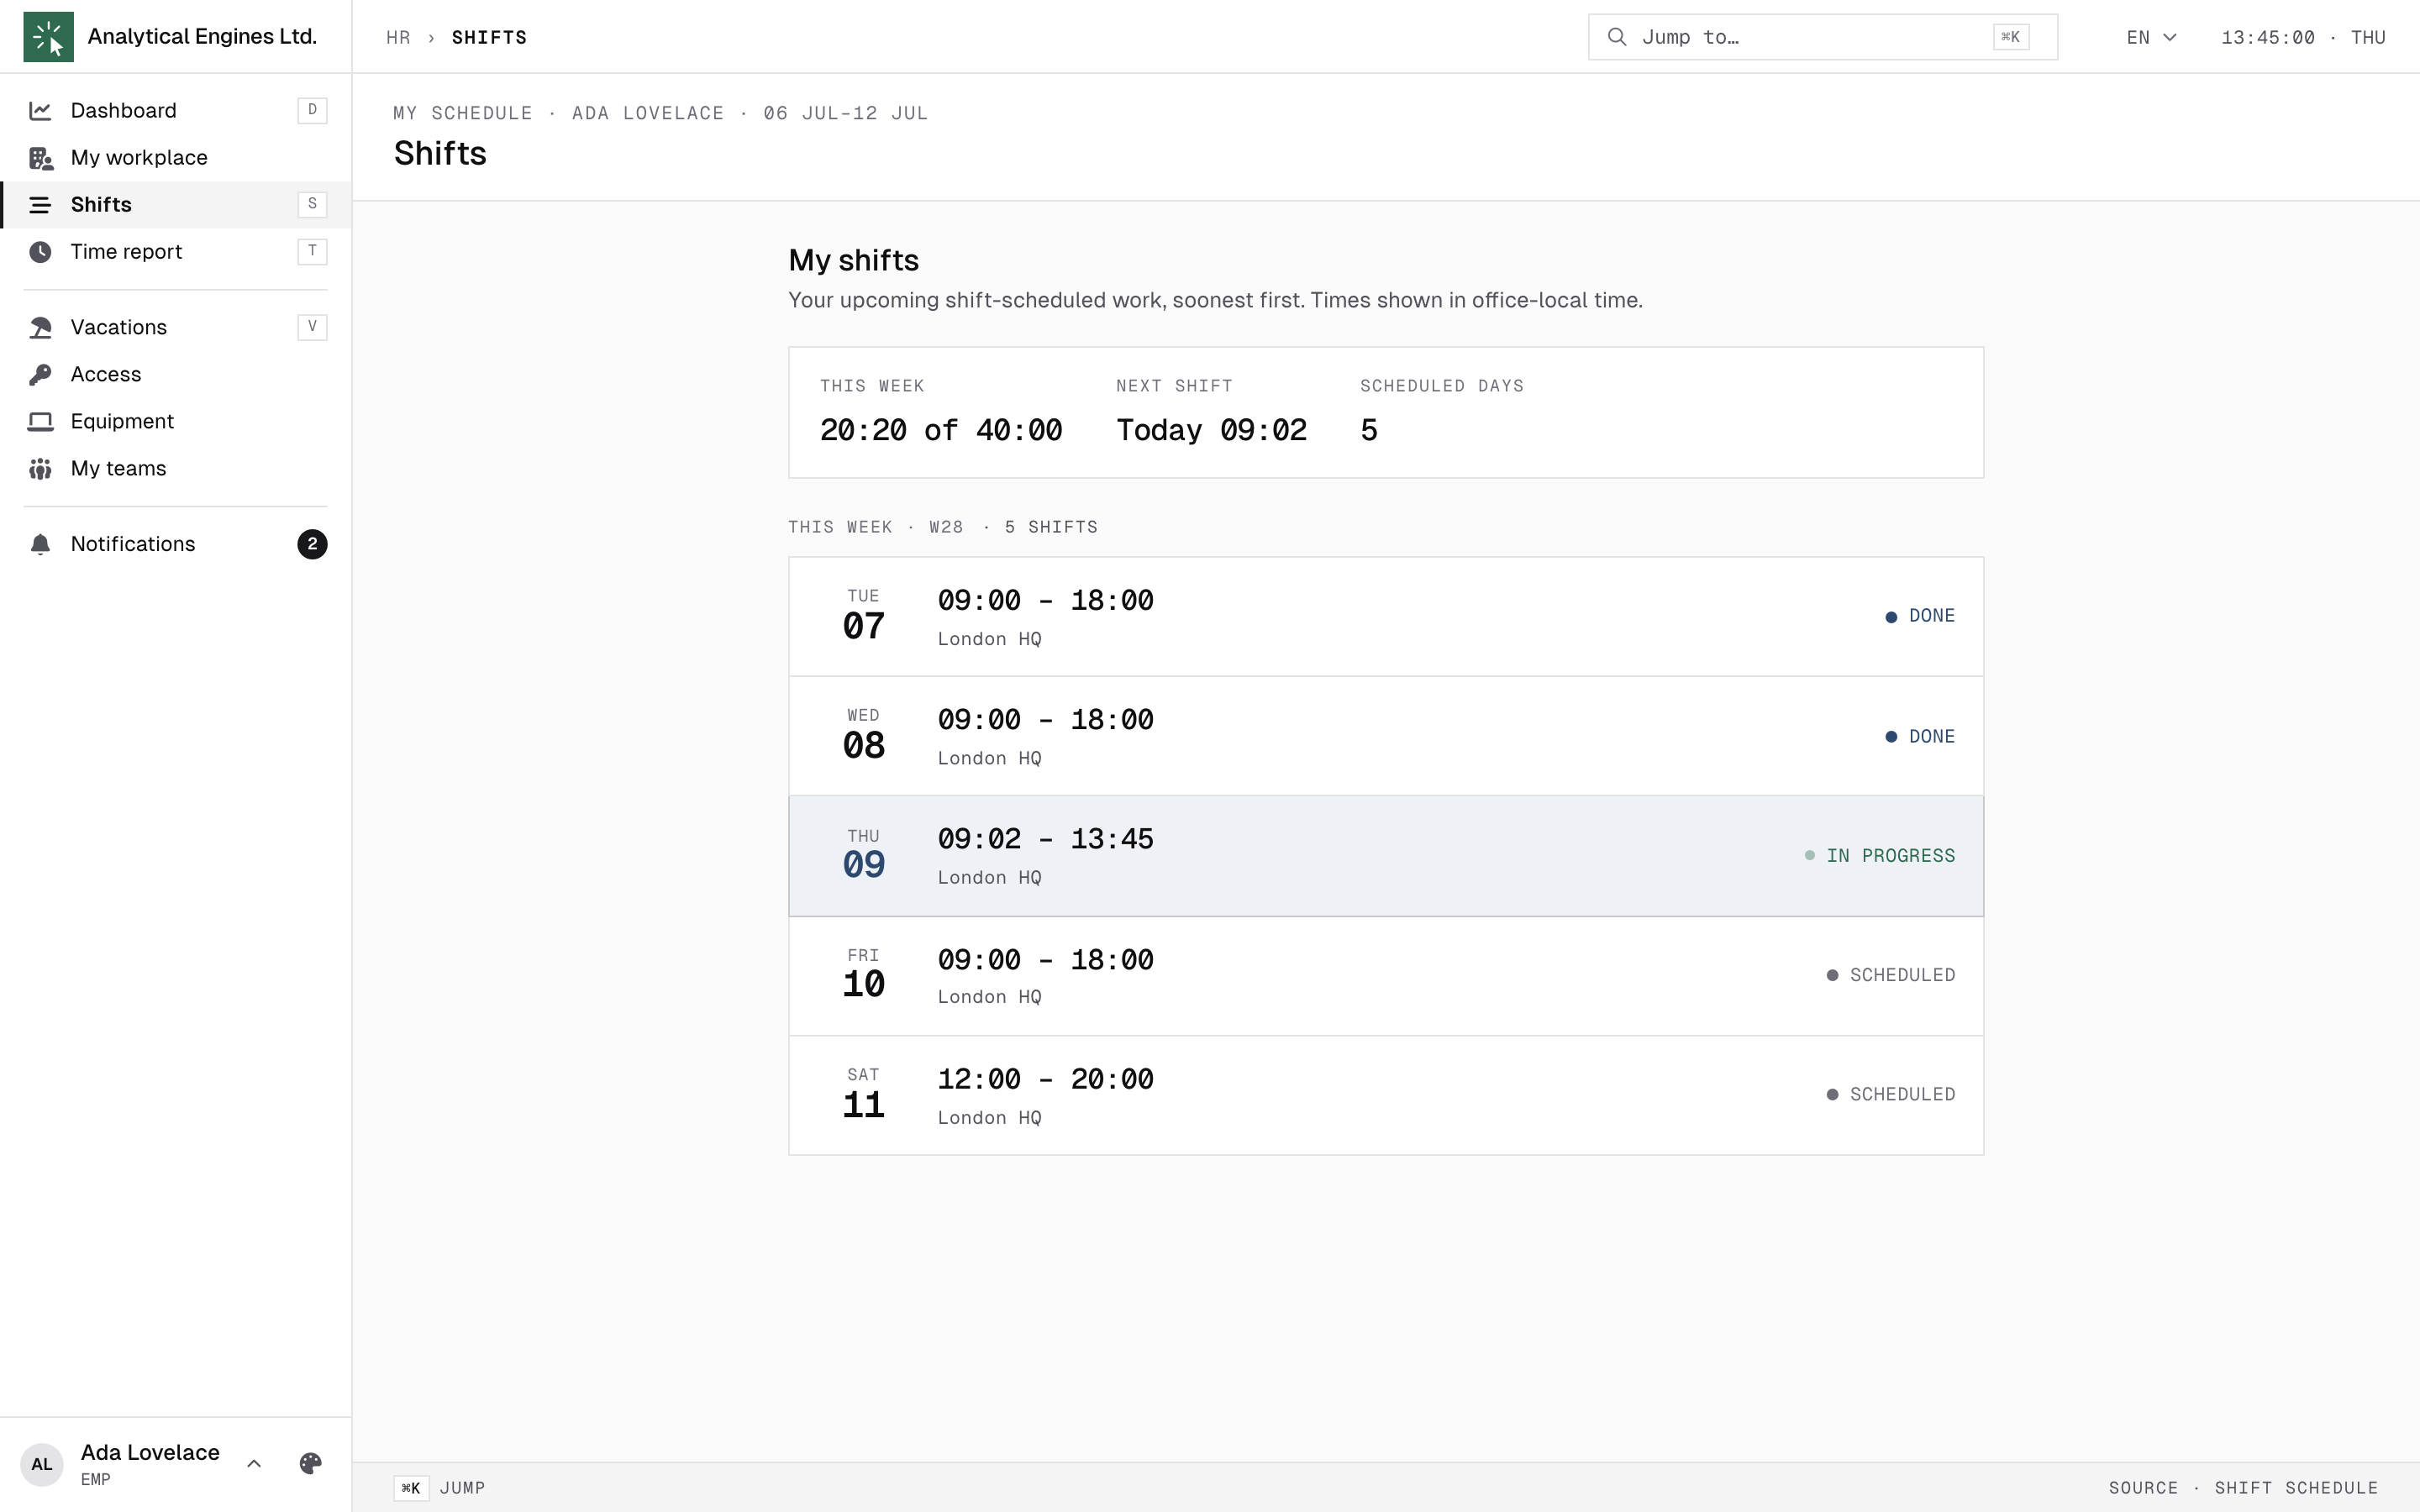
If your company schedules you in shifts, a Shifts item appears in your sidebar (office-schedule employees don’t have it). It is your read-only schedule:
- This week — hours worked against the week’s target, your next shift, and how many days you are scheduled.
- My shifts — your shifts soonest-first, each with the date, start–end times (shown in office-local time), the location, and a status: SCHEDULED (upcoming), IN PROGRESS (live now) or DONE.
- What a shift asks of you — the times you see are the window; if the shift includes an unpaid break, the hours it actually requires are the window minus that break. A 10:00–18:30 shift with a 30-minute break asks for 08:00, so punching your lunch leaves you exactly on target rather than short. Your day in Time report is measured against that figure.
- You’ll get a notification when your schedule is published or a shift changes. If something looks wrong, talk to your manager — shifts are planned by them.
6Your time report
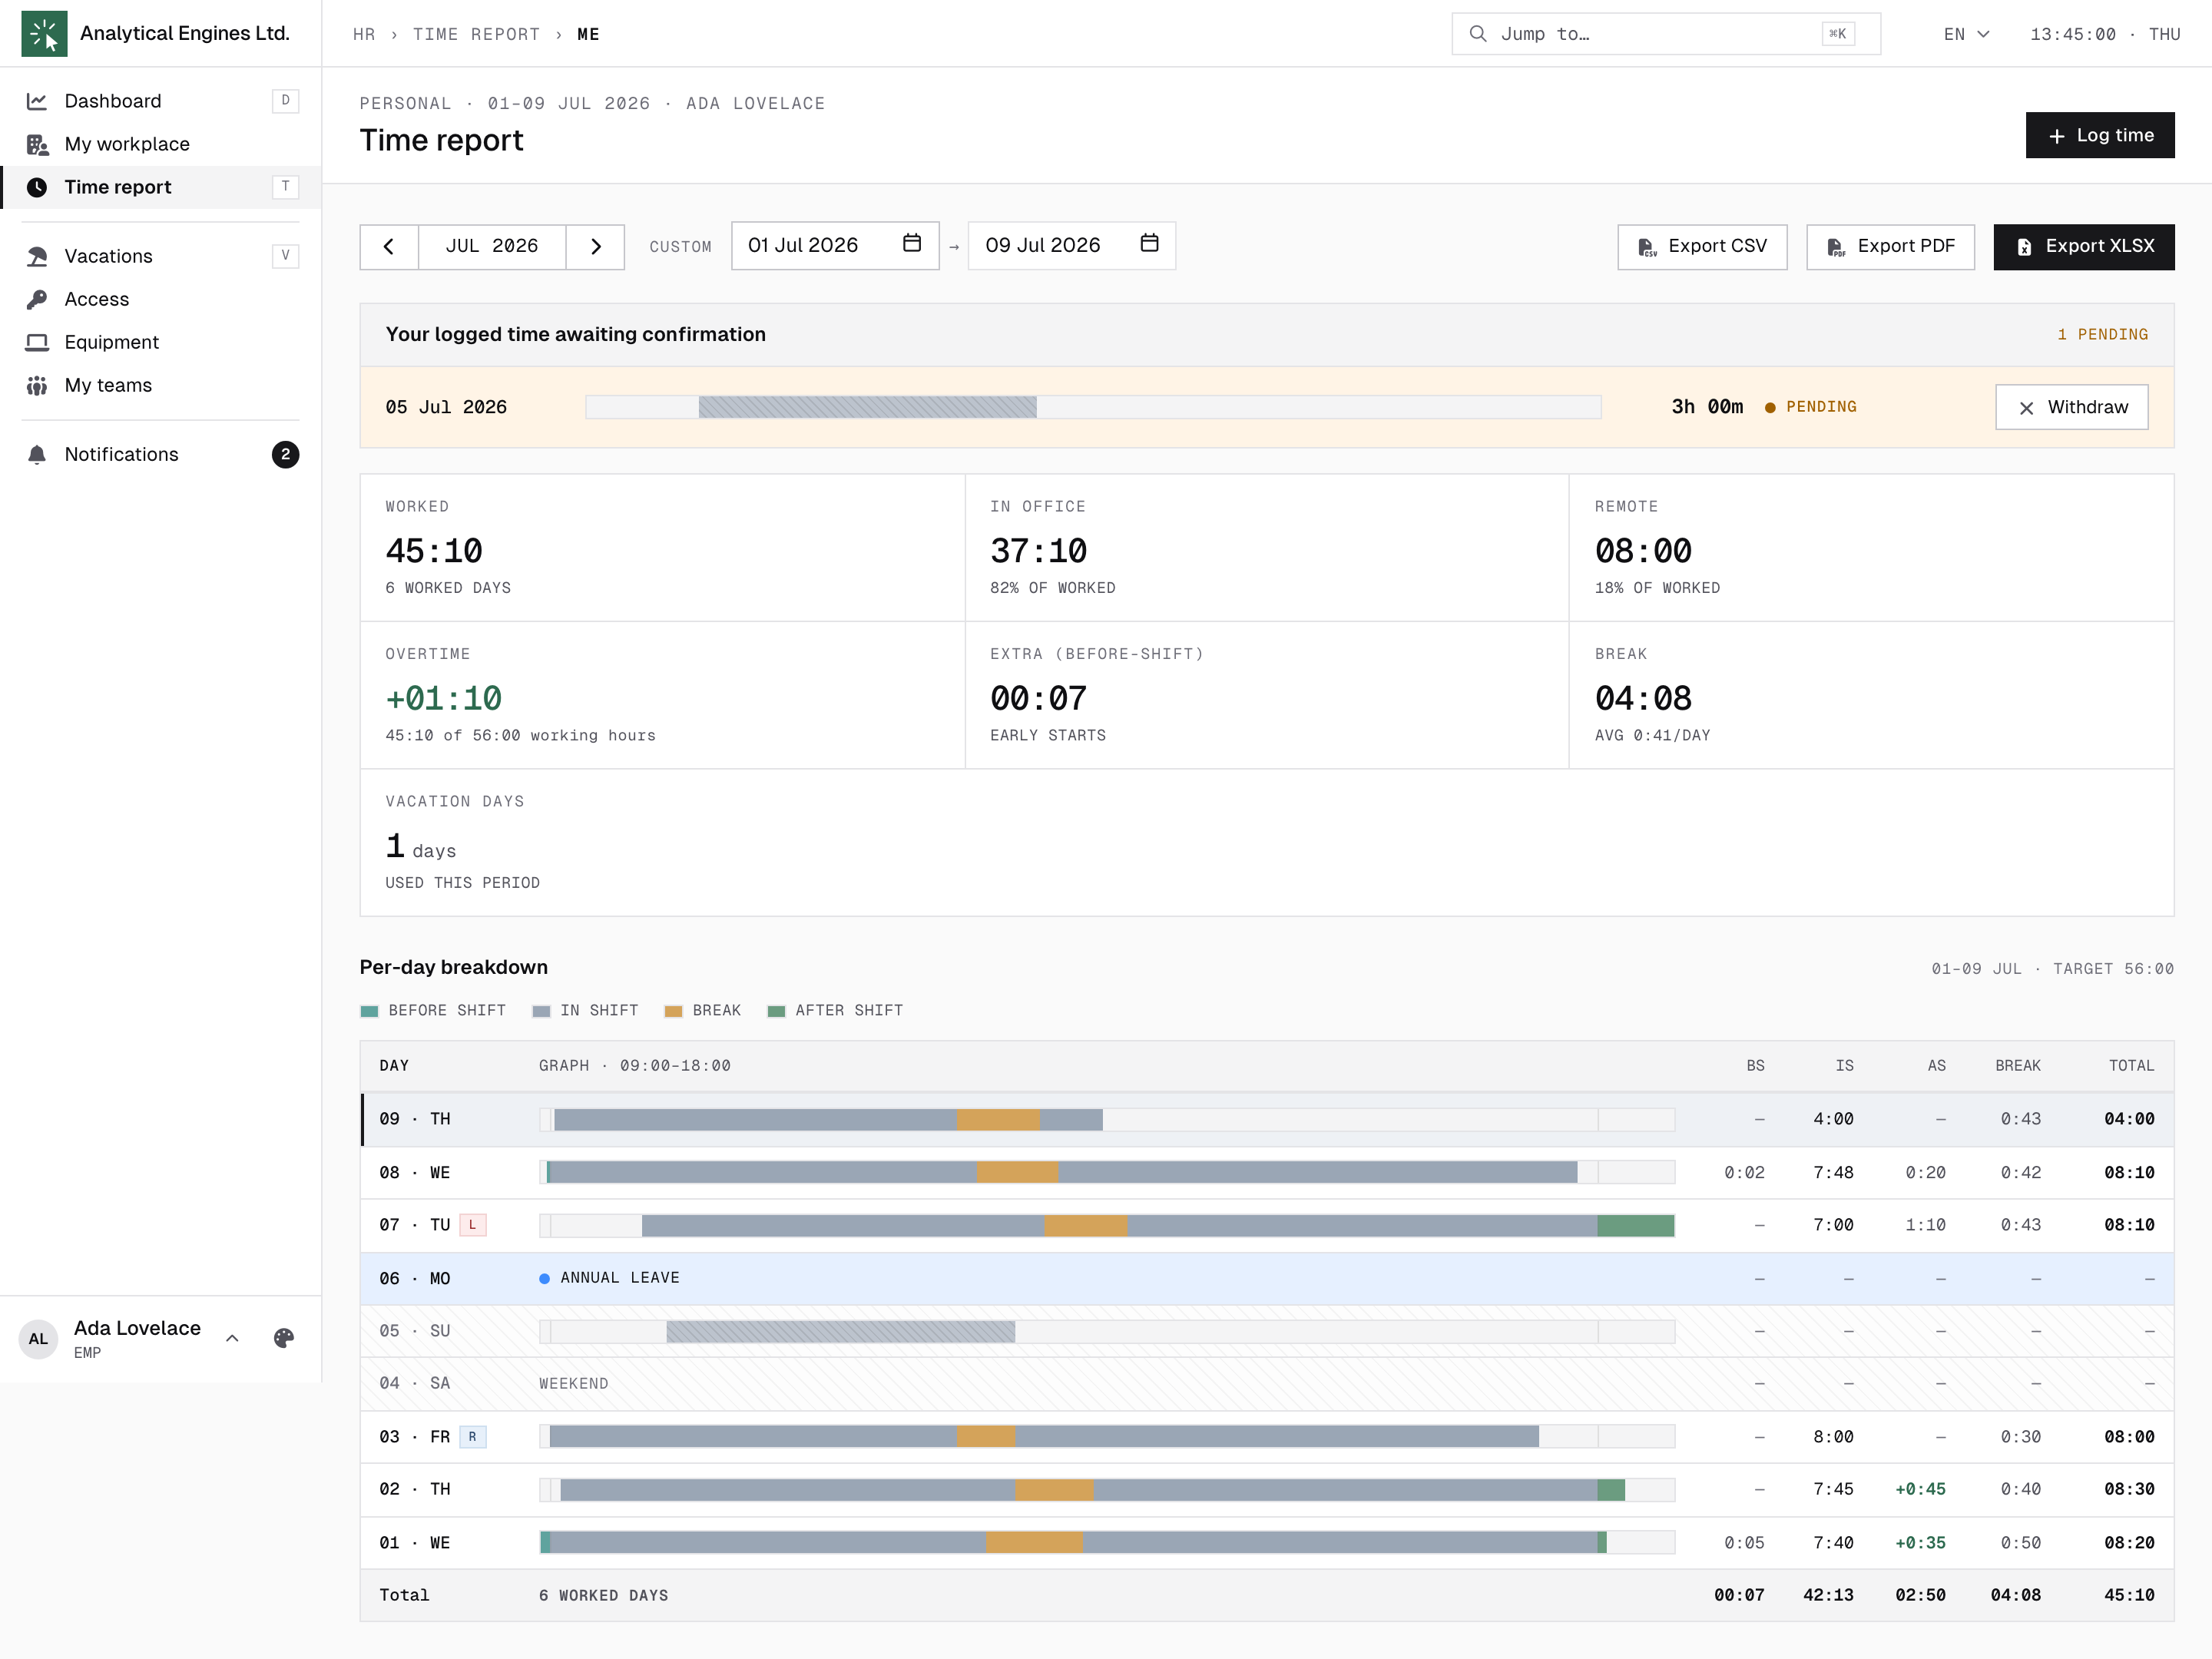
Your worked hours come from your check-ins — at the face terminal (including its phone-and-QR fallback) and, if your company has enabled it, from the HR.Click browser extension or right on the Dashboard itself (see below). Where none of those is enabled, the web app is read-only here: you just log missing hours for confirmation. Open Time report to see any period (use the month arrows or pick custom dates):
If your administrator has enabled site check-in, a row of buttons sits next to the status pill on the Dashboard — Check in, Break in/Break out, Check out — plus a note toggle for a short note (“stuck in traffic”), same as the browser extensions below. Every button commits on the first tap.
HR.Click has two Chrome extensions: HR.Click | Tab (a new-tab page with the day strip and your office at a glance) and HR.Click | Time (a small punch-only popup with a badge). If your administrator has enabled browser check-in, you can clock in, take a break and clock out straight from them, and add a short note to a punch (“stuck in traffic”) — your time manager sees it on the day. Install from Settings → Profile → Browser extension. Each has its own short guide — “HR.Click | Tab” Browser Extension Guide and “HR.Click | Time” Browser Extension Guide.
Your company decides where each of these channels is allowed from: only inside the office network, from anywhere, or not at all. A punch made outside a known office network is recorded as remote — it still counts as worked time.
- The stat row — Worked (ticks live while you’re on the clock), In office and Remote (how your worked time splits, with % shares), Overtime, Extra (time before your shift), Break (daily average) and Vacation days used in the period.
- Overtime is the signed balance over the closed days only, printed underneath as “worked X of Y working hours”. A day counts once it is finished — today joins in as soon as you check out. A day you are still working, and the days ahead of you, are left out — otherwise every period you are standing in the middle of would read as a shortfall. Days you spent on leave are out of the target too, so leave never turns into a debt. Green means you are ahead of the norm for those days, red means behind.
- Per-day table — one row per day: a small graph of the day, time BS (before shift), IS (in shift), AS (after shift), break, and the day total. Day tags: R remote day, L late arrival, · special day (holiday / short day). A day fully on leave appears as its own labelled row (e.g. “Annual leave”) — click it to open the leave. The bottom row sums every column.
- Export — Export CSV / PDF / XLSX download your personal report for the selected period: per-day worked, office/remote split, breaks, overtime and totals, counted exactly the way the page counts them. Handy for invoicing or your own records.
Some offices charge the standard break to a day where no break was punched at all, once the day is worked to at least 75% of its norm — the assumption being that lunch happened. When that applies, the per-day table prints the charged amount in a lighter tint next to your break, with the hint “Break not punched — counted by default”. Punch any break yourself, however short, and the day is counted as you punched it.
Forgot to punch? Log time
Log time is where you fix your own record. It opens on two tabs, because forgetting one punch and never punching at all are different problems:
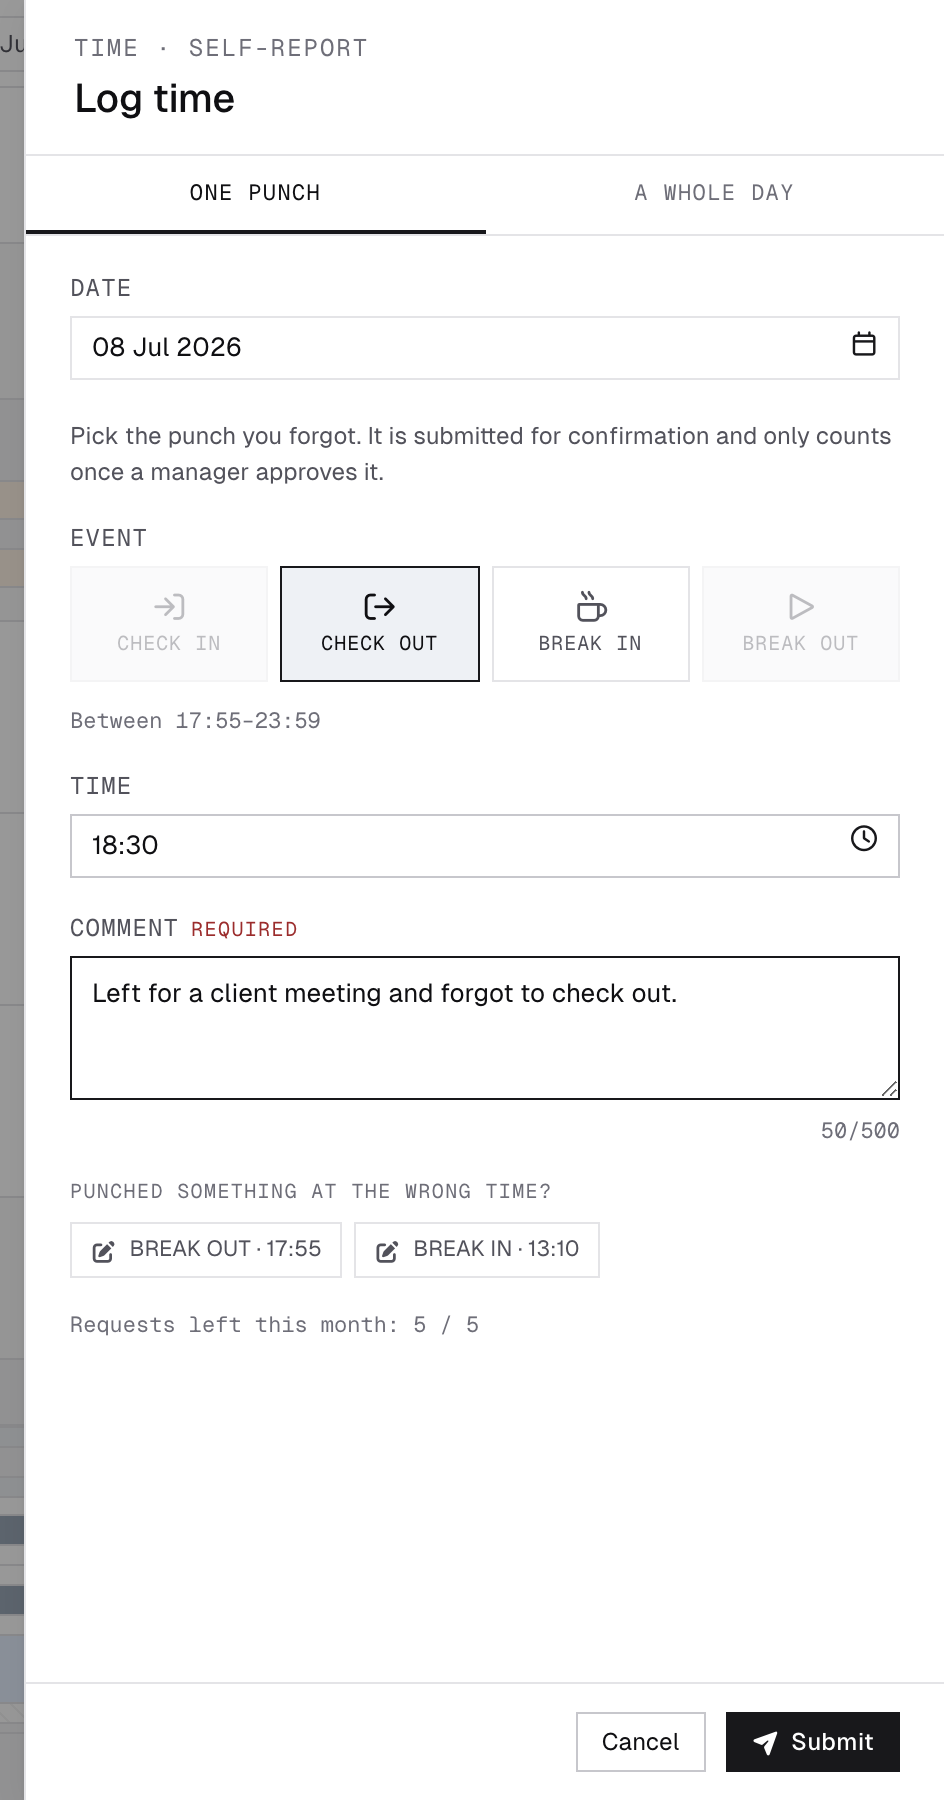
- One punch — you checked in but forgot to check out, forgot to end a break, or punched something at the wrong time. Use this whenever the day already has punches in it.
- A whole day — you worked a day the system knows nothing about. Enter the from–to interval, an optional break, and whether you worked from the office.
Either way the time is submitted for confirmation: it appears hatched in “Your logged time awaiting confirmation” and does not count towards your totals until a manager approves it. While it is pending you can Withdraw it.
One punch
Pick the date, then the event. All four are shown, and the ones that cannot belong to that day are greyed out — a check-in cannot follow another check-in, a break cannot end before it started. Hover a greyed one and it says so. Pick an available one and it tells you the window it may sit in (“Between 17:55–23:59”), starting your time field there.
A comment is required: a manager decides this, and “OUT 18:30” on its own tells them nothing.
Punched something at the wrong time
Under the form, the day’s own punches are offered as “Punched something at the wrong time?”. The classic case: you started a break, forgot to end it, and punched the end hours later — nothing is missing, one punch is simply wrong. Pick it, give the right time (and, if you punched the wrong kind of event entirely, the right event), and send it.
The wrong punch keeps counting until a manager approves the replacement — you cannot delete your own attendance, and until someone decides, your day is better off counted wrongly than not at all. On approval the old punch is retired and yours takes its place.
A missed punch can be filed for roughly the last day — long enough for “left at 18:00, noticed the next morning”, not long enough to rewrite last week. If your shift is longer than an ordinary day, the window grows with it. Anything older is a job for your manager, so the date picker simply will not offer those days.
There is also a monthly allowance (the form shows what is left of it) and a cap on how many requests can await a decision at once. Withdrawing a request gives it back.
7Vacations — balance, requests, calendar
Your balance
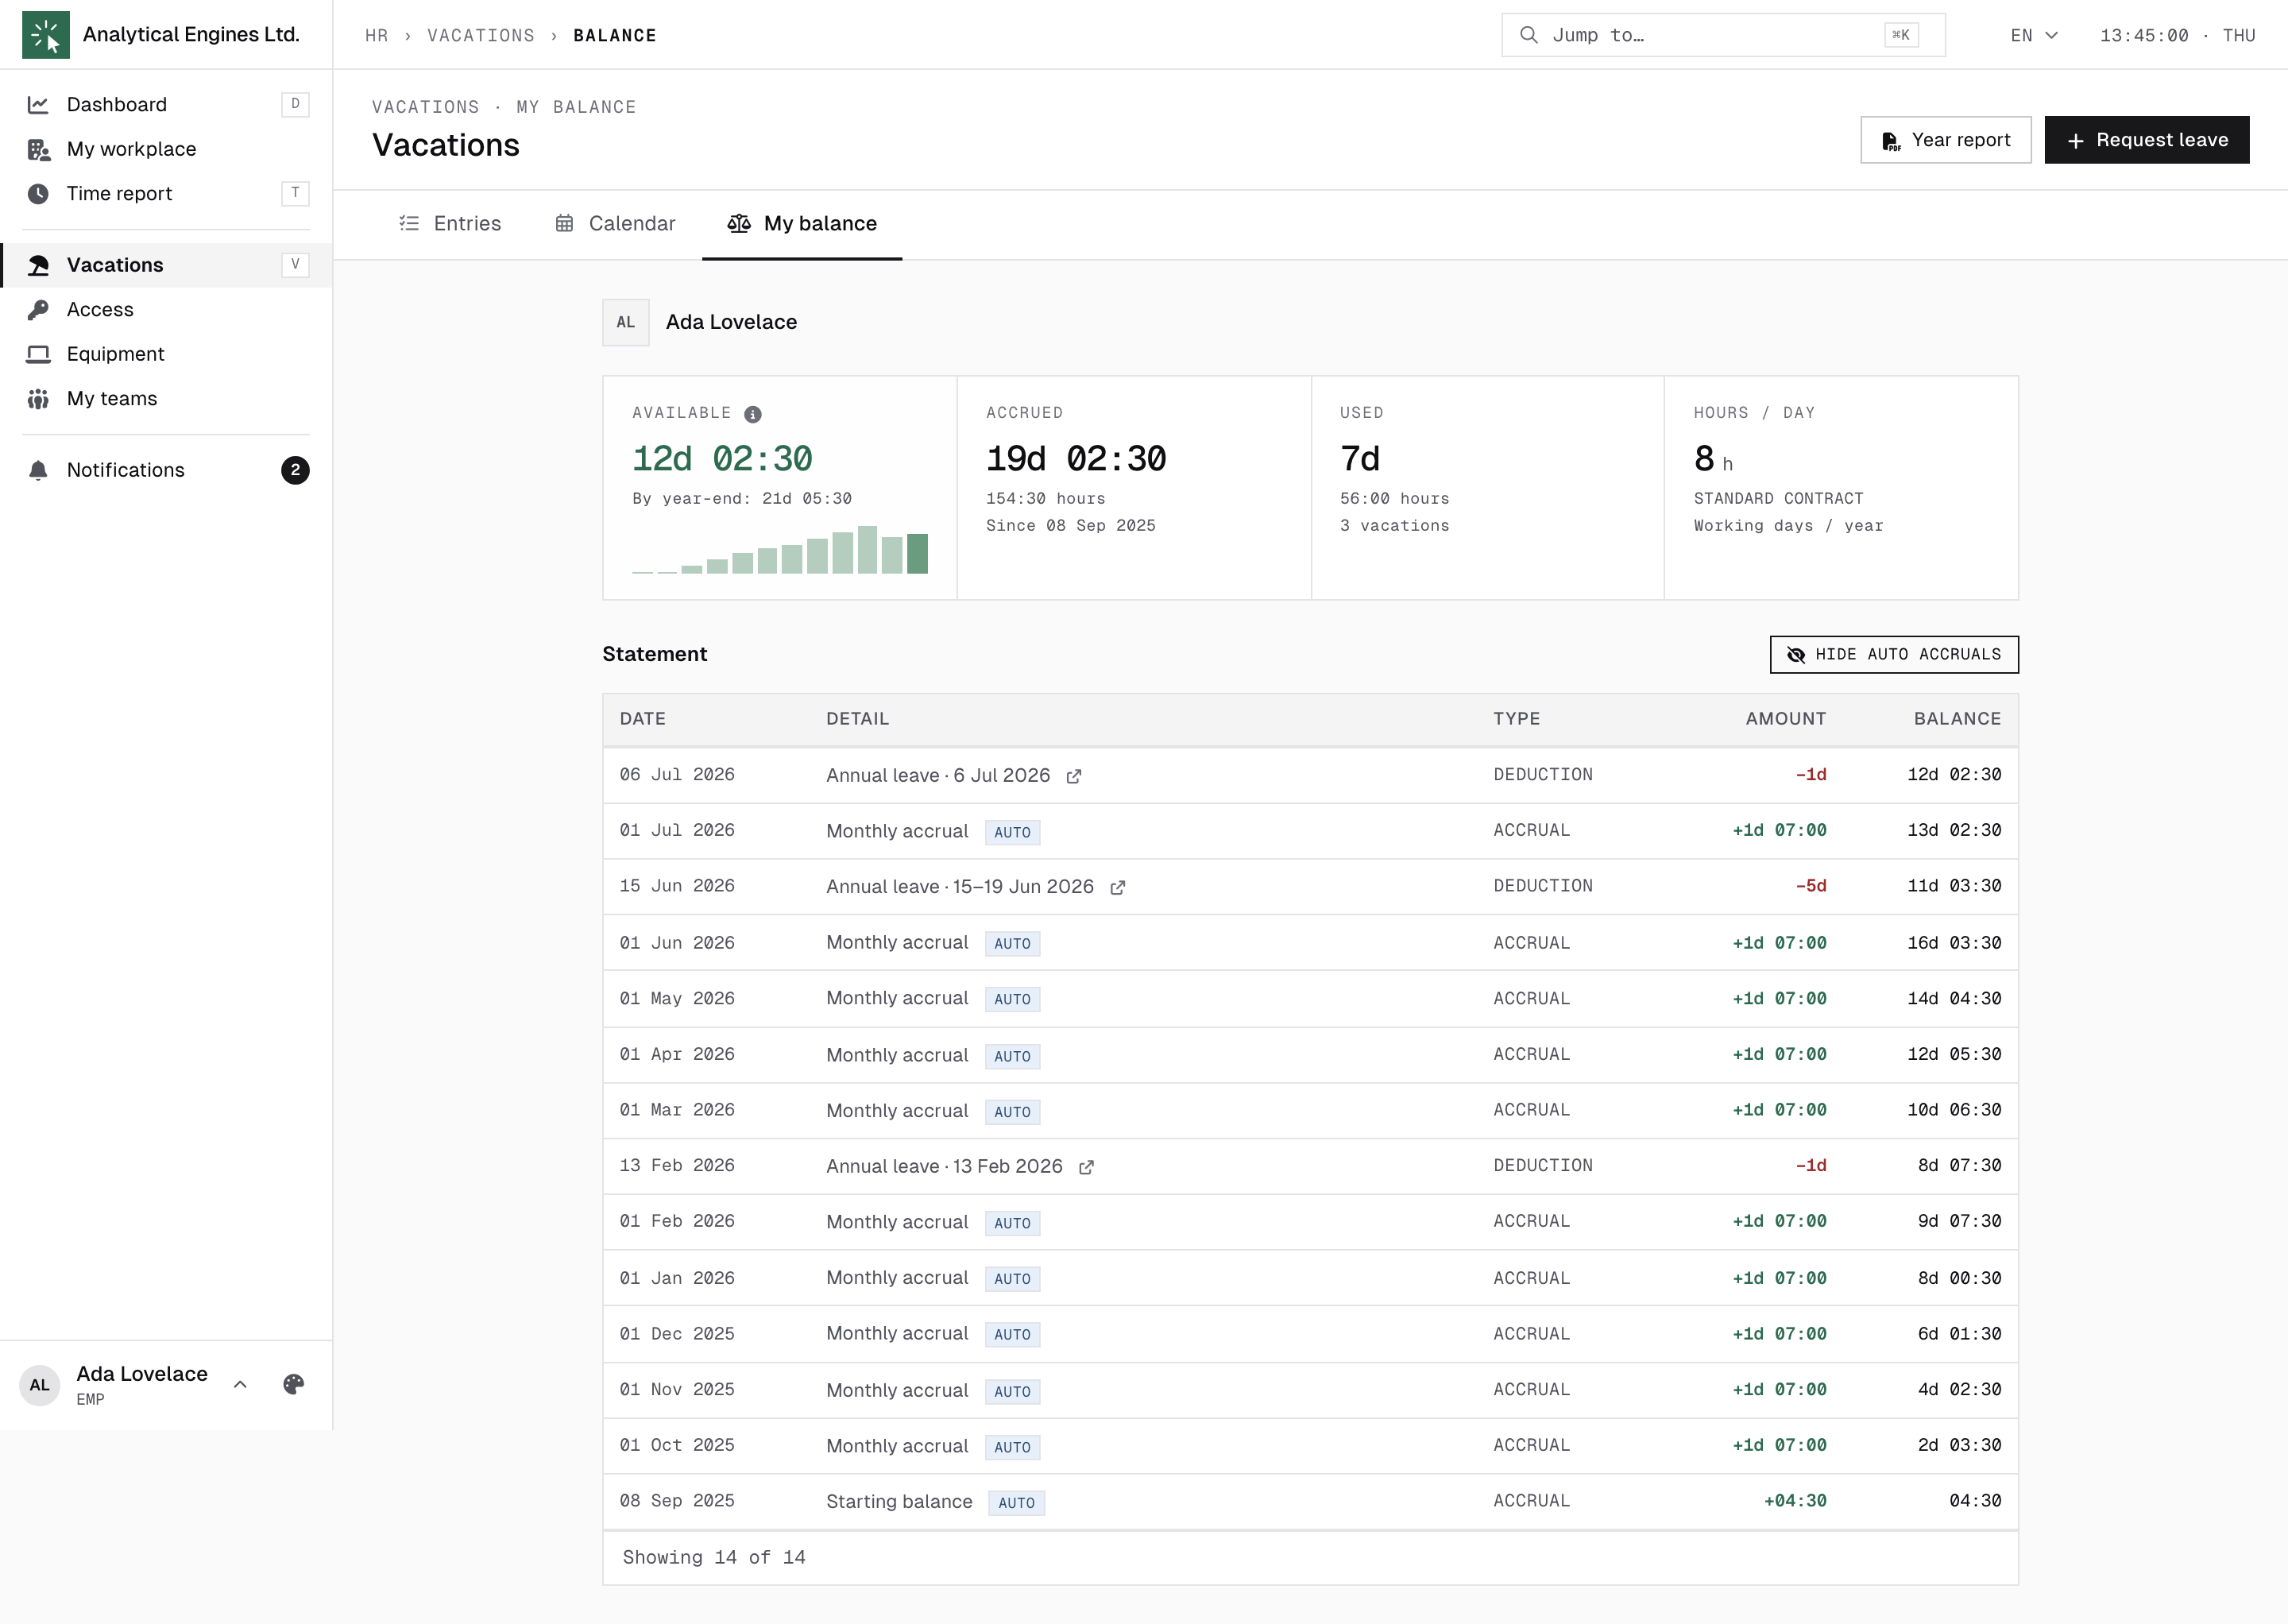
Open Vacations → My balance. Your leave balance is counted in hours, not whole days — that way part-time and full-time colleagues are treated equally. The page shows it as days and hours against your own working day (e.g. “12d 2:30” at 8h/day).
- Available = Accrued − Used. Your yearly allowance accrues automatically, a little every day, spread evenly across the year. There is no year-end reset — unused balance simply carries over.
- By year-end — a projection of your balance on 31 December if you take no more leave.
- Statement — the full ledger of your balance: automatic accruals (marked Auto, hidden by default — toggle “Show auto accruals”), and deductions for each leave. Click a row to open the leave it belongs to.
- Year report — downloads a PDF statement of your last 12 months.
Requesting leave
- Click Request leave (on the Dashboard, or any Vacations page).
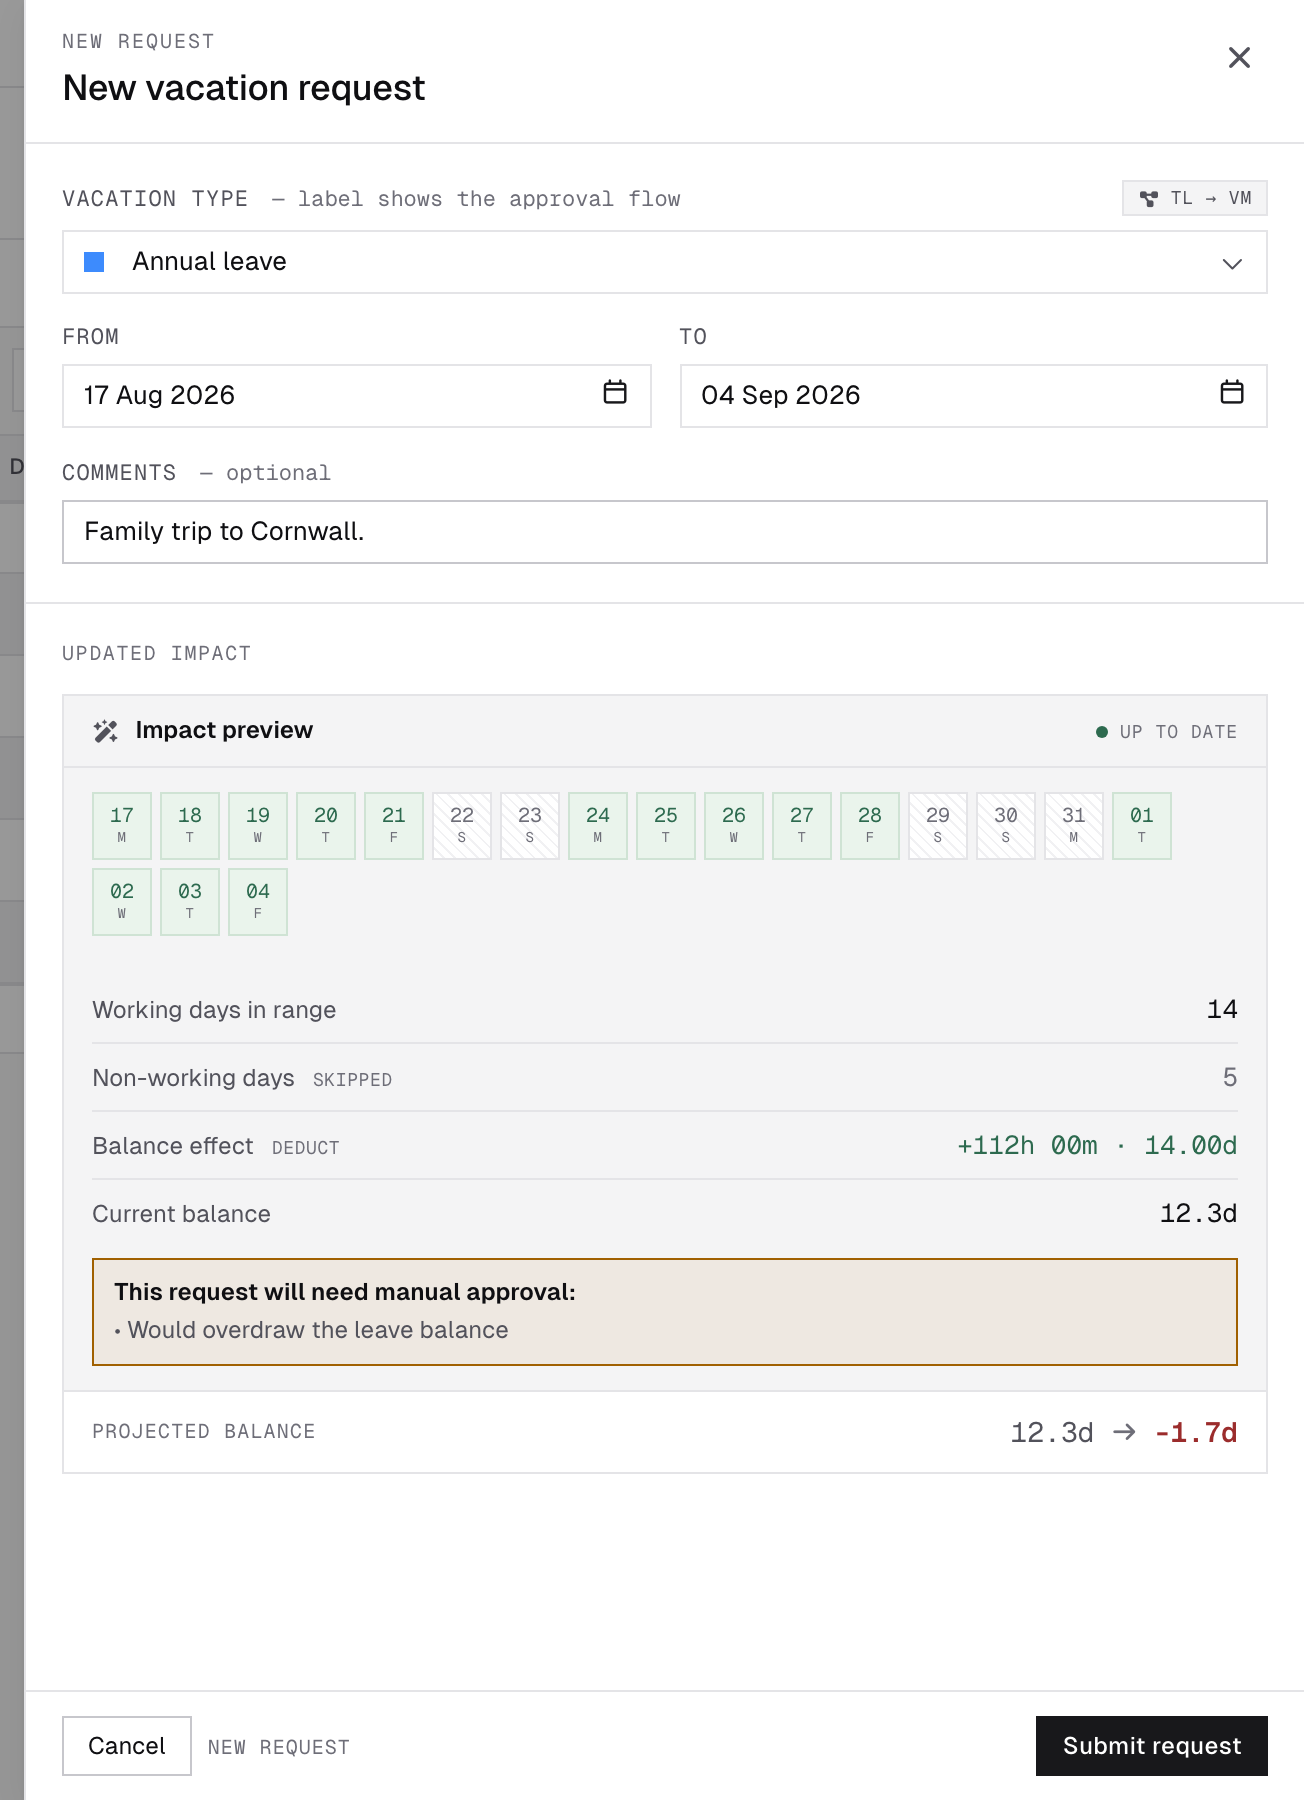
- Pick the vacation type — each carries its own icon and colour, the same pair you see beside it in the calendar, the list and your time report. The chip next to it shows the approval path: TL → VM (team lead, then vacation manager), TL only, VM only, or Auto-approved.
- Pick the From / To dates. For a single-day leave you can tick Only part of the day and enter the duration (HH:MM) — for when you need just a few hours. It is offered for every leave type, including unpaid and purely informational ones.
- Add a comment for your reviewers (optional but helpful).
- Watch the impact preview update live: which days in your range are working days (weekends and holidays are skipped automatically), the balance effect in hours, and your projected balance after this leave.
- Click Submit request.
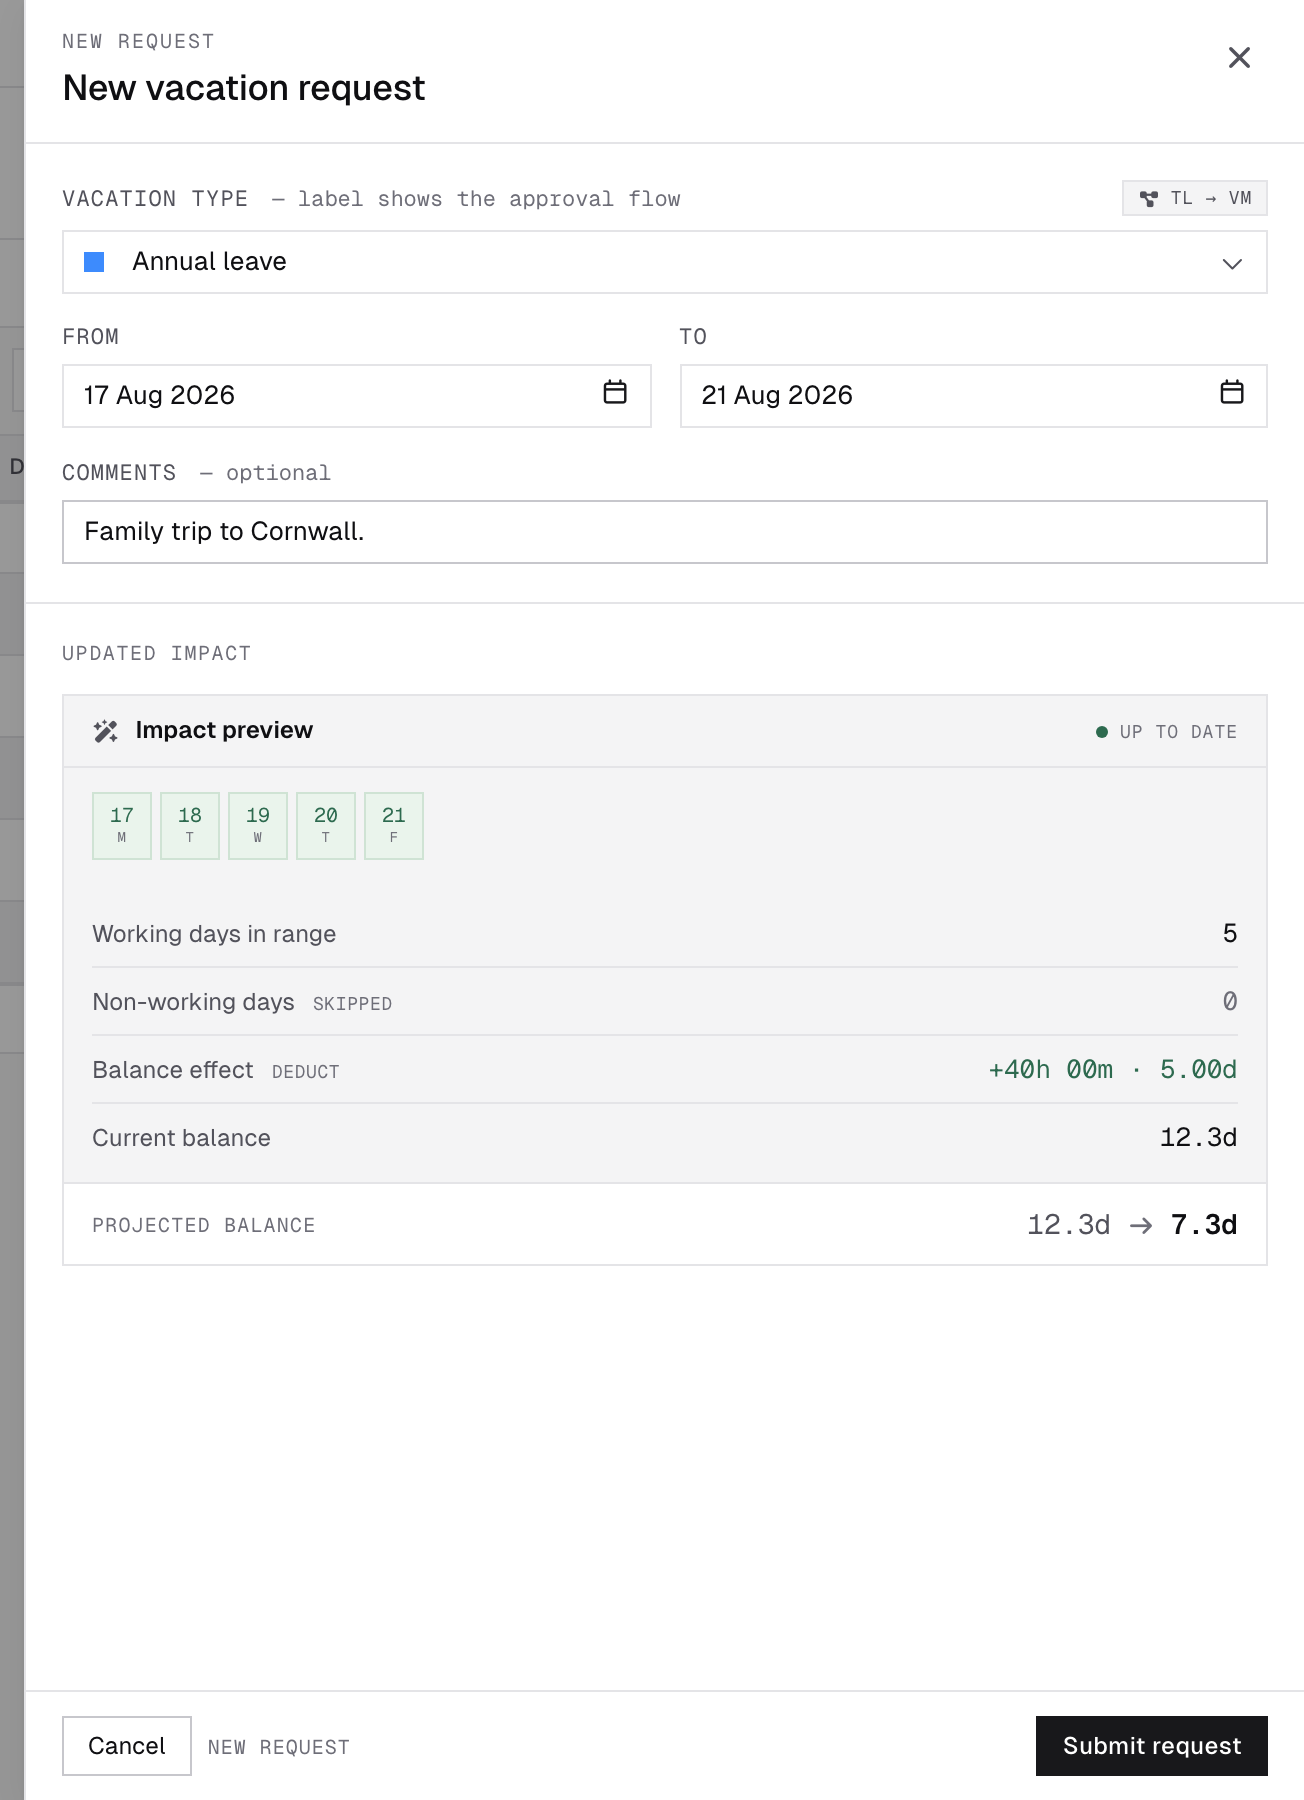
The preview may warn “This request will need manual approval” — e.g. the leave is longer than the usual limit, requested on short notice, or would take your balance below zero. You can still submit; it just always goes to a person for a decision. Where a deadline is shown on the request, nobody deciding by then means it is rejected automatically — a flagged request never slips through on its own. Some leave types are deliberately exempt from those timers: they carry no deadline and simply wait until someone decides. A “will be blocked” flag means the request can’t be submitted as-is — adjust the dates.
Going below zero is possible: with your manager’s approval you can borrow against leave you haven’t accrued yet — your balance simply goes negative and future accruals fill it back up.
After you submit
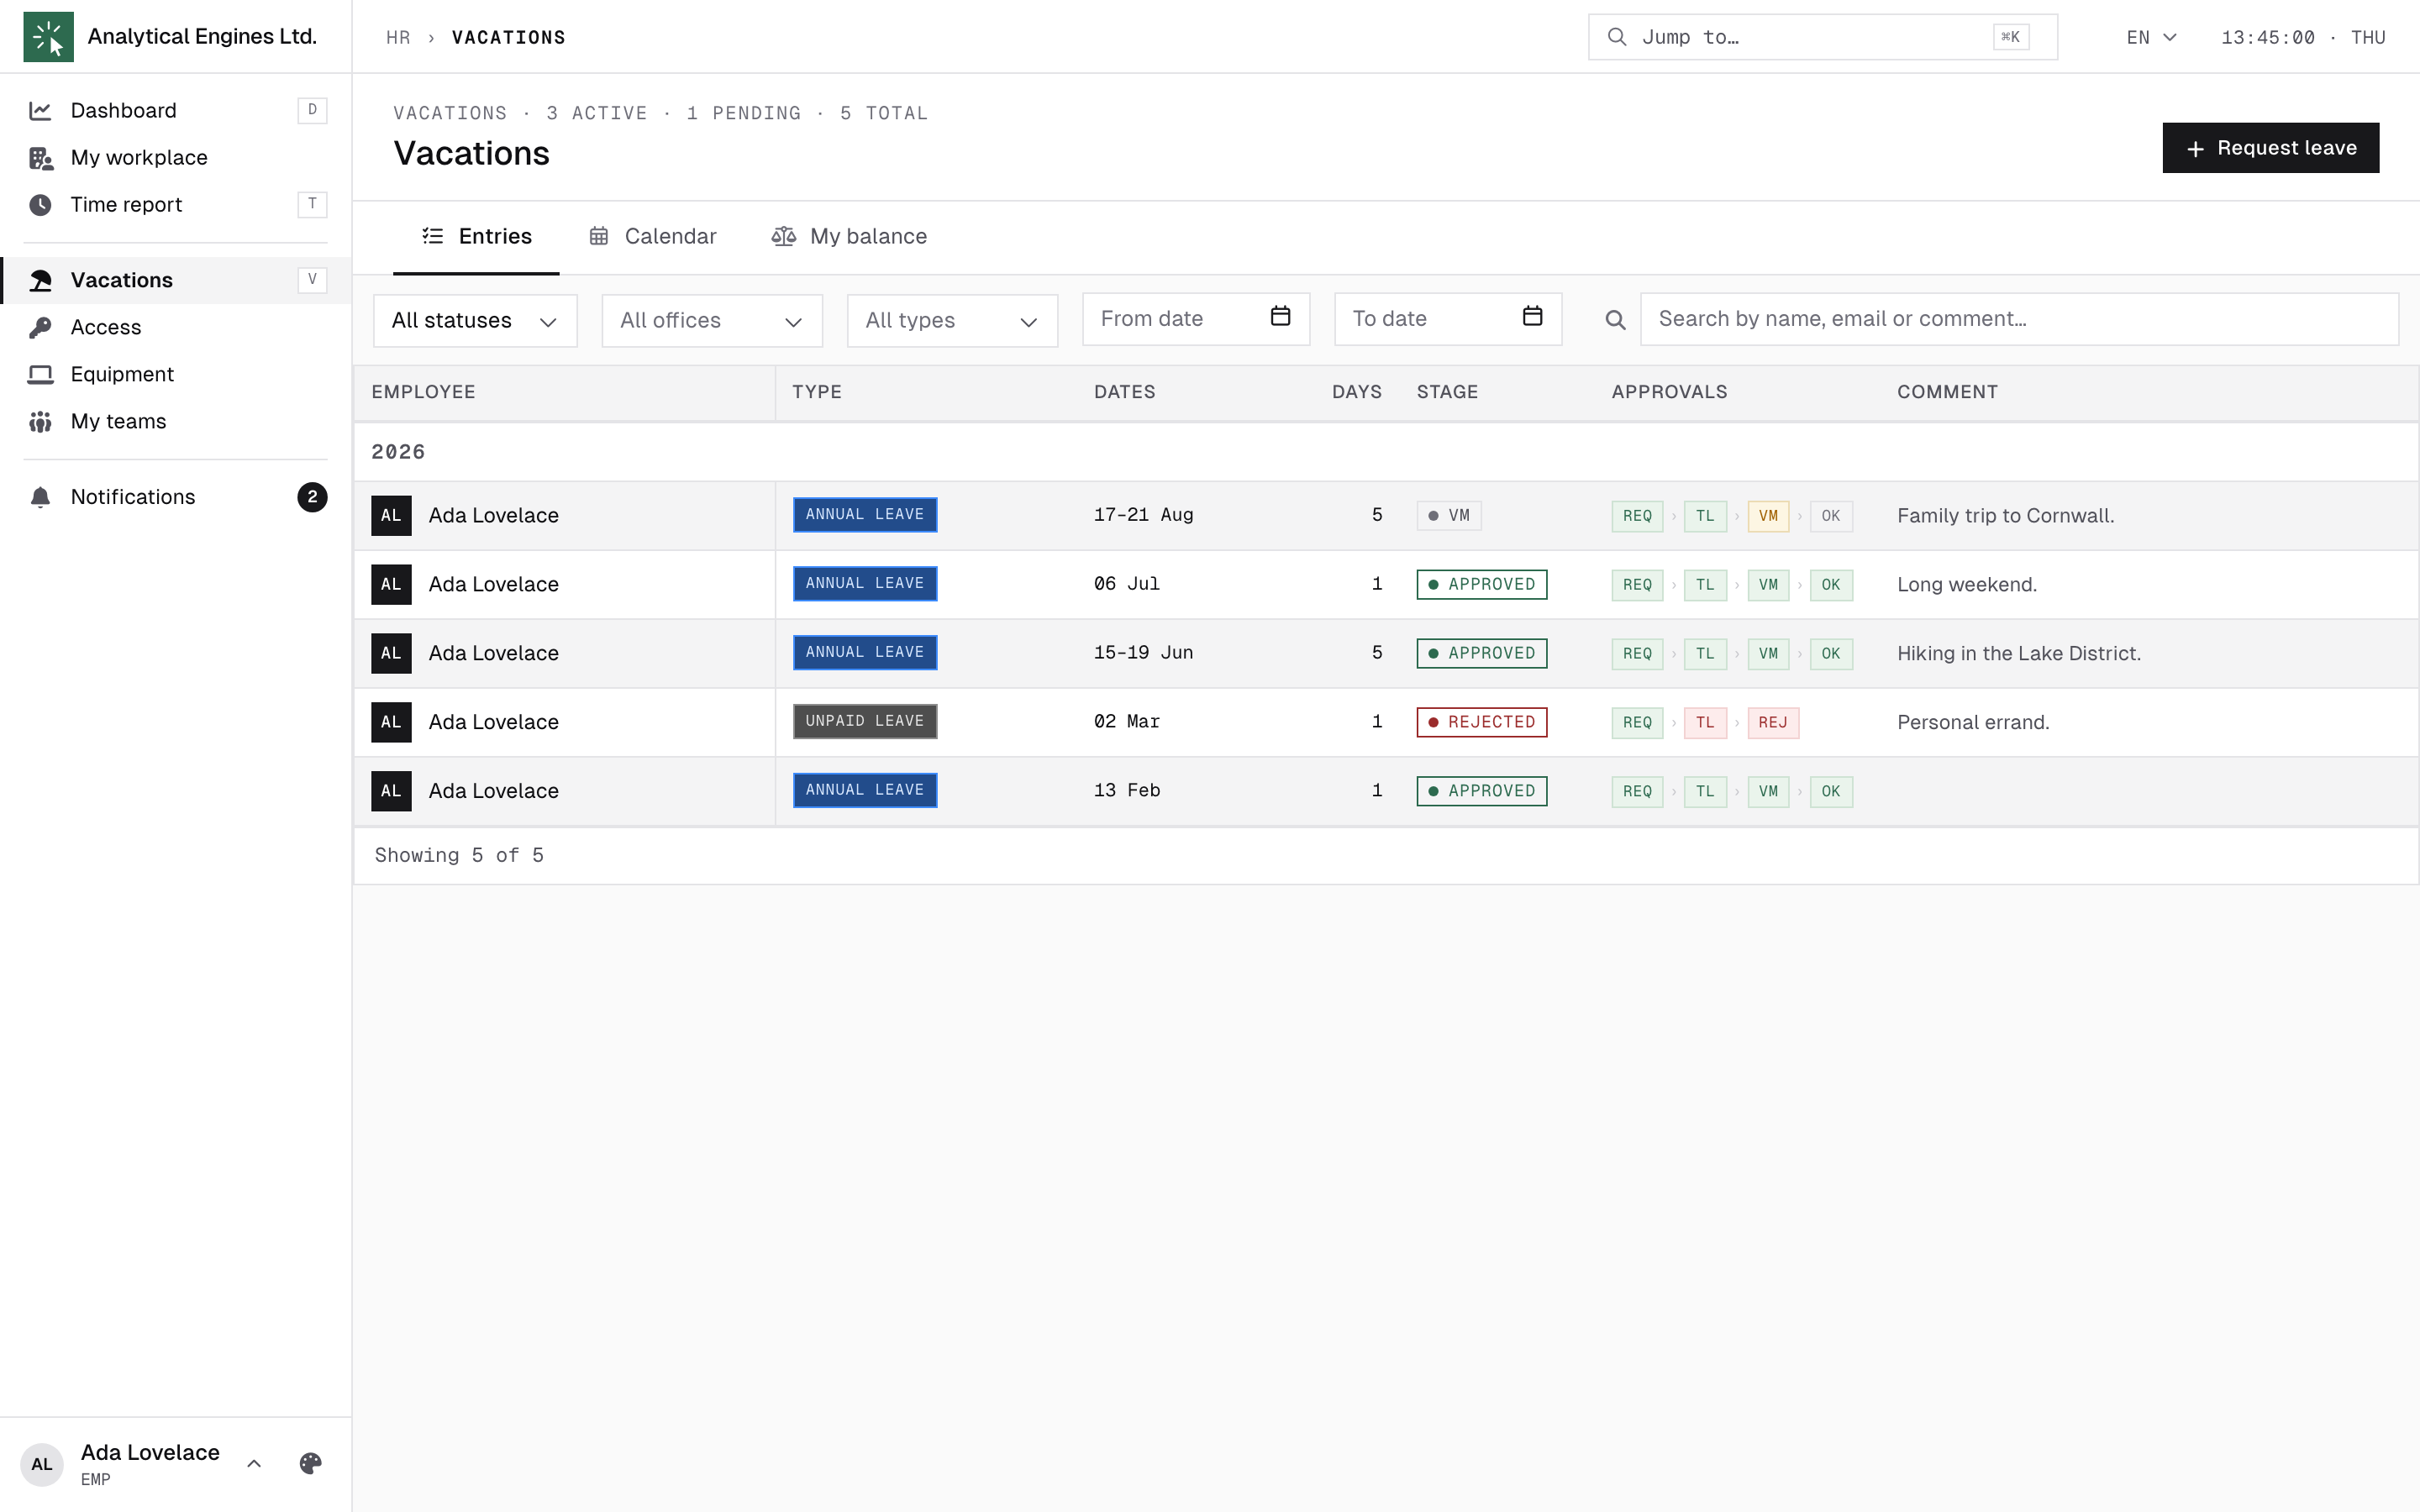
Track your requests in Vacations → Entries. Each row carries a status chip:
| Chip | Meaning |
|---|---|
| TL | Waiting for your team lead. |
| VM | Waiting for the vacation manager. |
| APPROVED | Approved — enjoy! |
| REJECTED | Declined — open it to read the reason. |
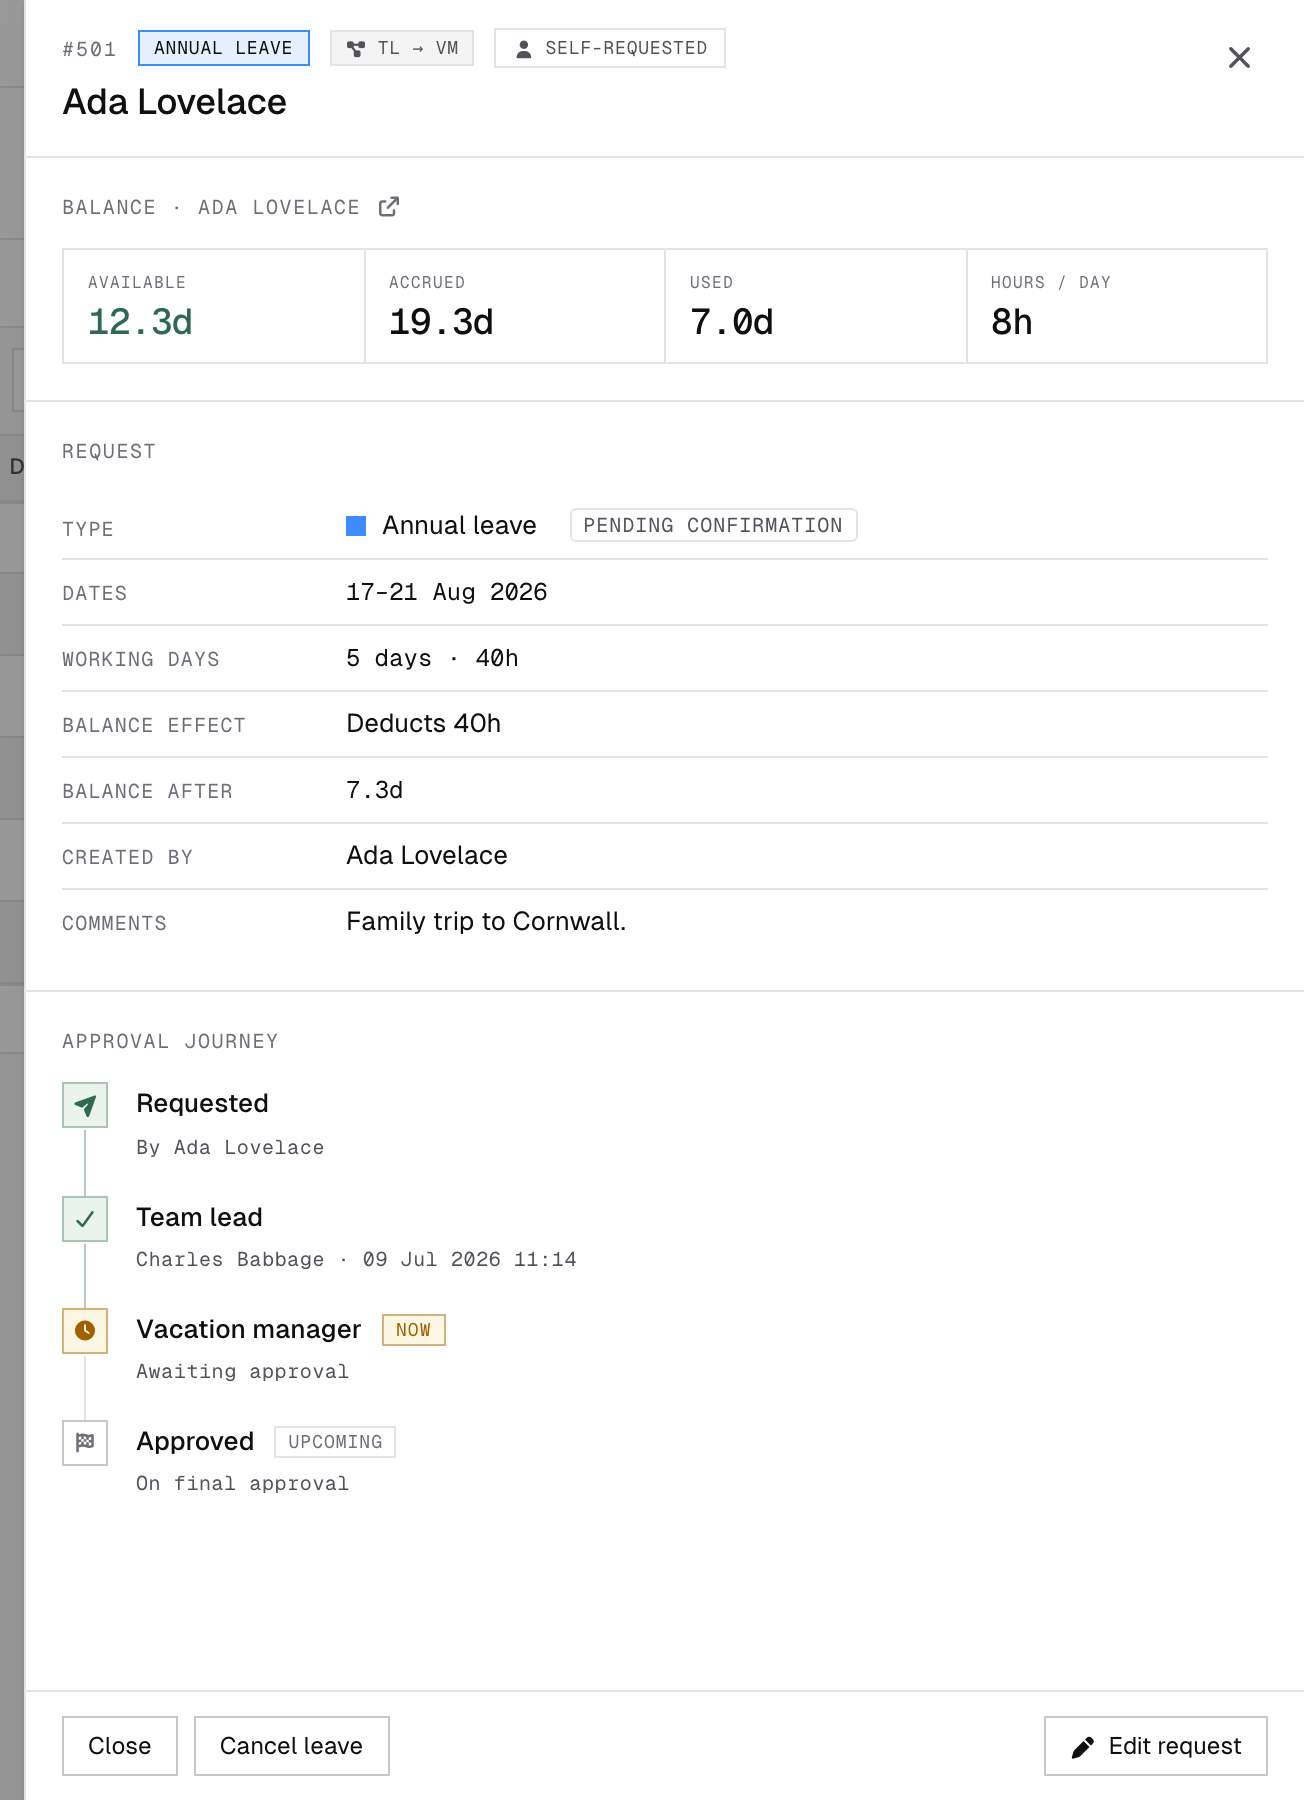
Open a request to see the Approval journey — who has signed off, who is next, and any comments. You get a notification at every step (approved, rejected, activated).
- Changed your mind?Cancel leave withdraws your request at any stage; any reserved balance is released.
- Need to fix dates? You can edit your own request while it hasn’t been approved yet. After approval, ask your manager.
- Type may be adjusted: the approver can grant a different leave type than requested (you’ll see “asked: …” next to it) — for example converting unpaid leave to paid.
Team calendar
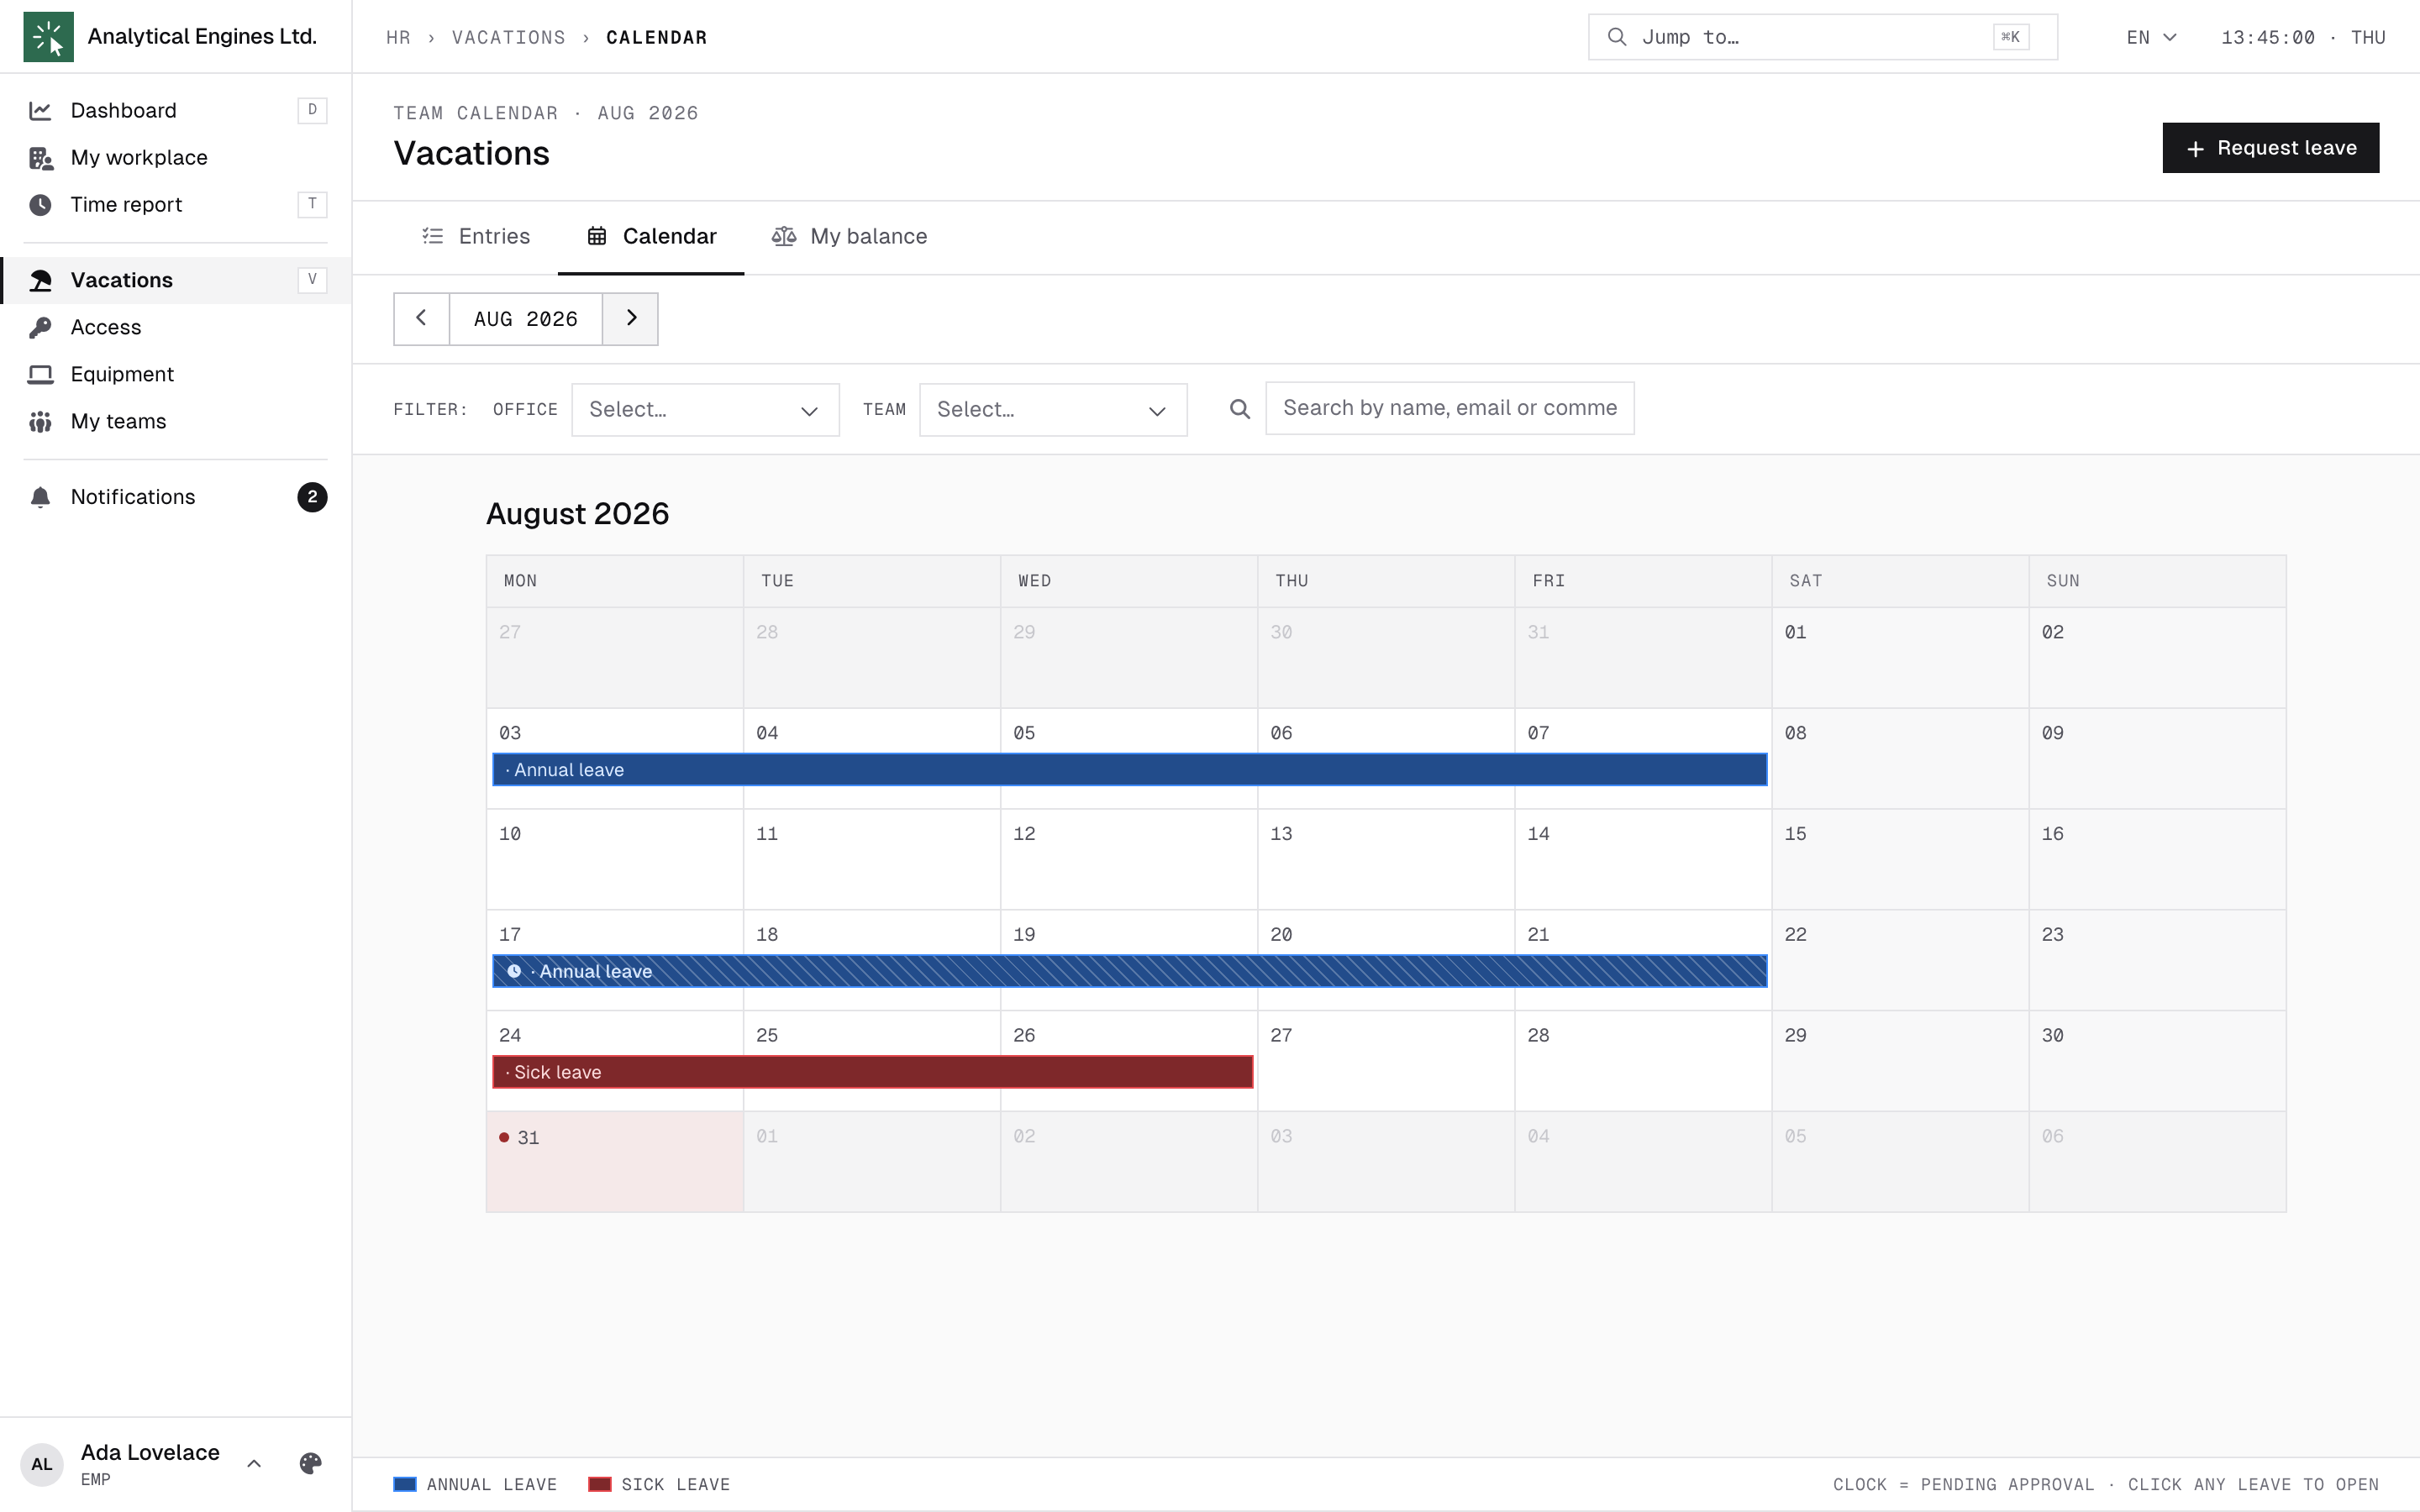
Vacations → Calendar shows the month as a grid with everyone’s leave as coloured bars (colours = leave types; the legend explains the ones on screen). A hatched bar with a clock is still pending approval. Holidays and special days show as dots.
For privacy, colleagues’ bars are shown without details — you see when people are away, managers see the specifics. Click your own bar to open the request.
8Access
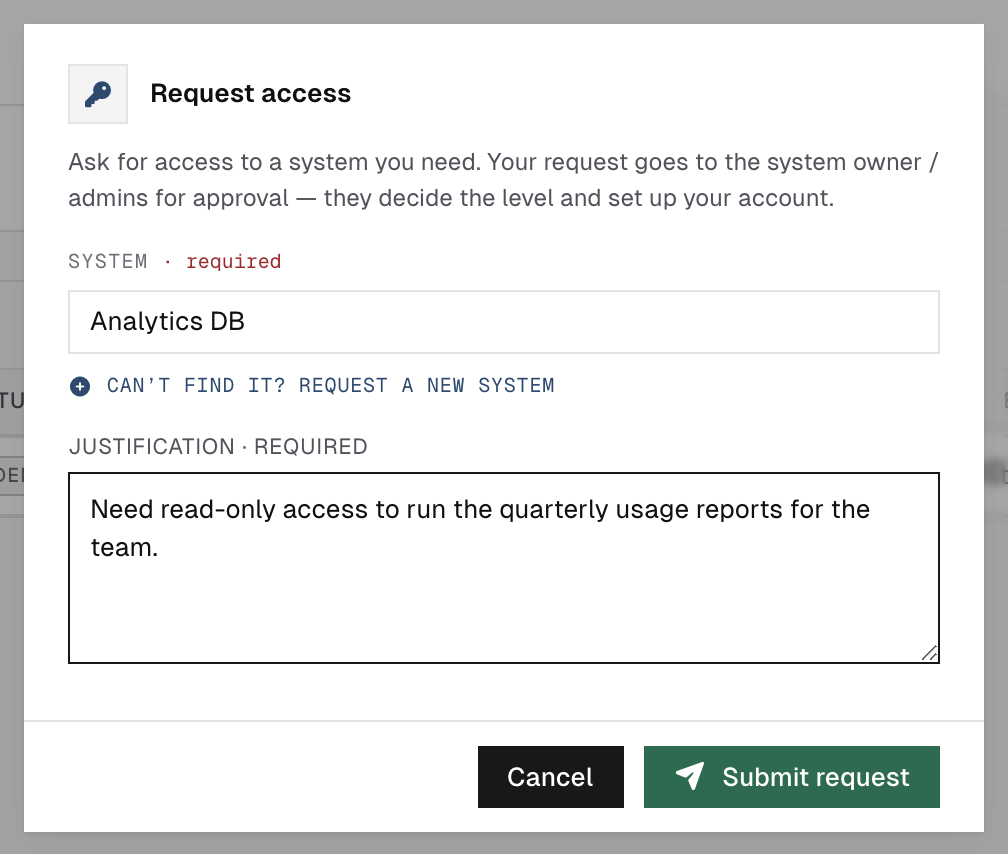
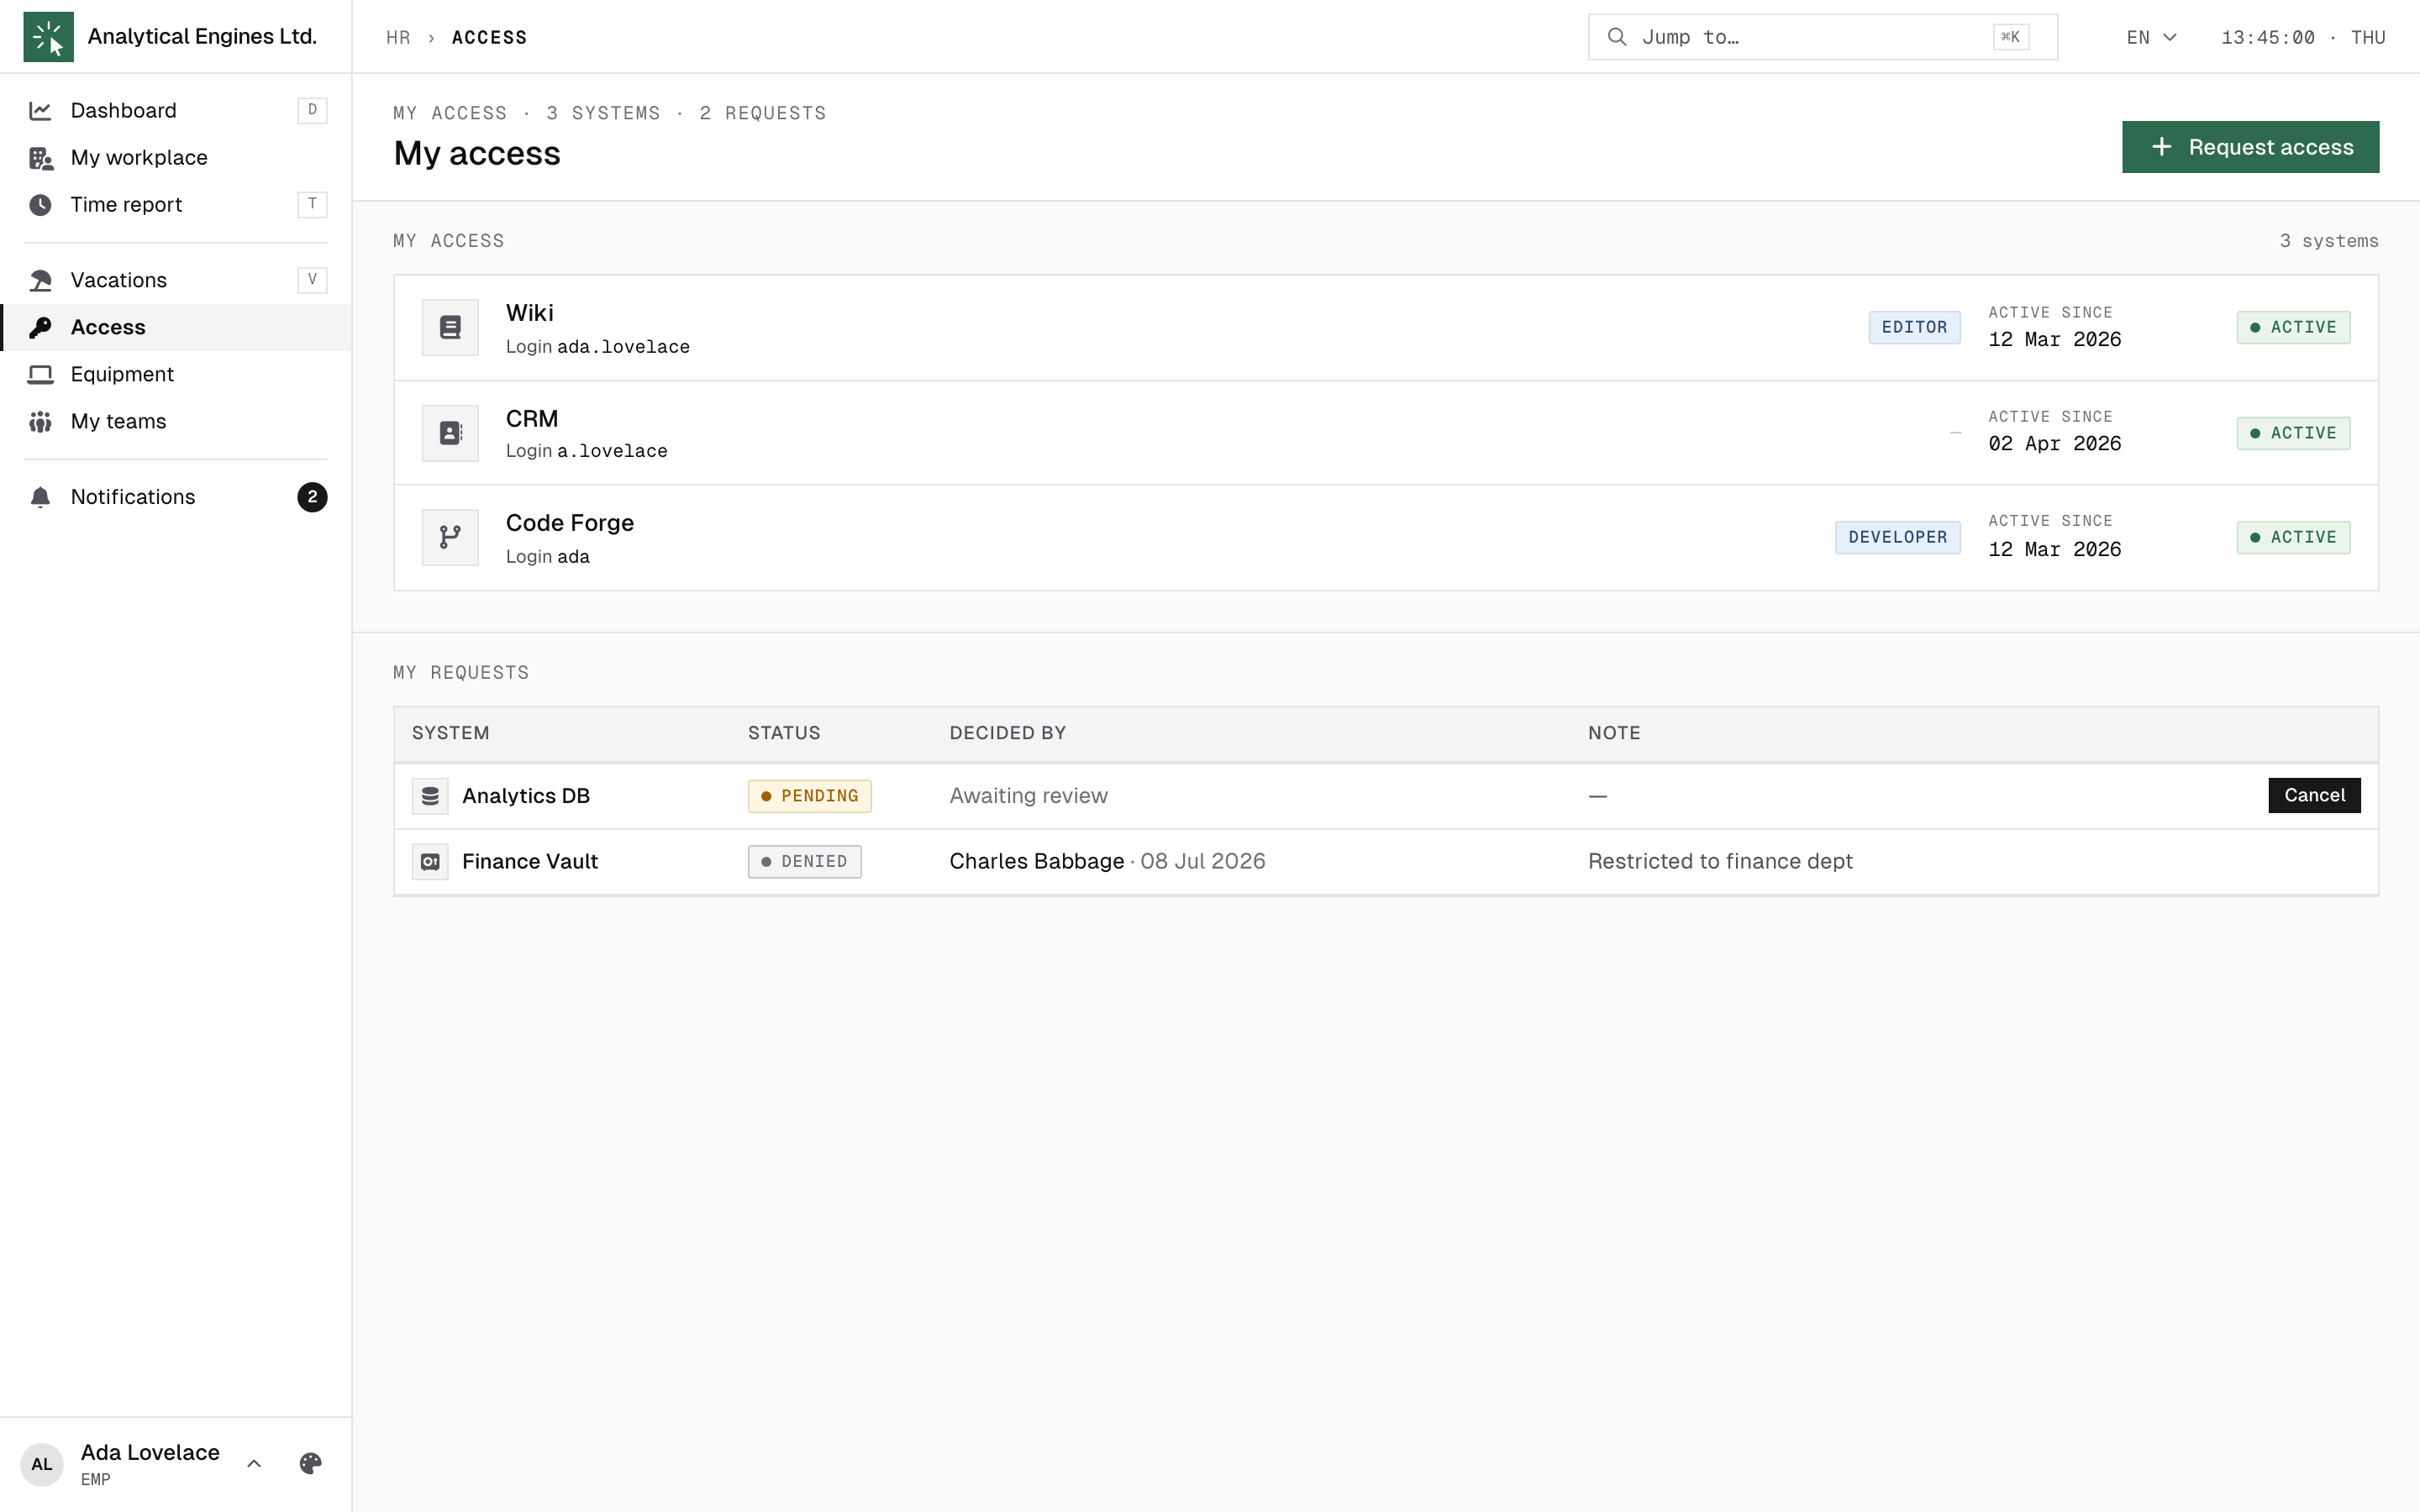
Access lists the company systems you can use — with the login the admins put on file for you — and lets you ask for new ones.
Requesting access
- Click Request access.
- Pick the system from the catalogue (or type a new name if it isn’t listed yet).
- Write a short justification — the person approving reads exactly this.
- Submit. The request goes to the administrators and the system’s owner.
Track it in My requests:
| Status | Meaning |
|---|---|
| Pending | Awaiting review — you can still Cancel. |
| Approved | Approved; your account is being set up. |
| Granted | Done — the system appears in “My access” with your login. |
| Denied | Declined — the note explains why. |
| Revoked | Access was removed (e.g. no longer needed). Stays listed so you know. |
9Equipment
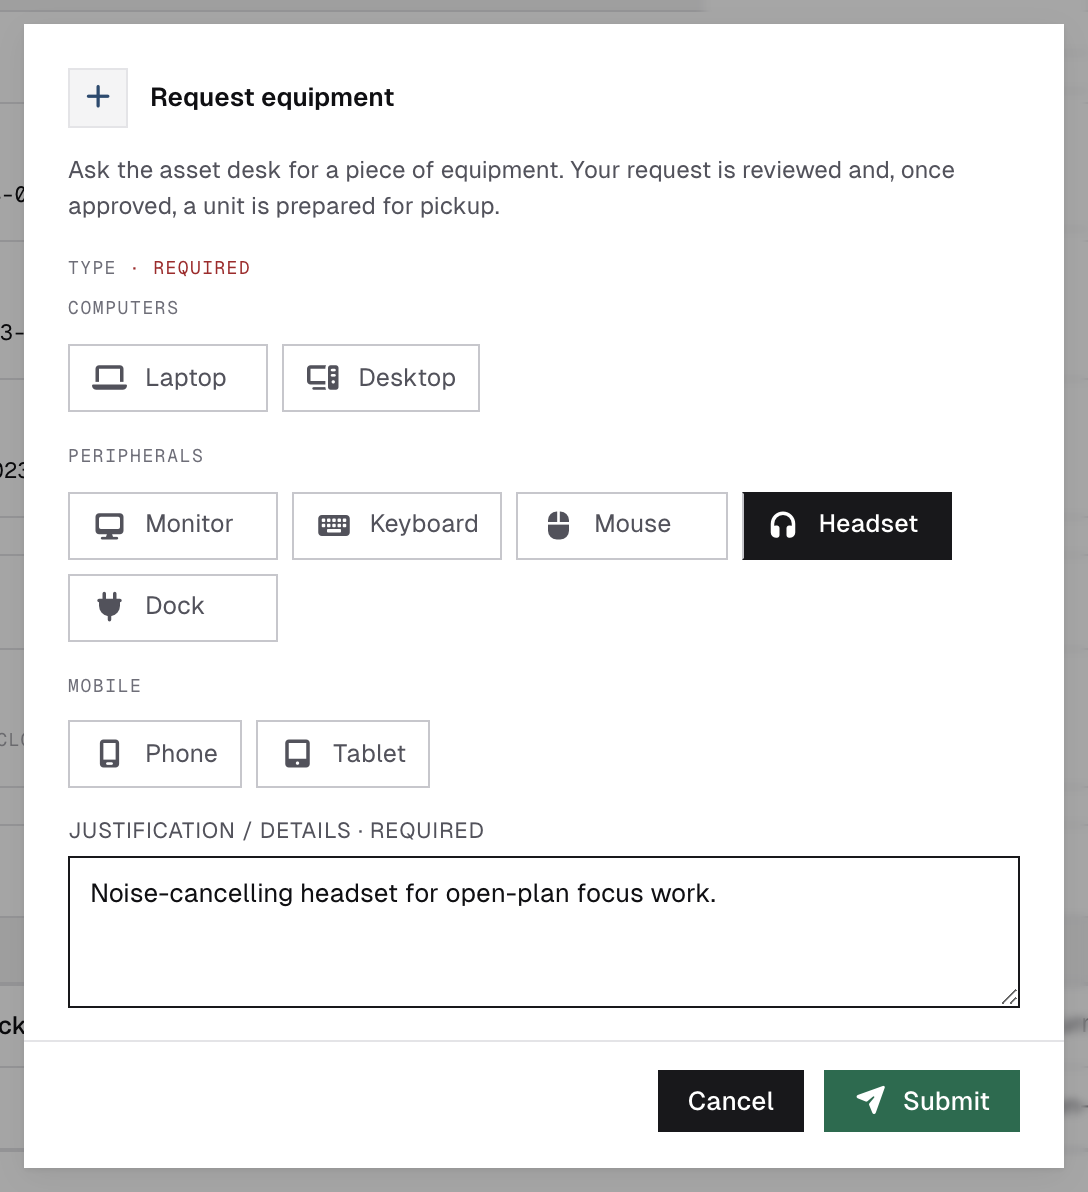
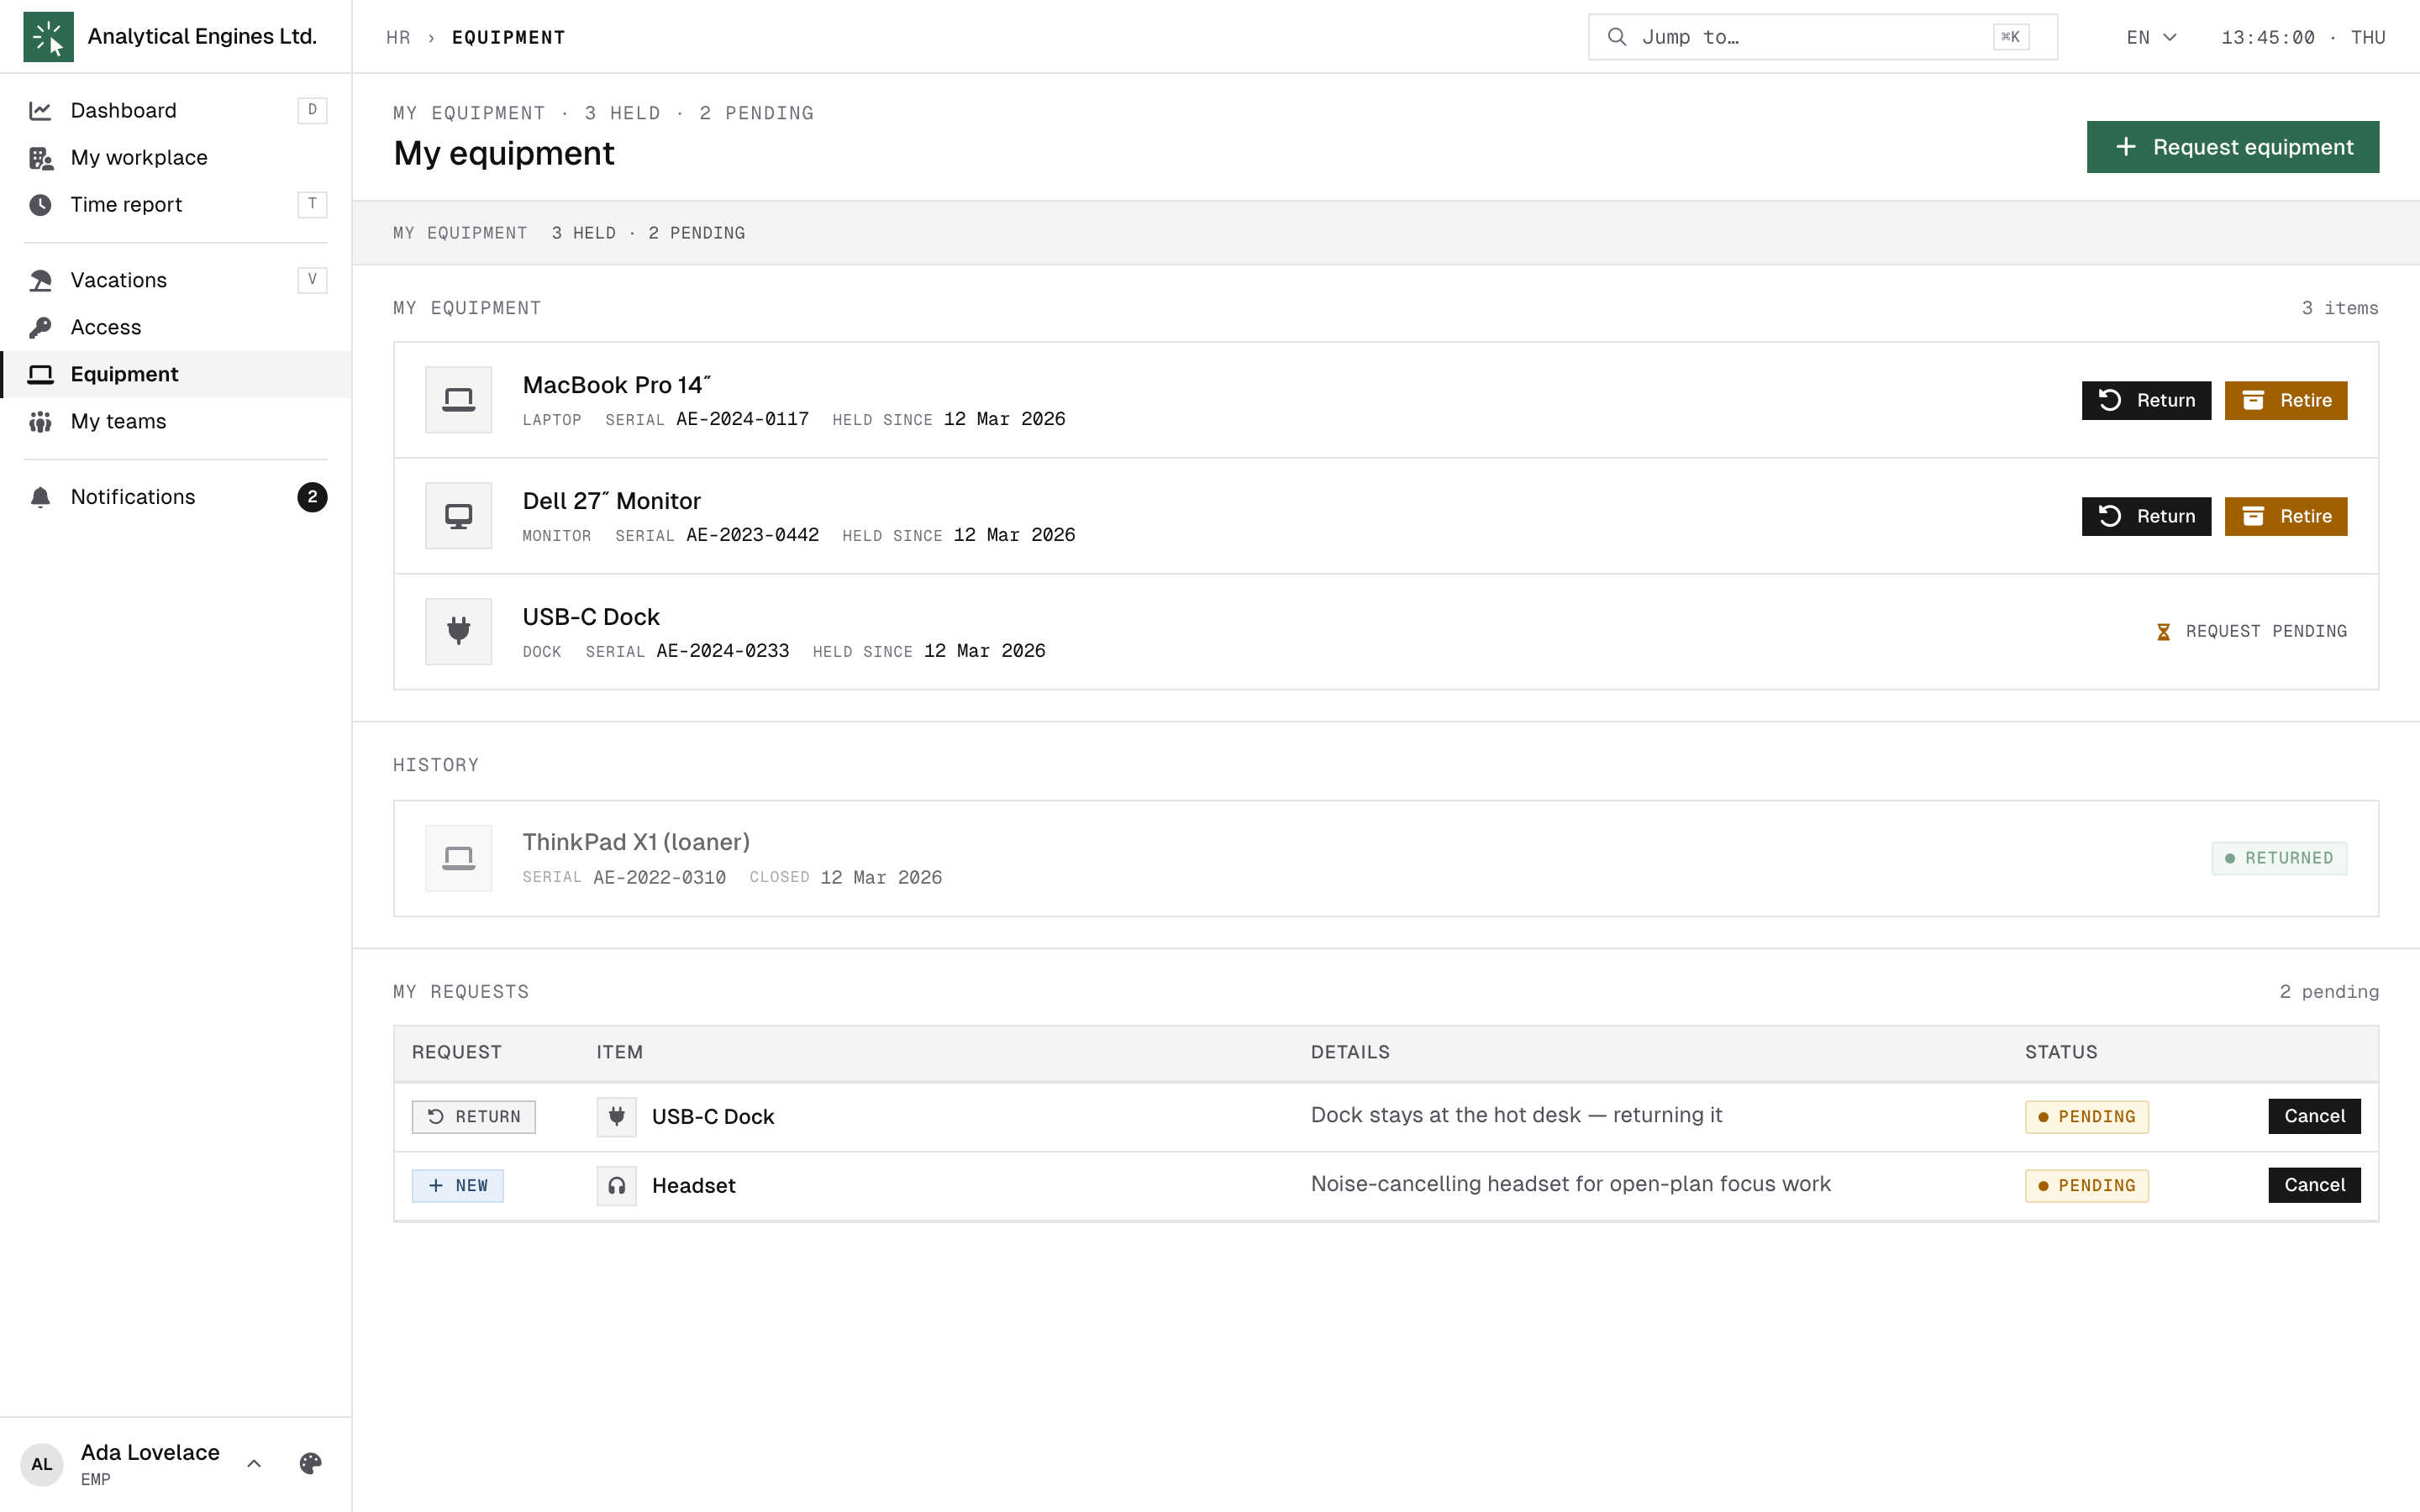
Equipment shows every company asset assigned to you — laptop, monitor, phone — with serial numbers and since when you hold it.
- Request equipment — pick the type of equipment and explain what you need it for. The asset desk reviews it; once approved, a unit is prepared for you.
- Return — ask the desk to take an item back. Keep the item until they confirm — it stays your responsibility until then.
- Retire — report an item broken, lost or stolen. Describe what happened; the desk reviews and retires the unit. This is permanent.
Every action lands in My requests with a status — Pending → Approved → Fulfilled (or Denied). While it’s pending you can Cancel. Items you’ve returned or retired move to History.
10My teams
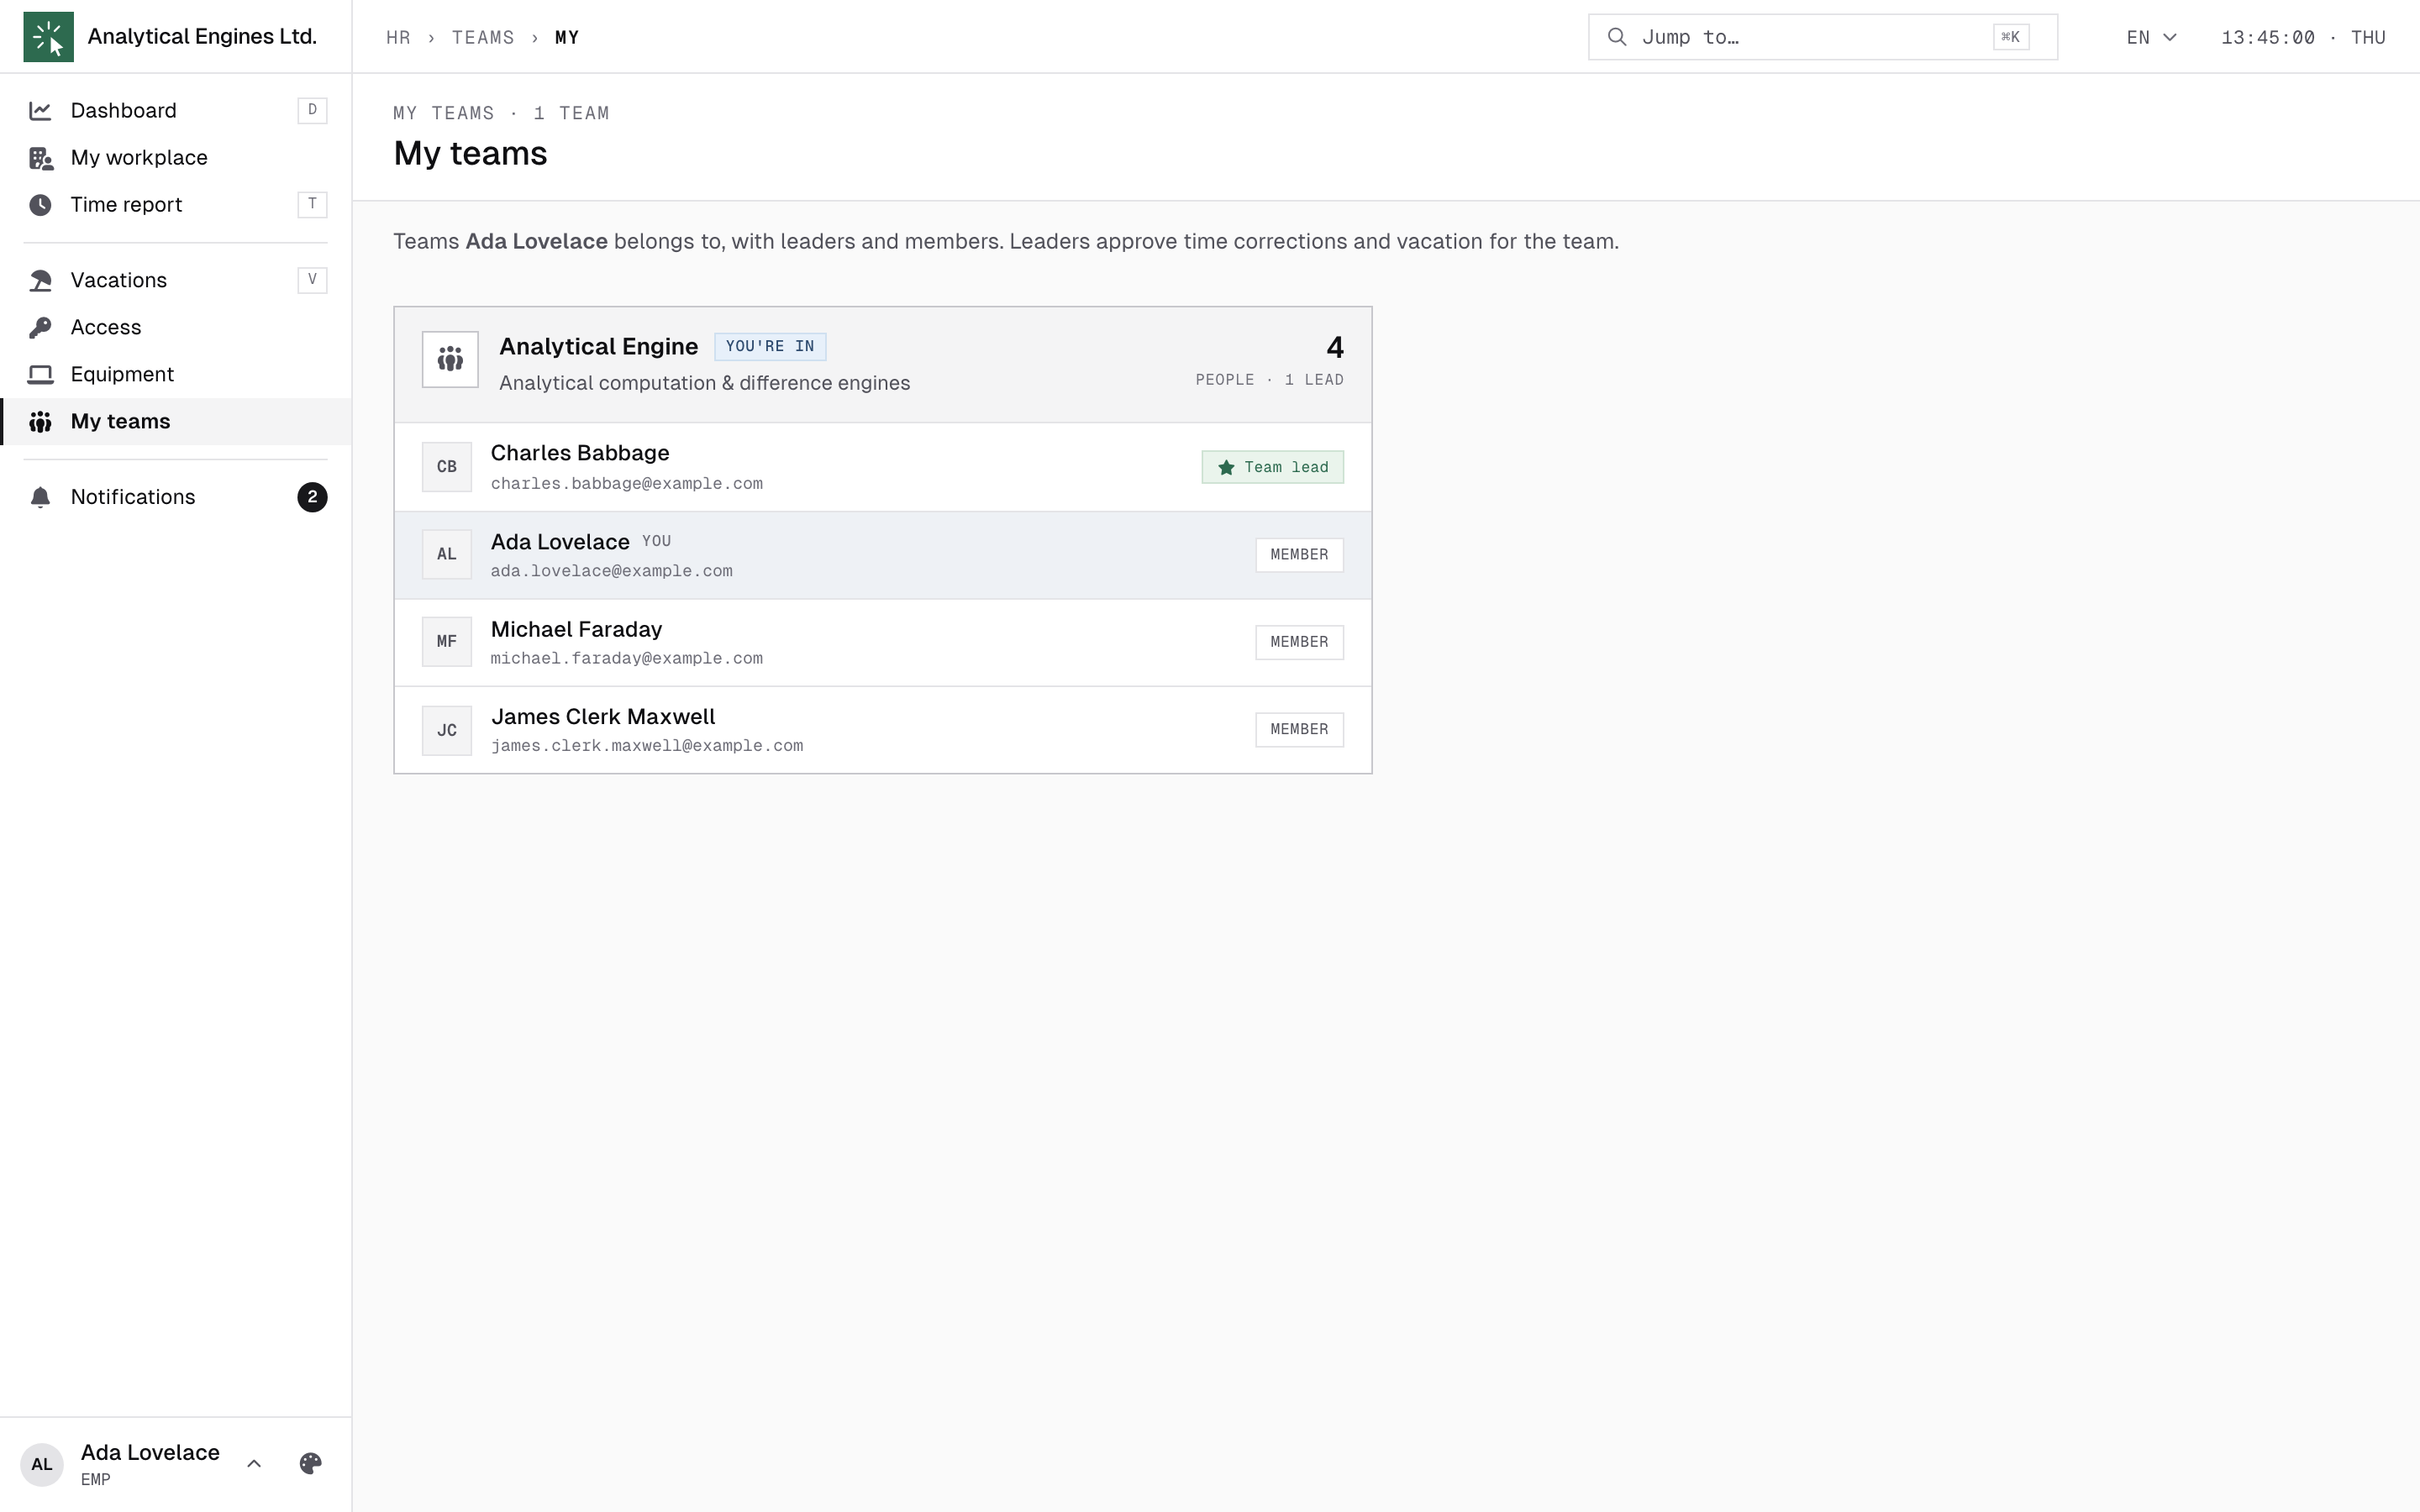
If you belong to a team, My teams shows it: the team name, your team lead (the person who approves your leave at the TL stage), and your teammates. Purely informational — a quick way to check who your lead is.
11Notifications
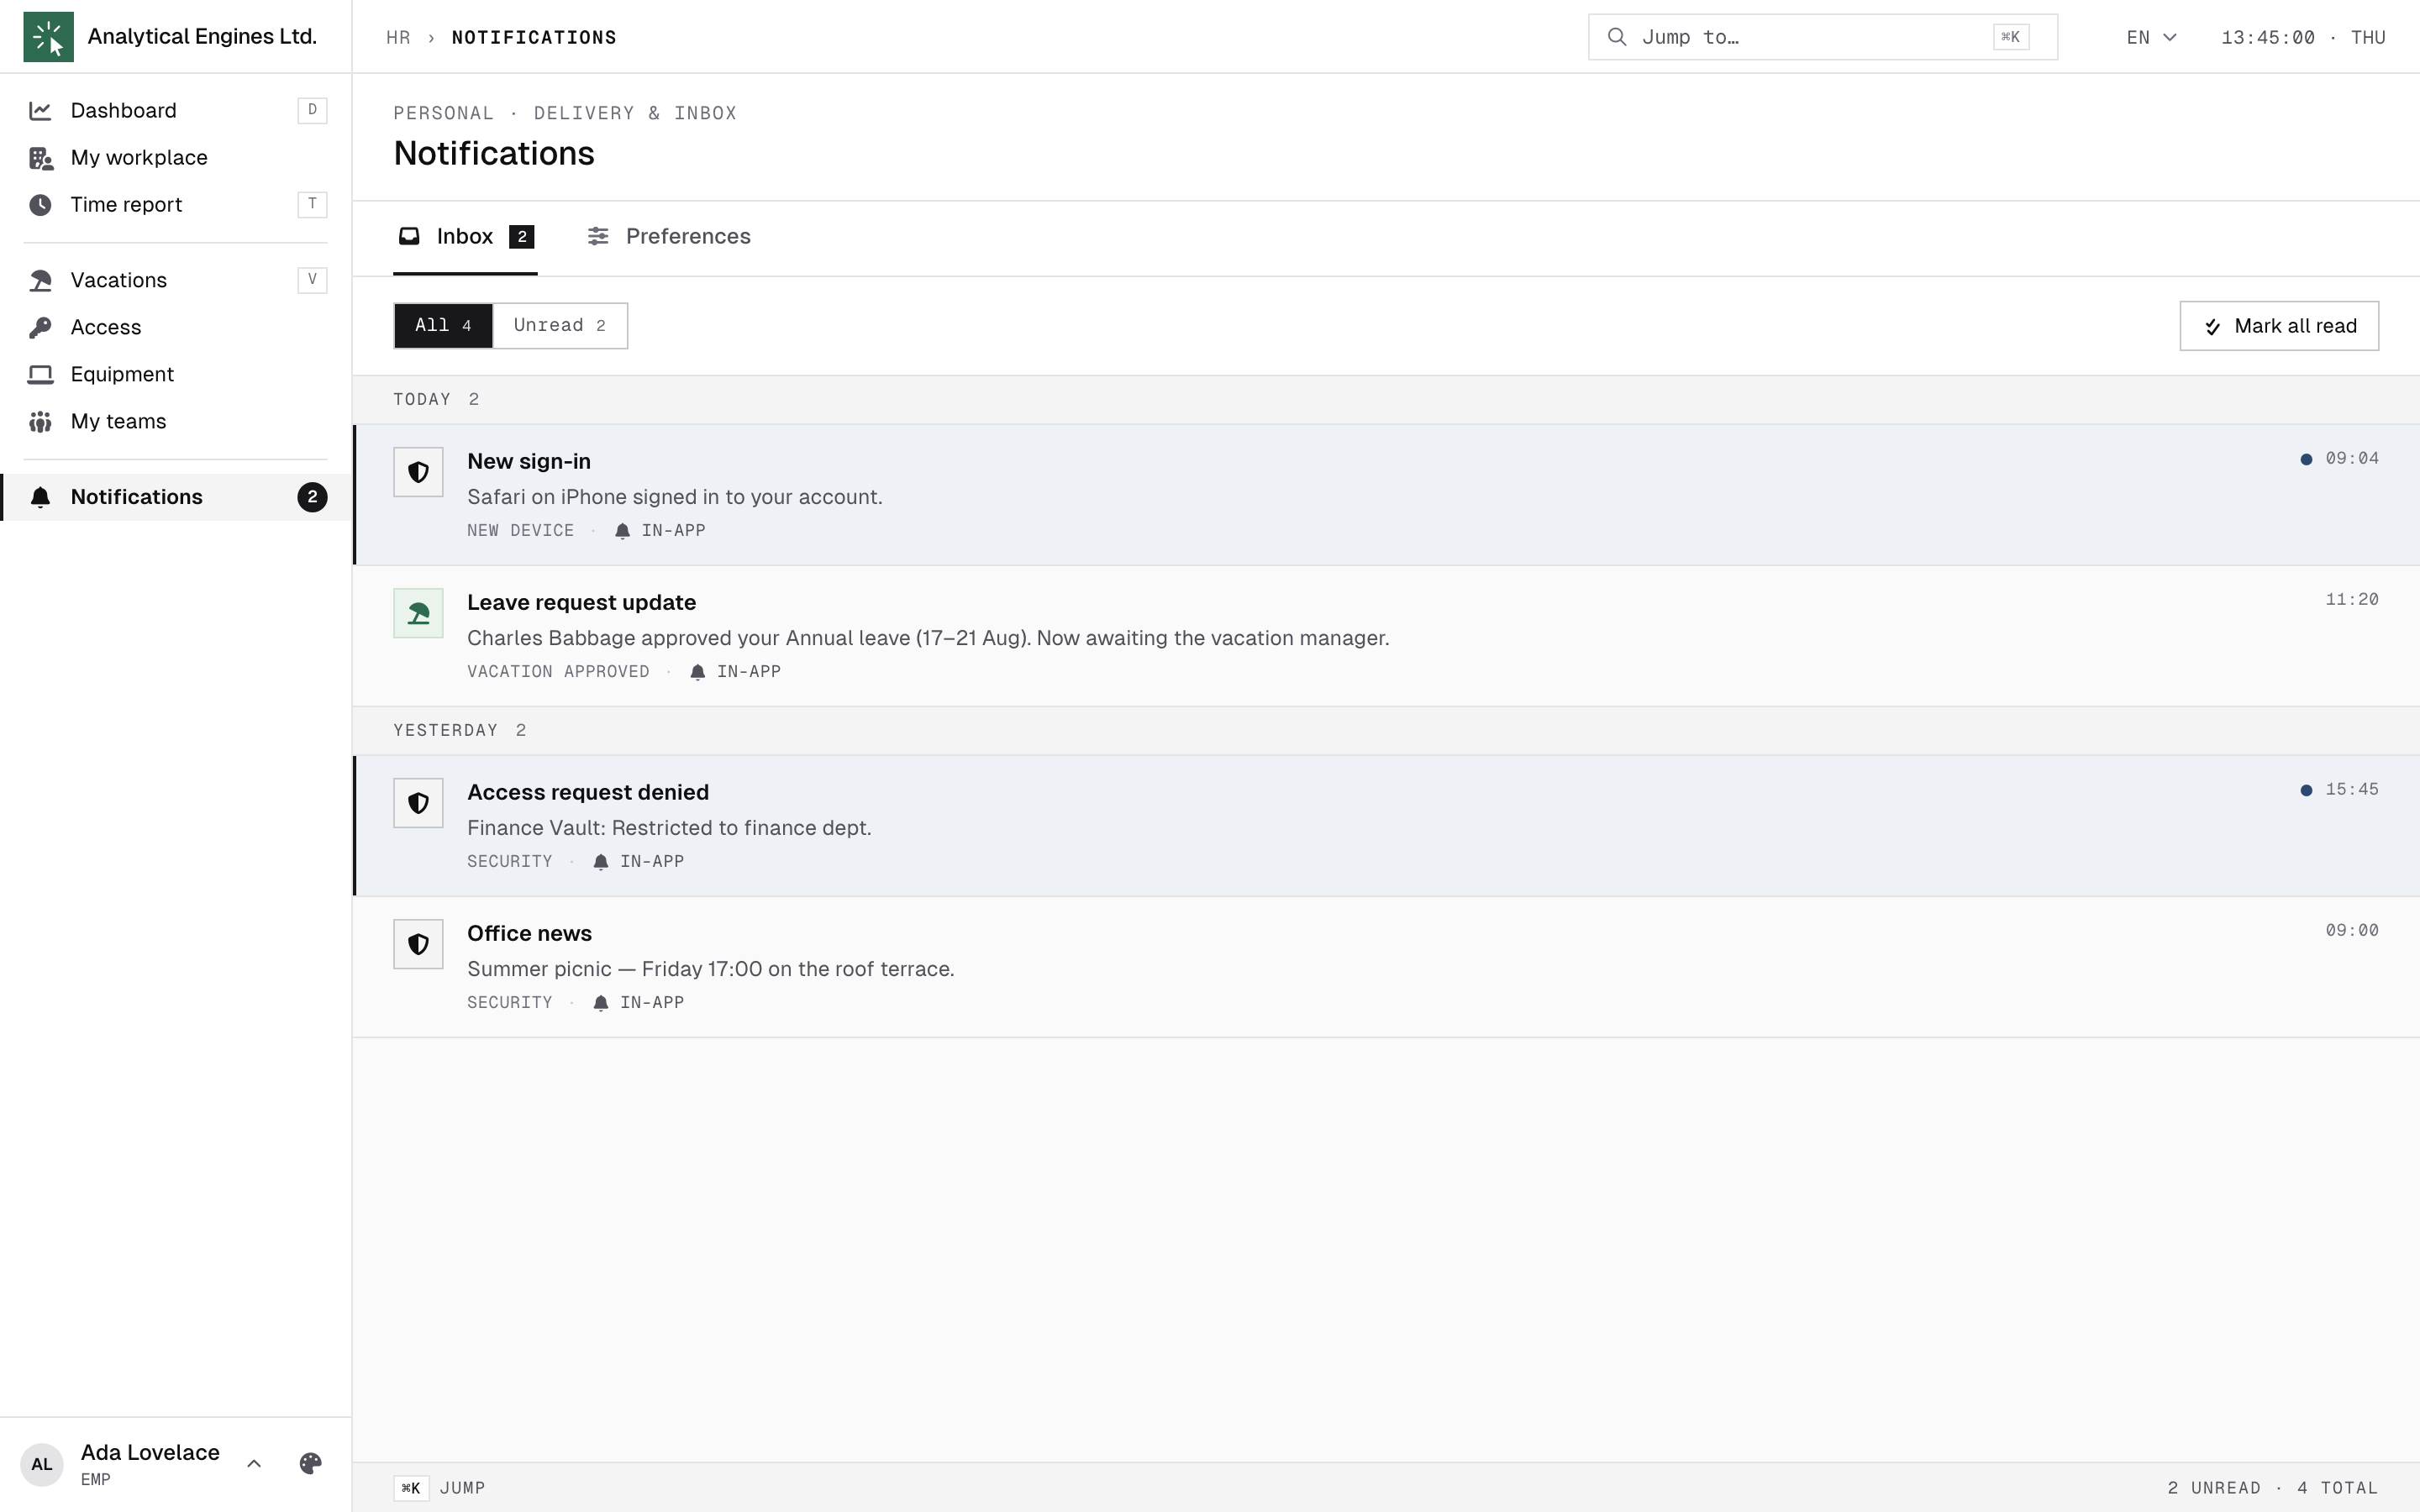
The Notifications item in the sidebar carries your unread count. The Inbox collects everything addressed to you — leave decisions, access grants, equipment updates, office news — grouped by day. Mark all read clears the badge.
On the Preferences tab you choose, per category, how you want to be notified (in-app, e-mail, push). Each inbox row also has a Manage shortcut straight to its category.
Push is granted per device, not per account: Enable push pairs the browser you are sitting at. If HR.Click says Push paused — no paired device, or notices this browser has lost its pairing (a cleared profile, a reinstalled browser), Re-register this device restores it in one click. Nothing is lost meanwhile — the messages wait in the inbox.
12Settings — profile, security & privacy
Profile in the sidebar is the read-only card of your record — one page answering “what does HR.Click say about me?”: your position and its full history, department, office, team lead, work hours and schedule mode, month-to-date worked time, leave balance (accrued / used / available, and the 31 December projection), plus counts of your active access, equipment and signed consents. Nothing is edited here — each block links to the page that owns it. Settings is where you change what you are allowed to change.
Profile
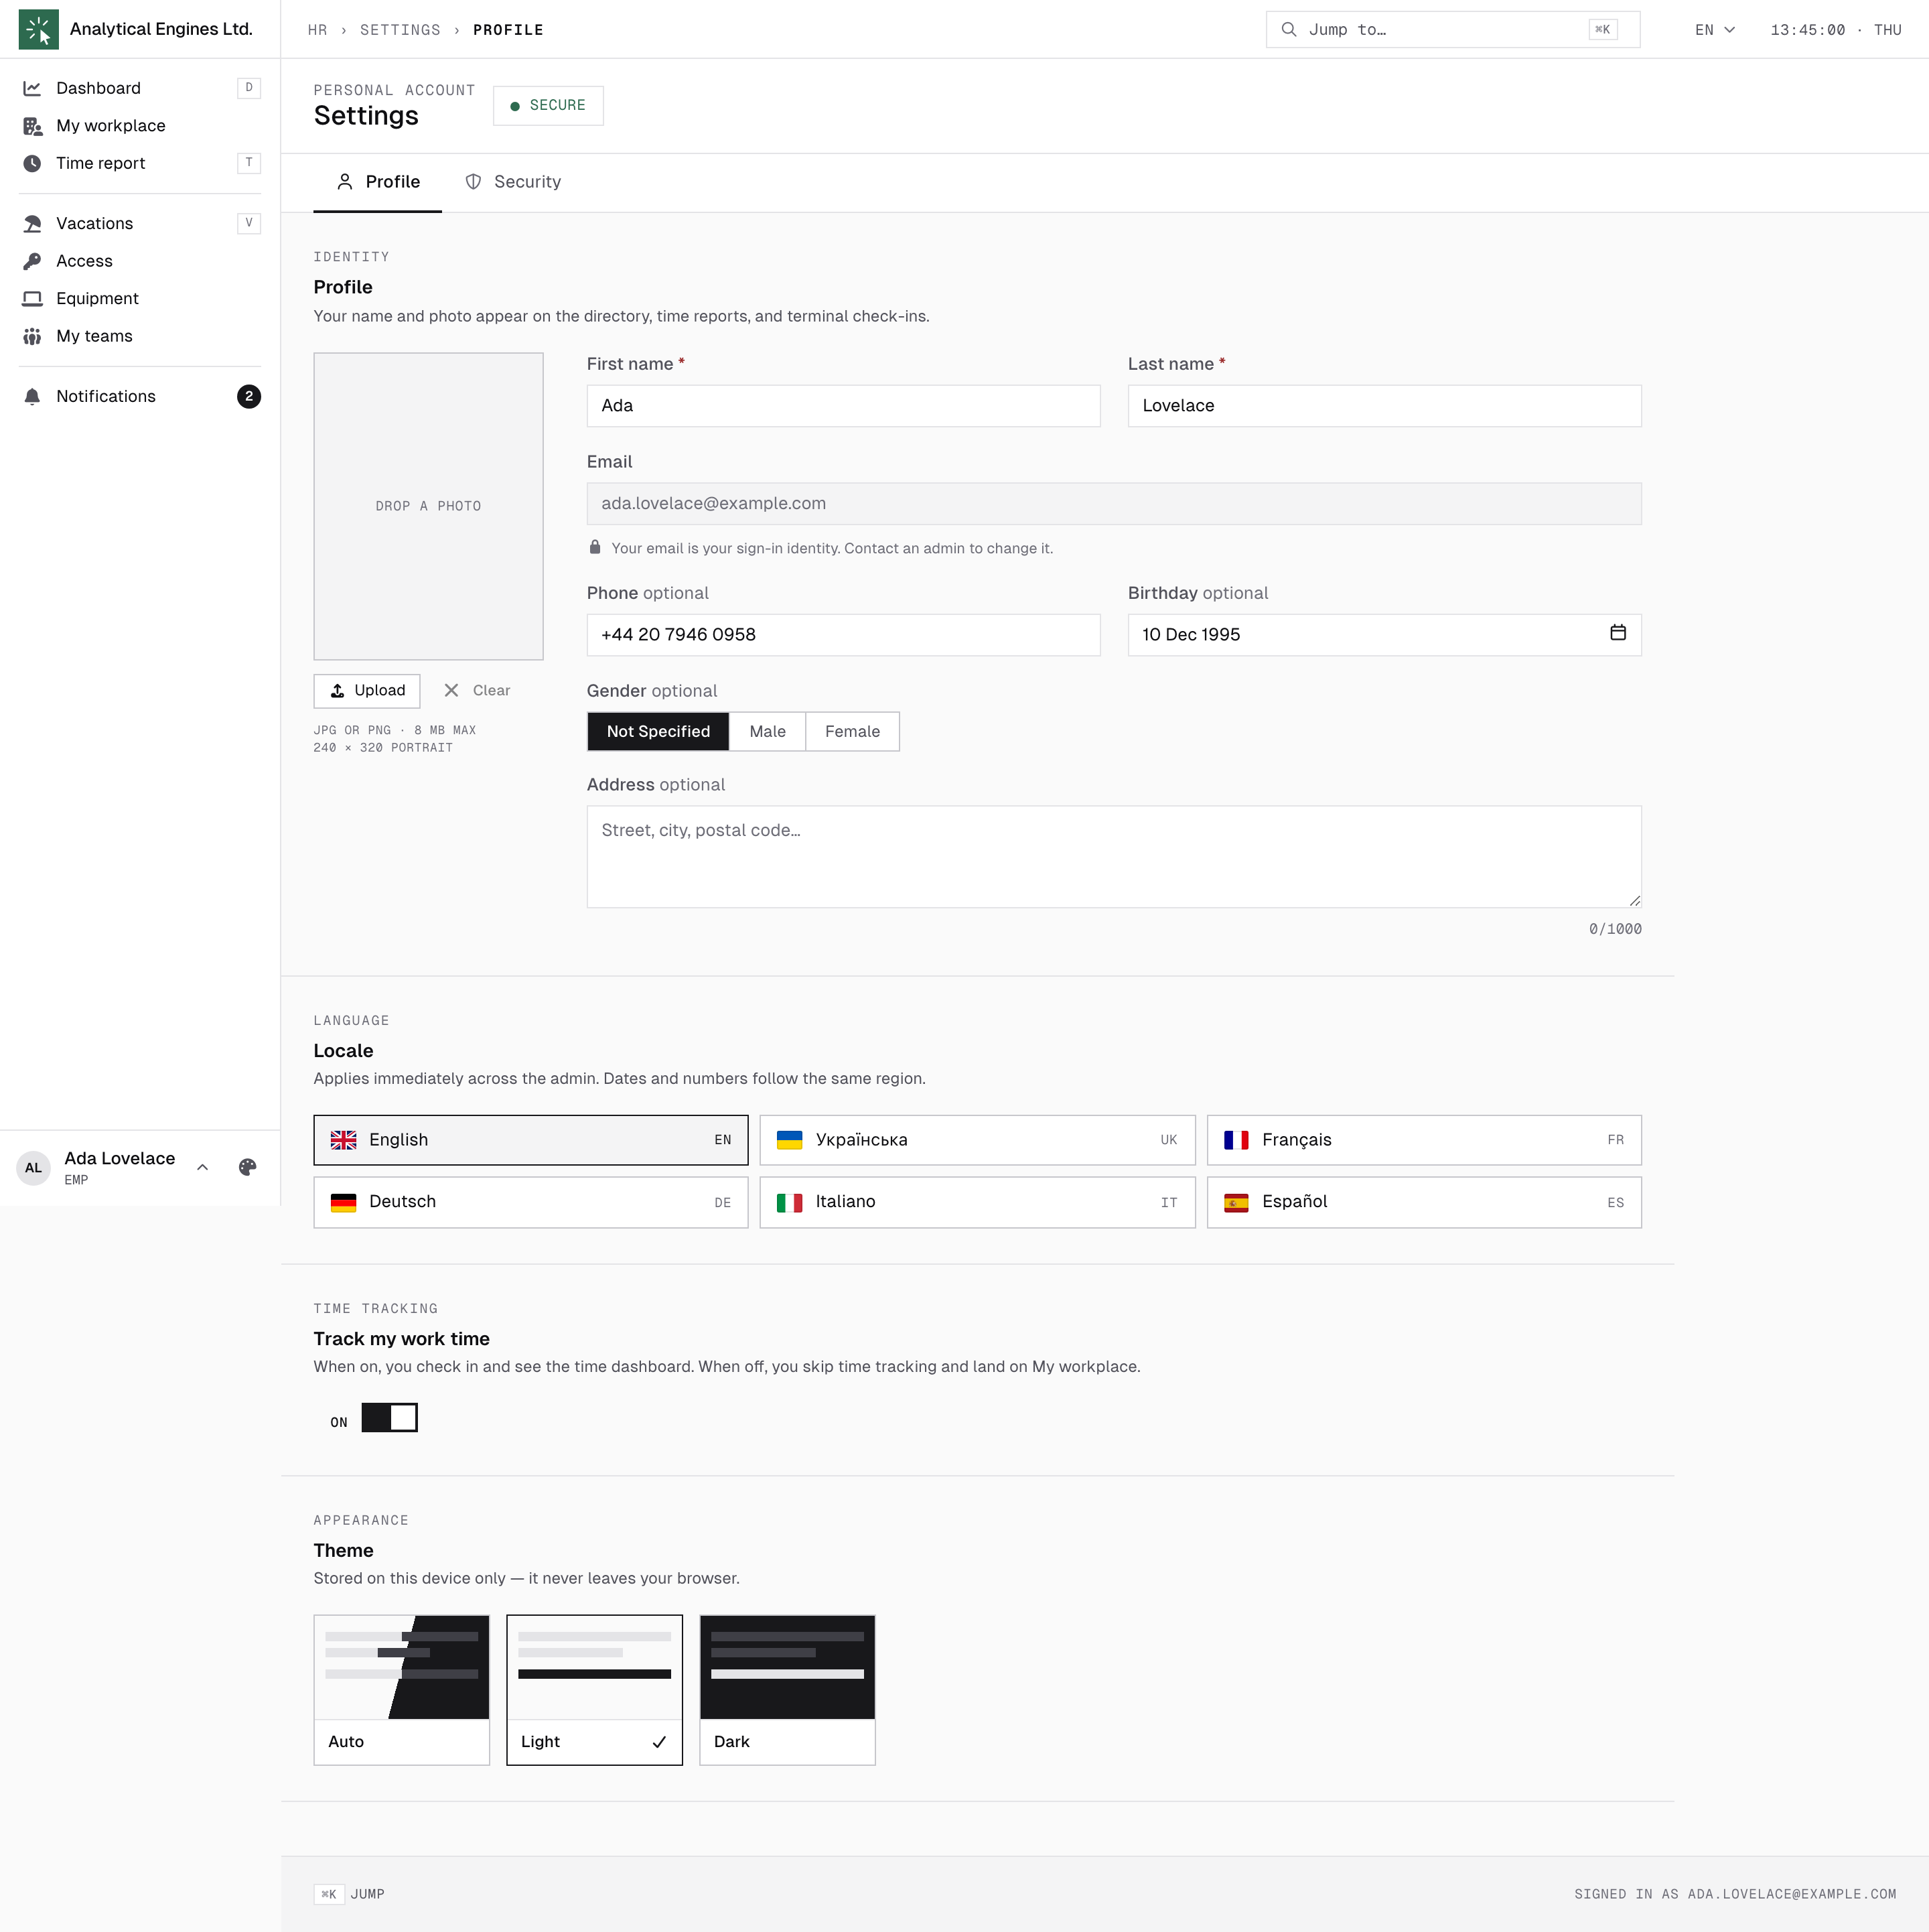
Upload a photo, edit your name, phone and birthday, and pick your interface language (applies immediately) and theme (Auto / Light / Dark — per device). Your e-mail is managed by the administrators — ask them if it needs changing. Two more things live here:
- Track my work time — when on, you check in and get the time dashboard; when off, you skip time tracking altogether and land on My workplace instead (sections 3 and 6 stop applying).
- Browser extension — Install extension takes you to the Chrome Web Store listing. Shown on desktop Chrome only.
Security
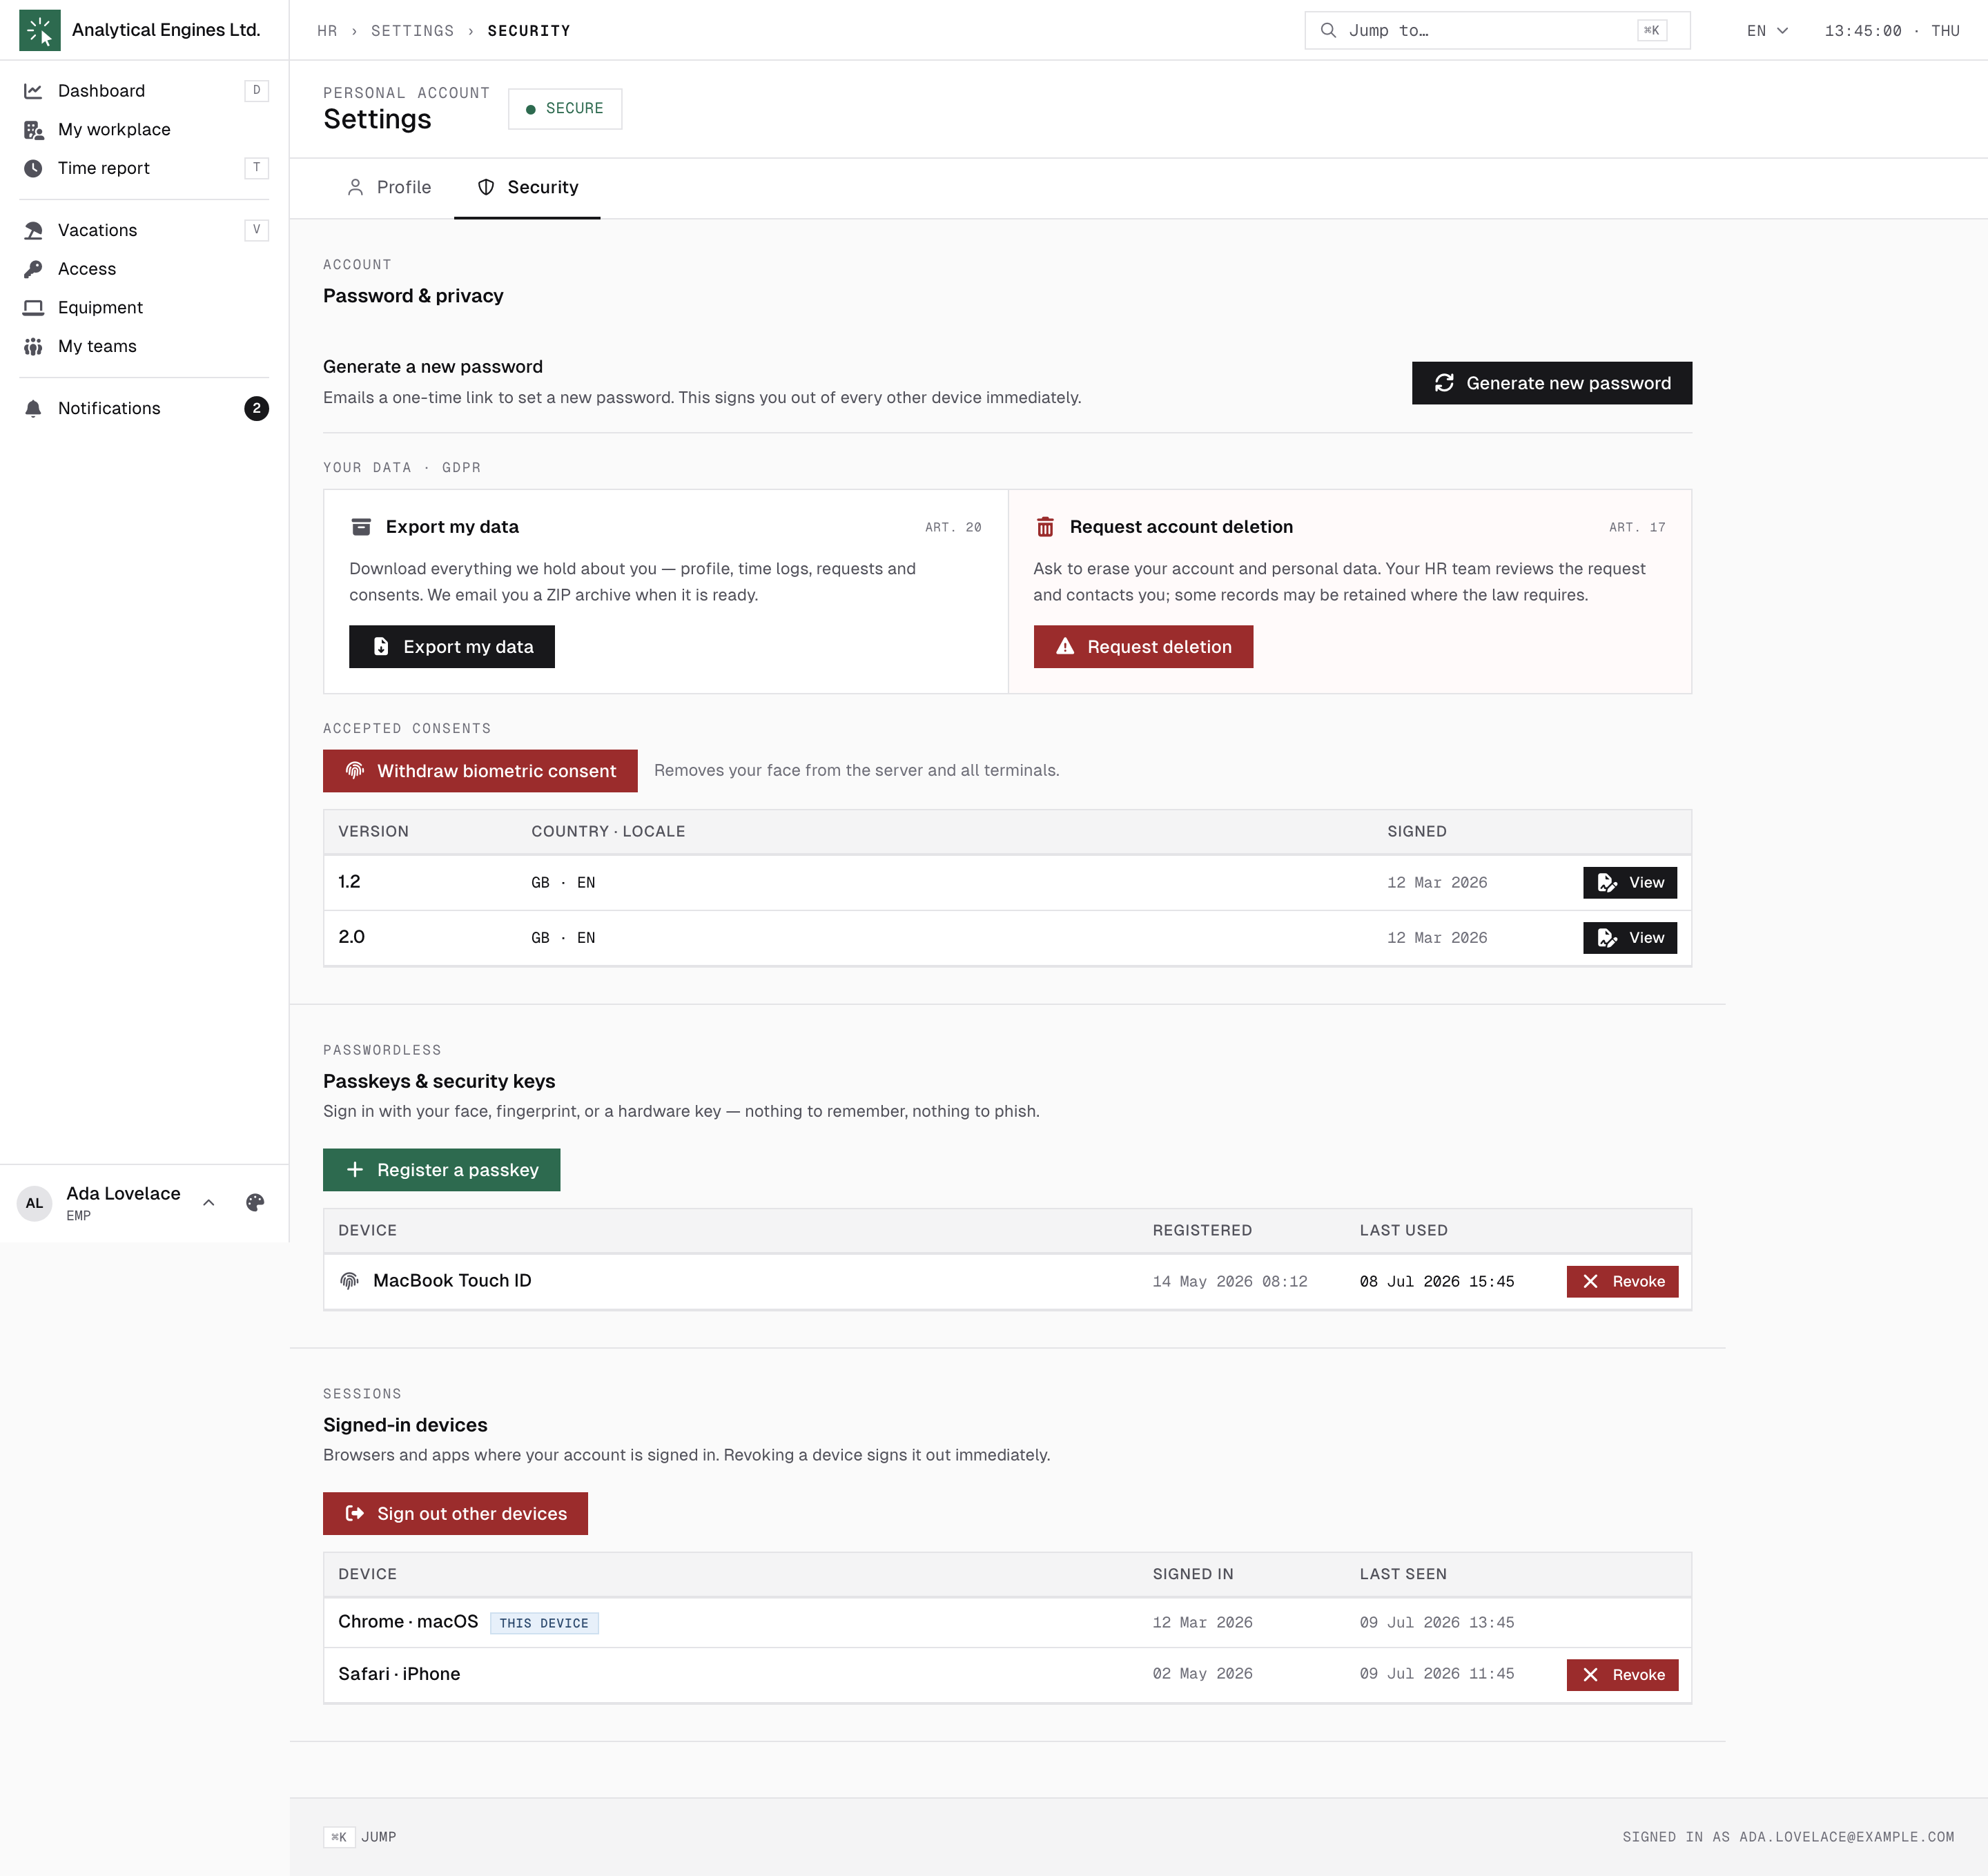
- Password — click Generate a new password: you receive a one-time link by e-mail to set a new one. For safety this also signs out your other devices.
- Passkeys & security keys — register a passkey (fingerprint / face / hardware key) to sign in without a password. You can revoke them here any time.
- Signed-in devices — every browser session on your account, with the current one marked. Sign out other devices if you left yourself signed in somewhere.
Privacy (GDPR)
- Export my data — download everything HR.Click stores about you.
- Withdraw biometric consent — removes your face profile from the check-in terminals. You can re-enrol later at a terminal if you change your mind.
- Request account deletion — starts the formal erasure process with your administrators.
- Accepted consents — every consent you have signed (e.g. the biometric consent from terminal enrolment), viewable in full.
13Common questions
| Question | Answer |
|---|---|
| I forgot to check in / out — my hours are wrong. | Log time on the Time report (section 6) → One punch, pick what you forgot. The hours count once a manager confirms them. |
| I punched a break end (or a check-out) at completely the wrong time. | Same place: pick that punch under “Punched something at the wrong time?” and give the right time. Your original keeps counting until a manager approves the replacement. |
| The day I need isn’t in the date picker. | It is older than the window for fixing your own record (about a day, longer for long shifts). Ask your manager — they can correct any day. |
| My leave request has been sitting in “TL” for days. | Open it — the Approval journey shows exactly who it is waiting for. A friendly nudge to that person usually helps; they also got a notification. |
| Can I take more leave than I have? | Often yes — the request gets a “would overdraw the balance” flag and needs the vacation manager’s explicit approval. Your balance goes negative and refills as you accrue. |
| Why is my balance in hours? | So part-time and full-time are fair: everyone accrues in hours against their own working day. The balance page also shows it converted to your days. |
| Where do I see who approved my request? | Open the request — the Approval journey lists every step with names, times and comments. |
| I got “Vacation approved” but the type is different. | Approvers may grant a different leave type than requested (shown as “asked: …”). If it looks wrong, ask your vacation manager. |
| A day in my report is red / shows “L”. | L = you checked in after your shift started. If a day looks wrong, talk to your manager — corrections are made by time managers. |
| How do I change my password or e-mail? | Password: Settings → Security → Generate a new password. E-mail: only administrators can change it. |
| I want my face removed from the terminal. | Settings → Security → Withdraw biometric consent. Check-in then works only via the methods your company offers you instead. |
Your HR administrator is the right first stop for account, hours or leave questions — corrections are made in HR.Click by managers, not on the terminal.
HR.Click — Employee Web Guide · v1.2 · September 2026. Product screens shown with sample data; names of persons are fictitious examples.