

Face Terminal
User & Administrator Manual
Time & attendance terminal with face recognition
Contents
- 1 Meet your terminal
- 2 Checking in and out
- 3 If something doesn’t work
- 4 Hardware at a glance
- 5 First boot and network setup
- 6 Pairing the terminal with HR.Click
- 7 Enrolling employees
- 8 The on-device admin menu
- 9 Managing terminals from the web
- 10 Software updates
- 11 Offline behaviour and data safety
- 12 Troubleshooting
- 13 Quick reference
Part 1 · For everyoneUsing the terminal
1Meet your terminal
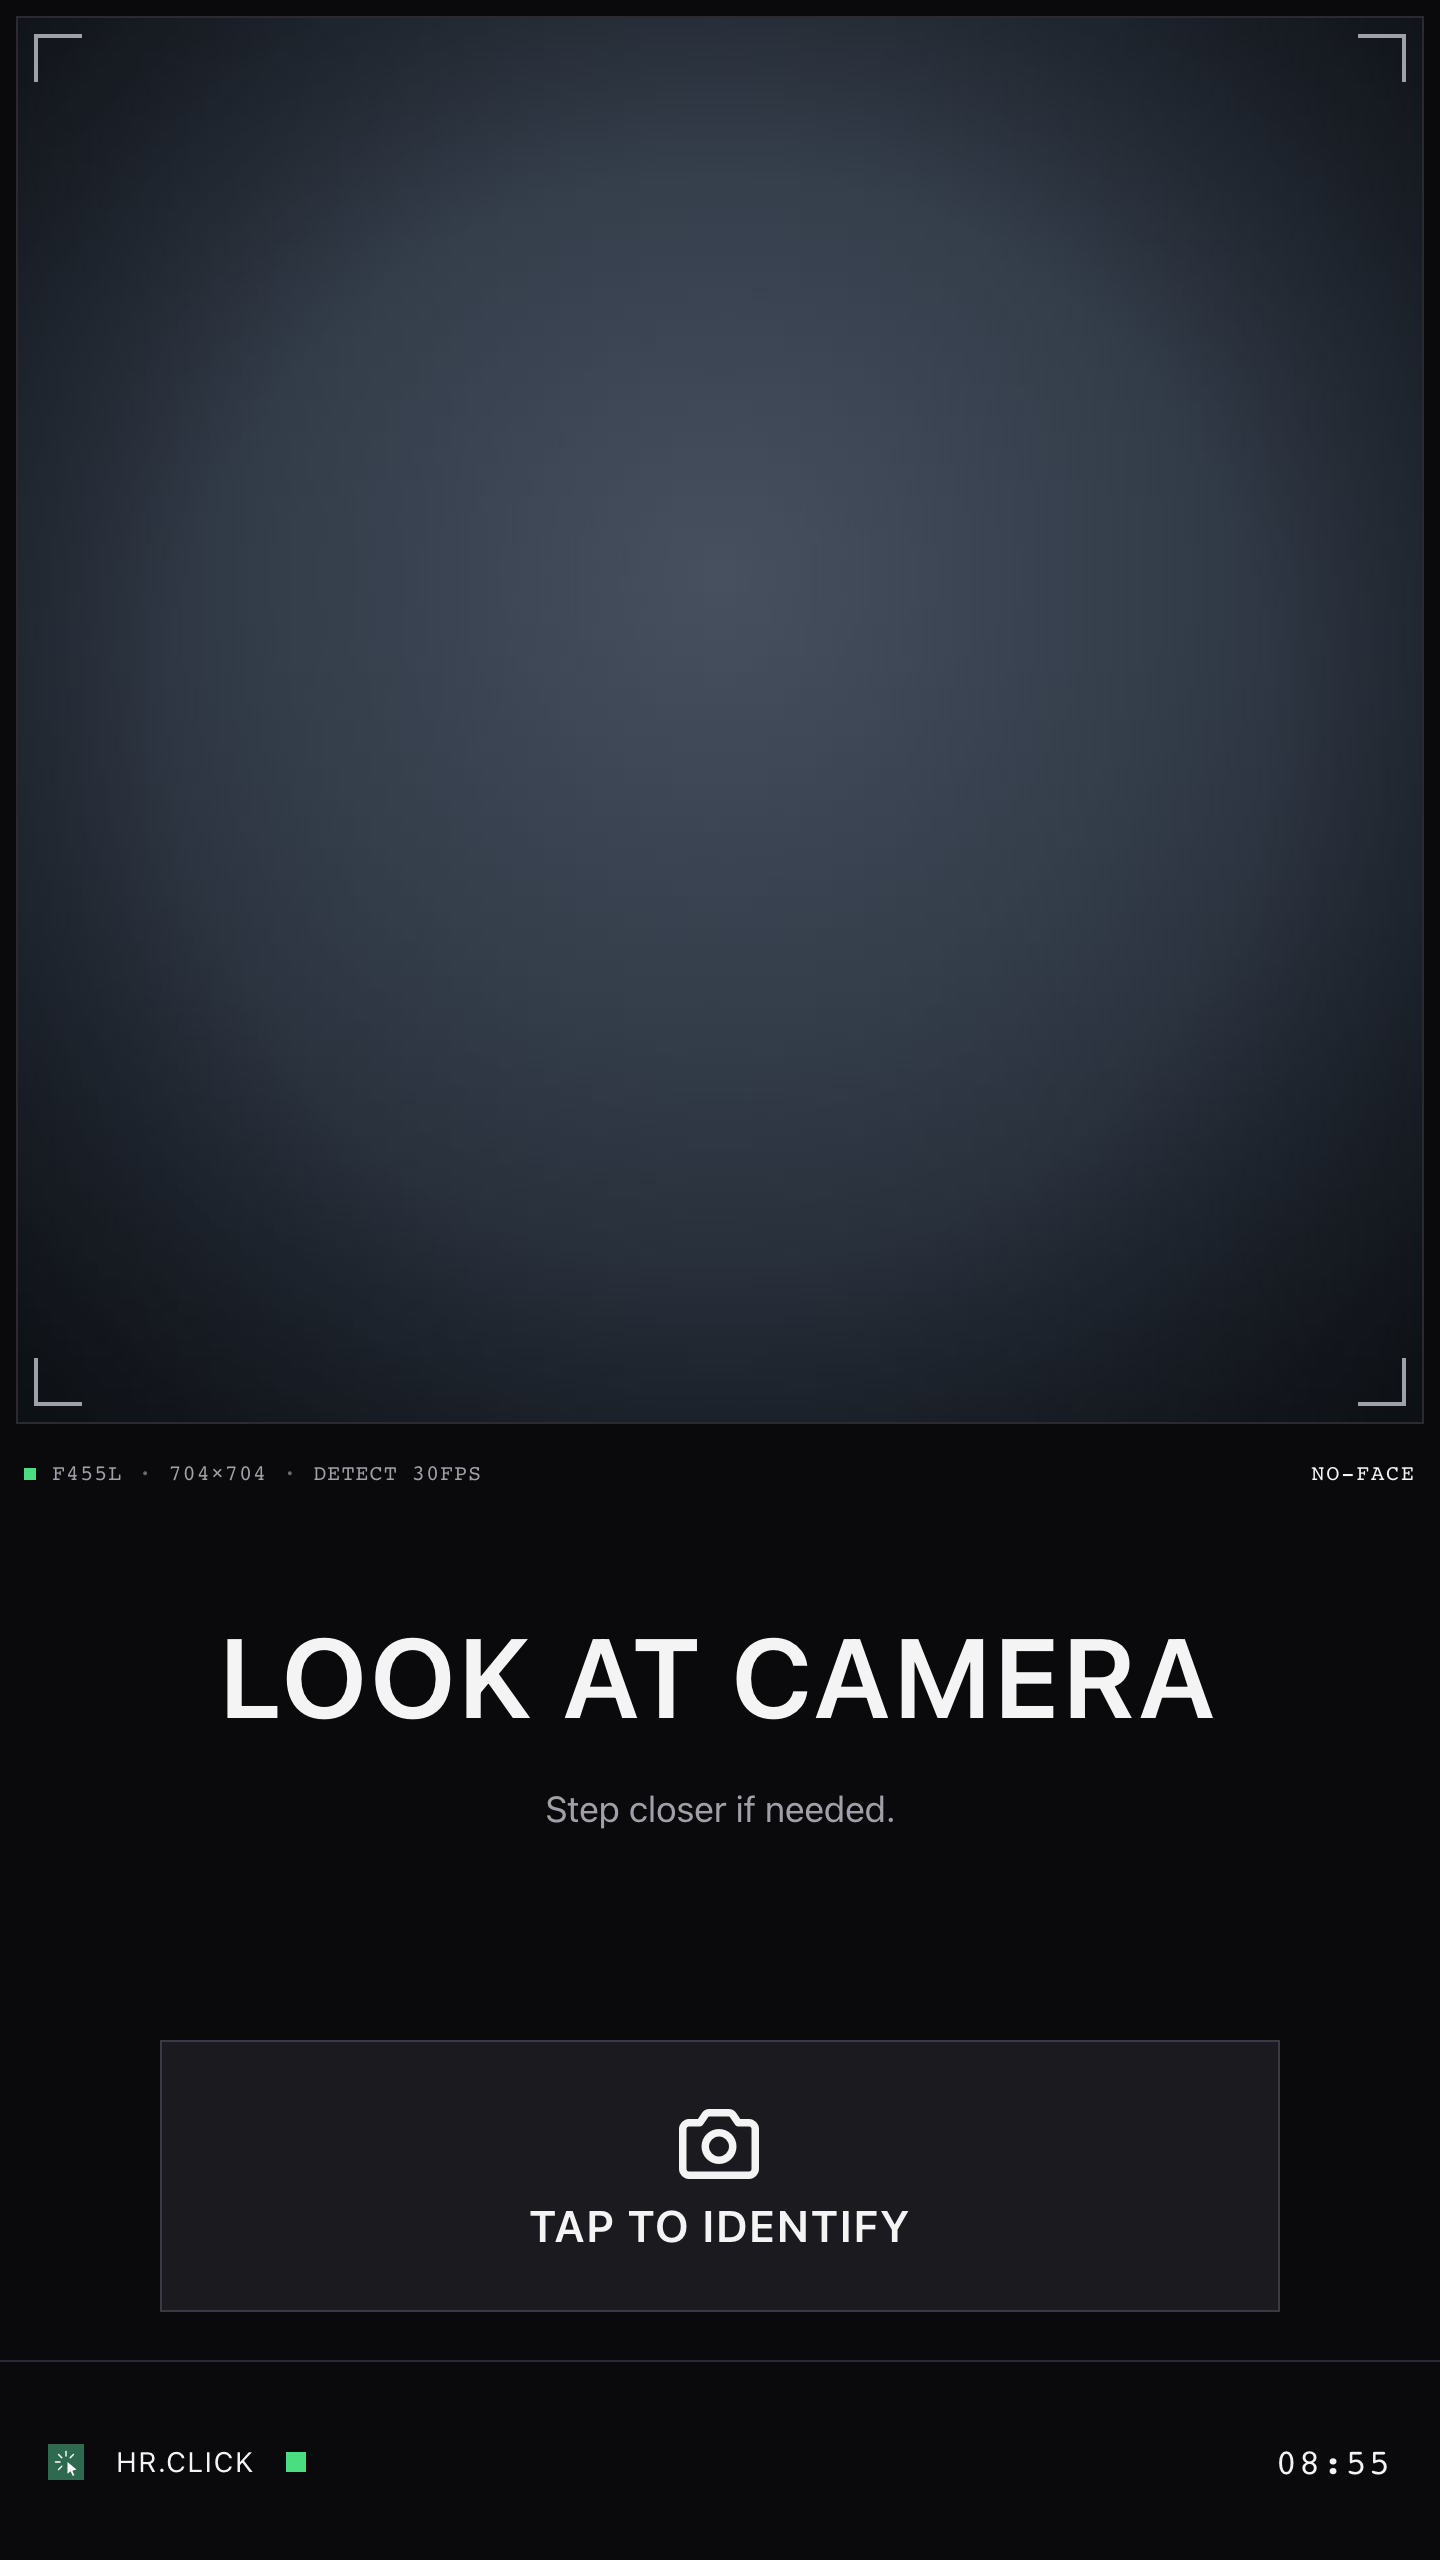
The HR.Click terminal is a small touchscreen device, usually mounted near the entrance. It recognises your face and records when you start work, take a break, and finish work — no cards, fobs or PIN codes.
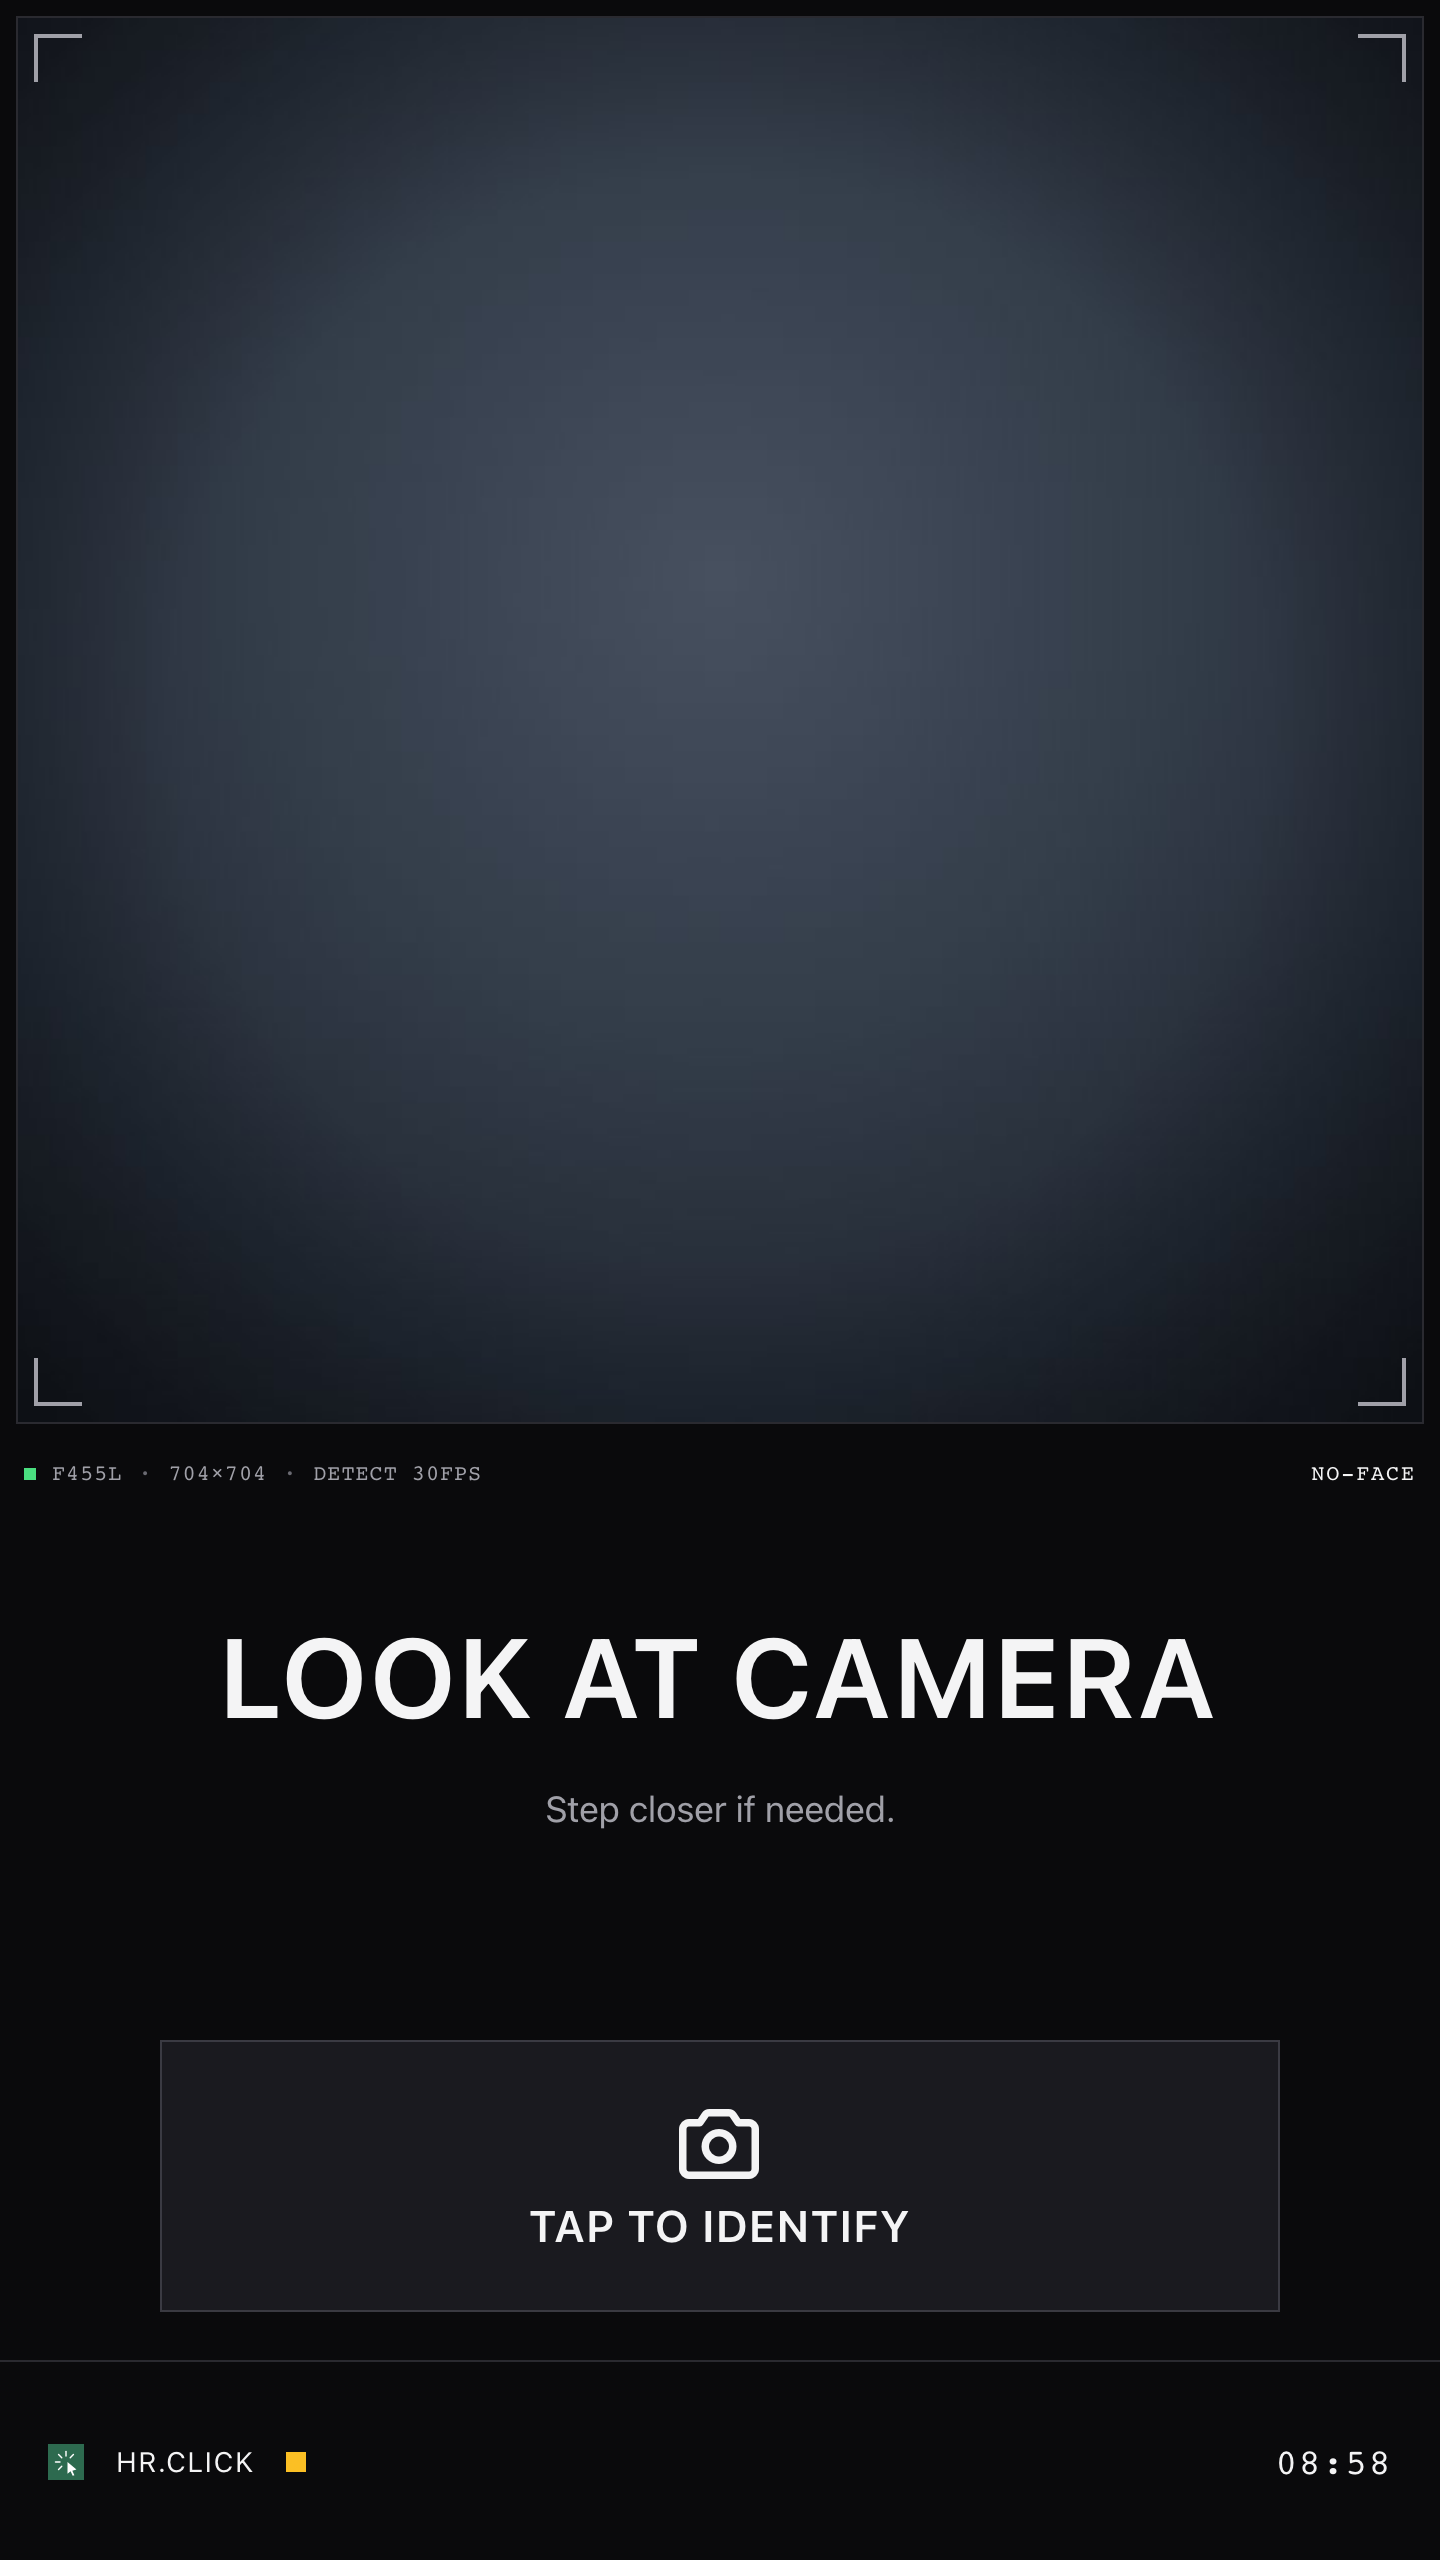
On the resting screen you can see:
- The camera view — a live preview with hints that help you position your face (“Look at camera”, “Step closer”…).
- The clock — always shows your office’s local time. This is the time your check-in will be recorded with.
- A status dot at the bottom — green means everything is connected. If it blinks yellow, the terminal is temporarily offline — keep checking in as usual; everything is saved and synced automatically.
You never need to log in or press anything to be recognised — just walk up and look at the camera.
The terminal stores a mathematical template of your face, not photographs, and only after you have signed a consent form. You can ask your administrator to delete it at any time.
2Checking in and out
- Step up to the terminal and look at the camera. Follow the on-screen hints if it asks you to step closer or centre your face.
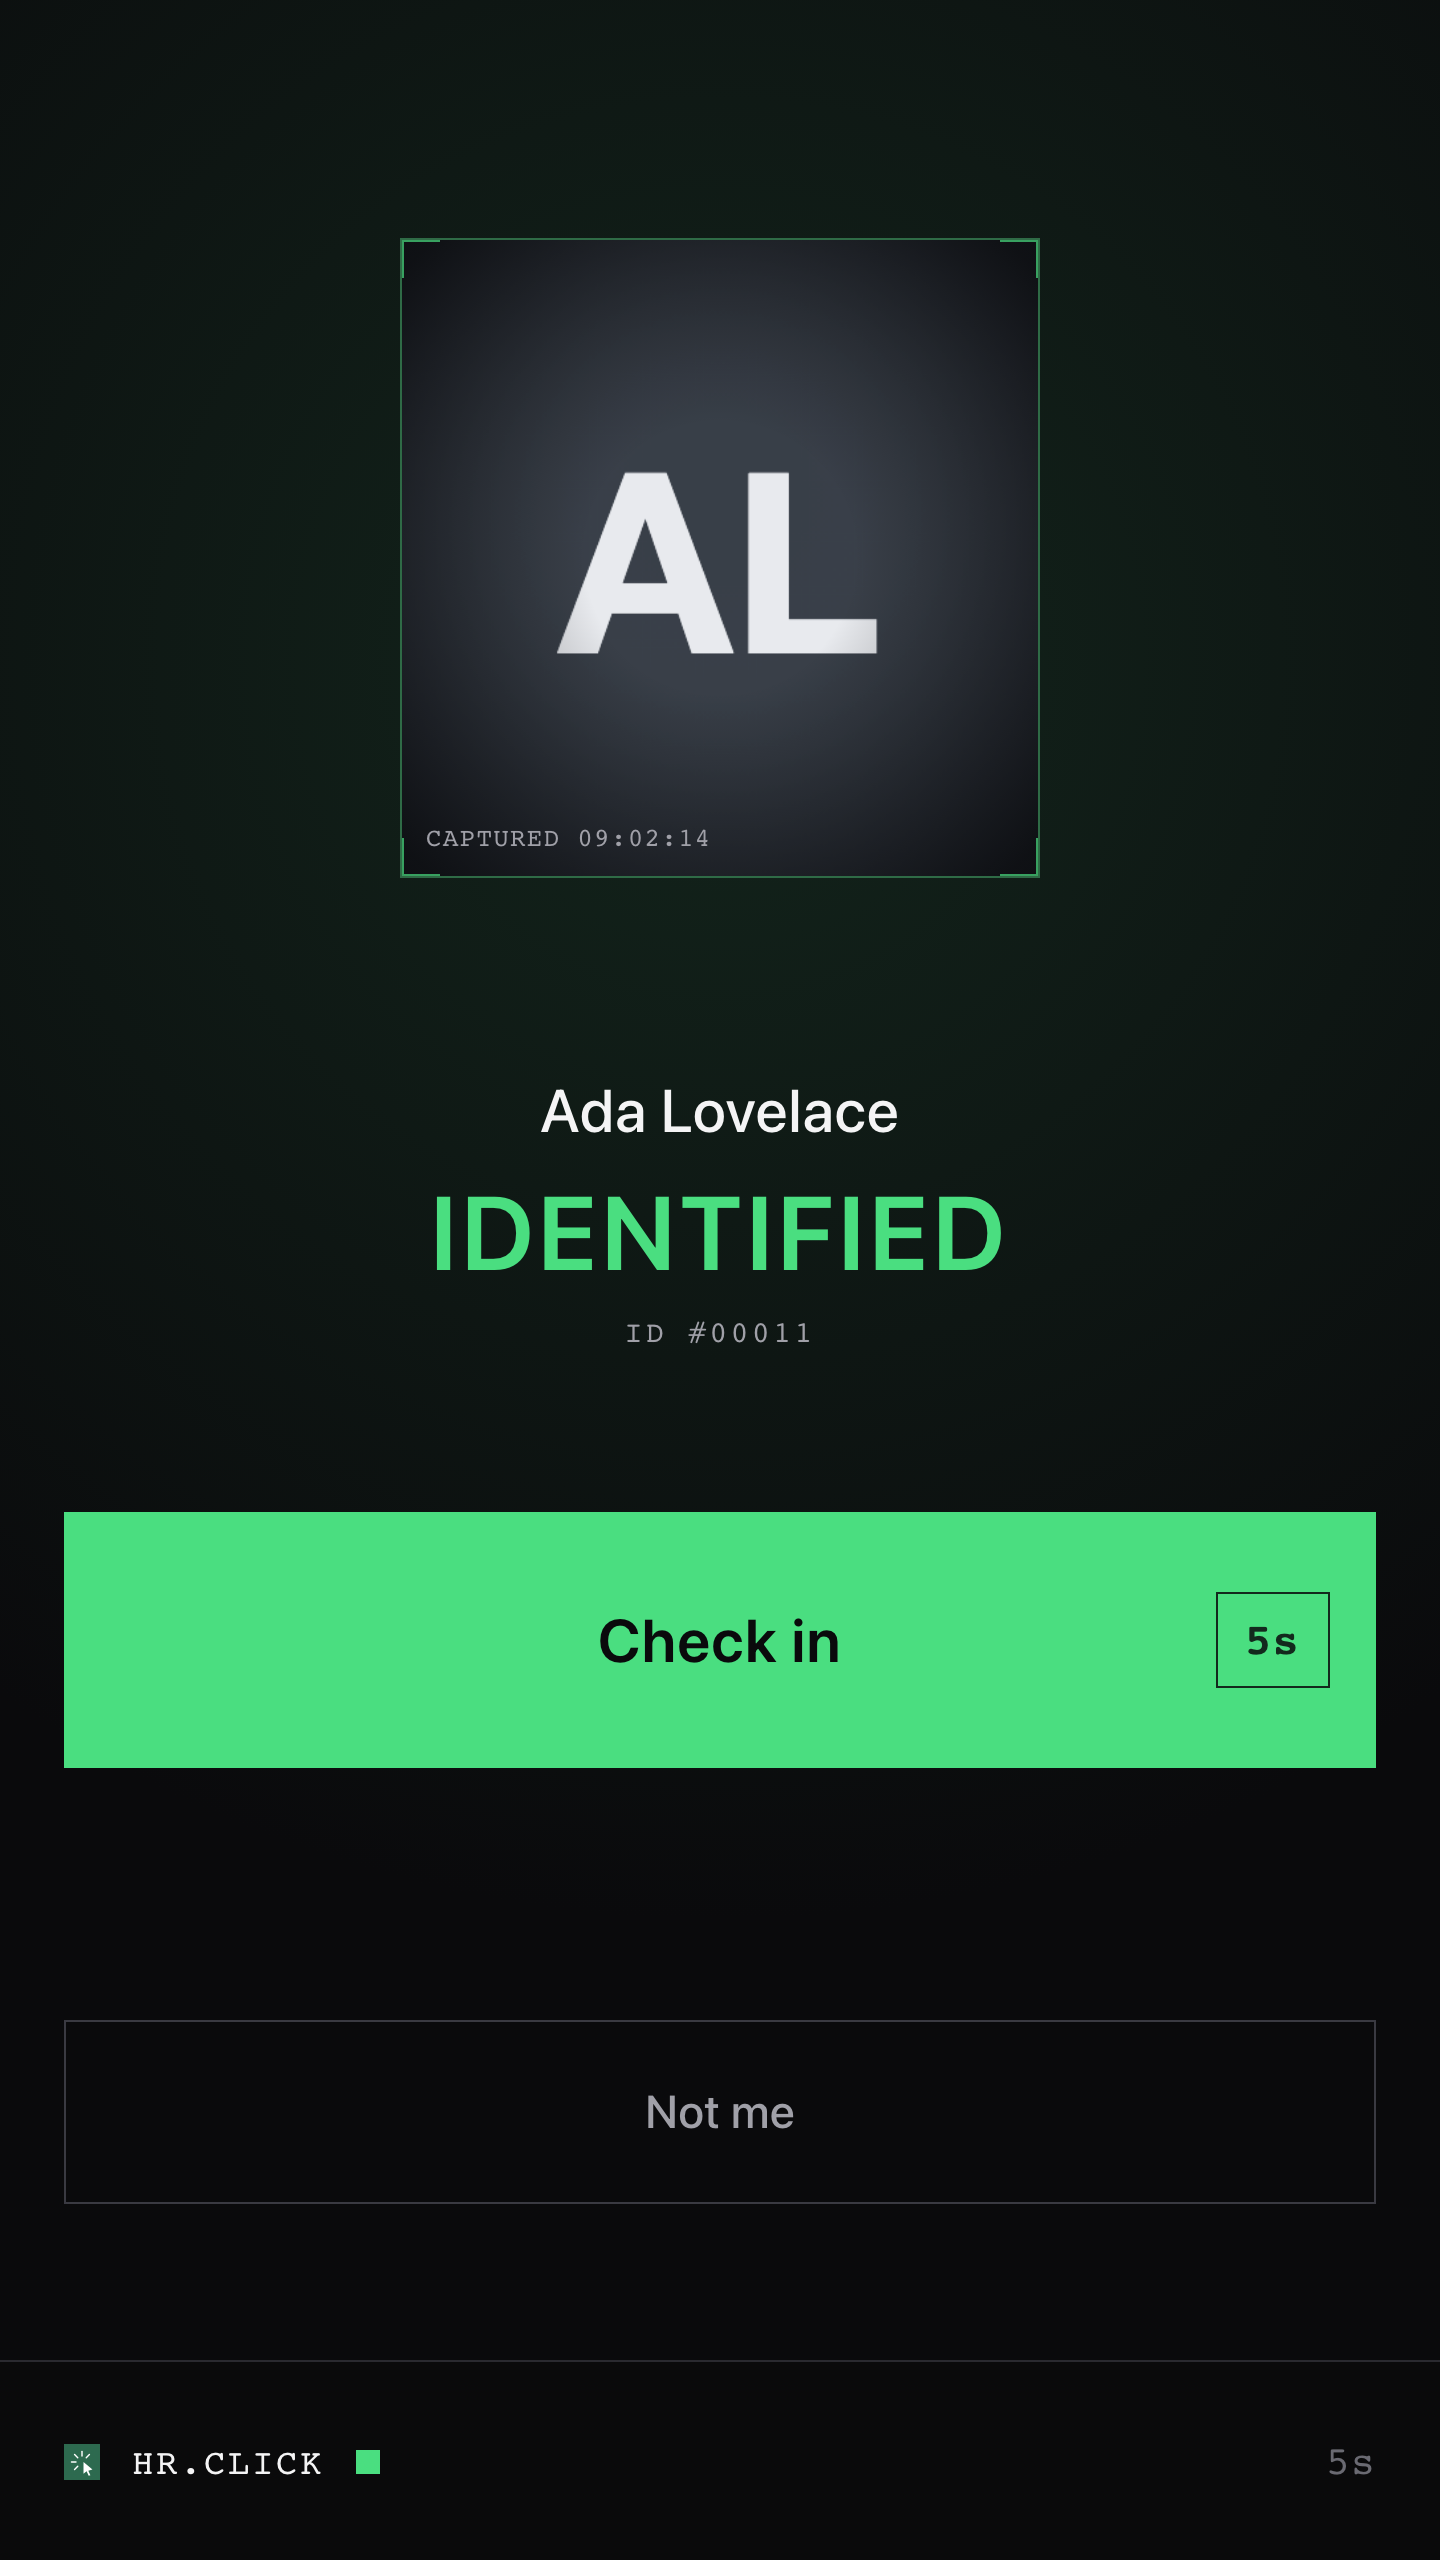
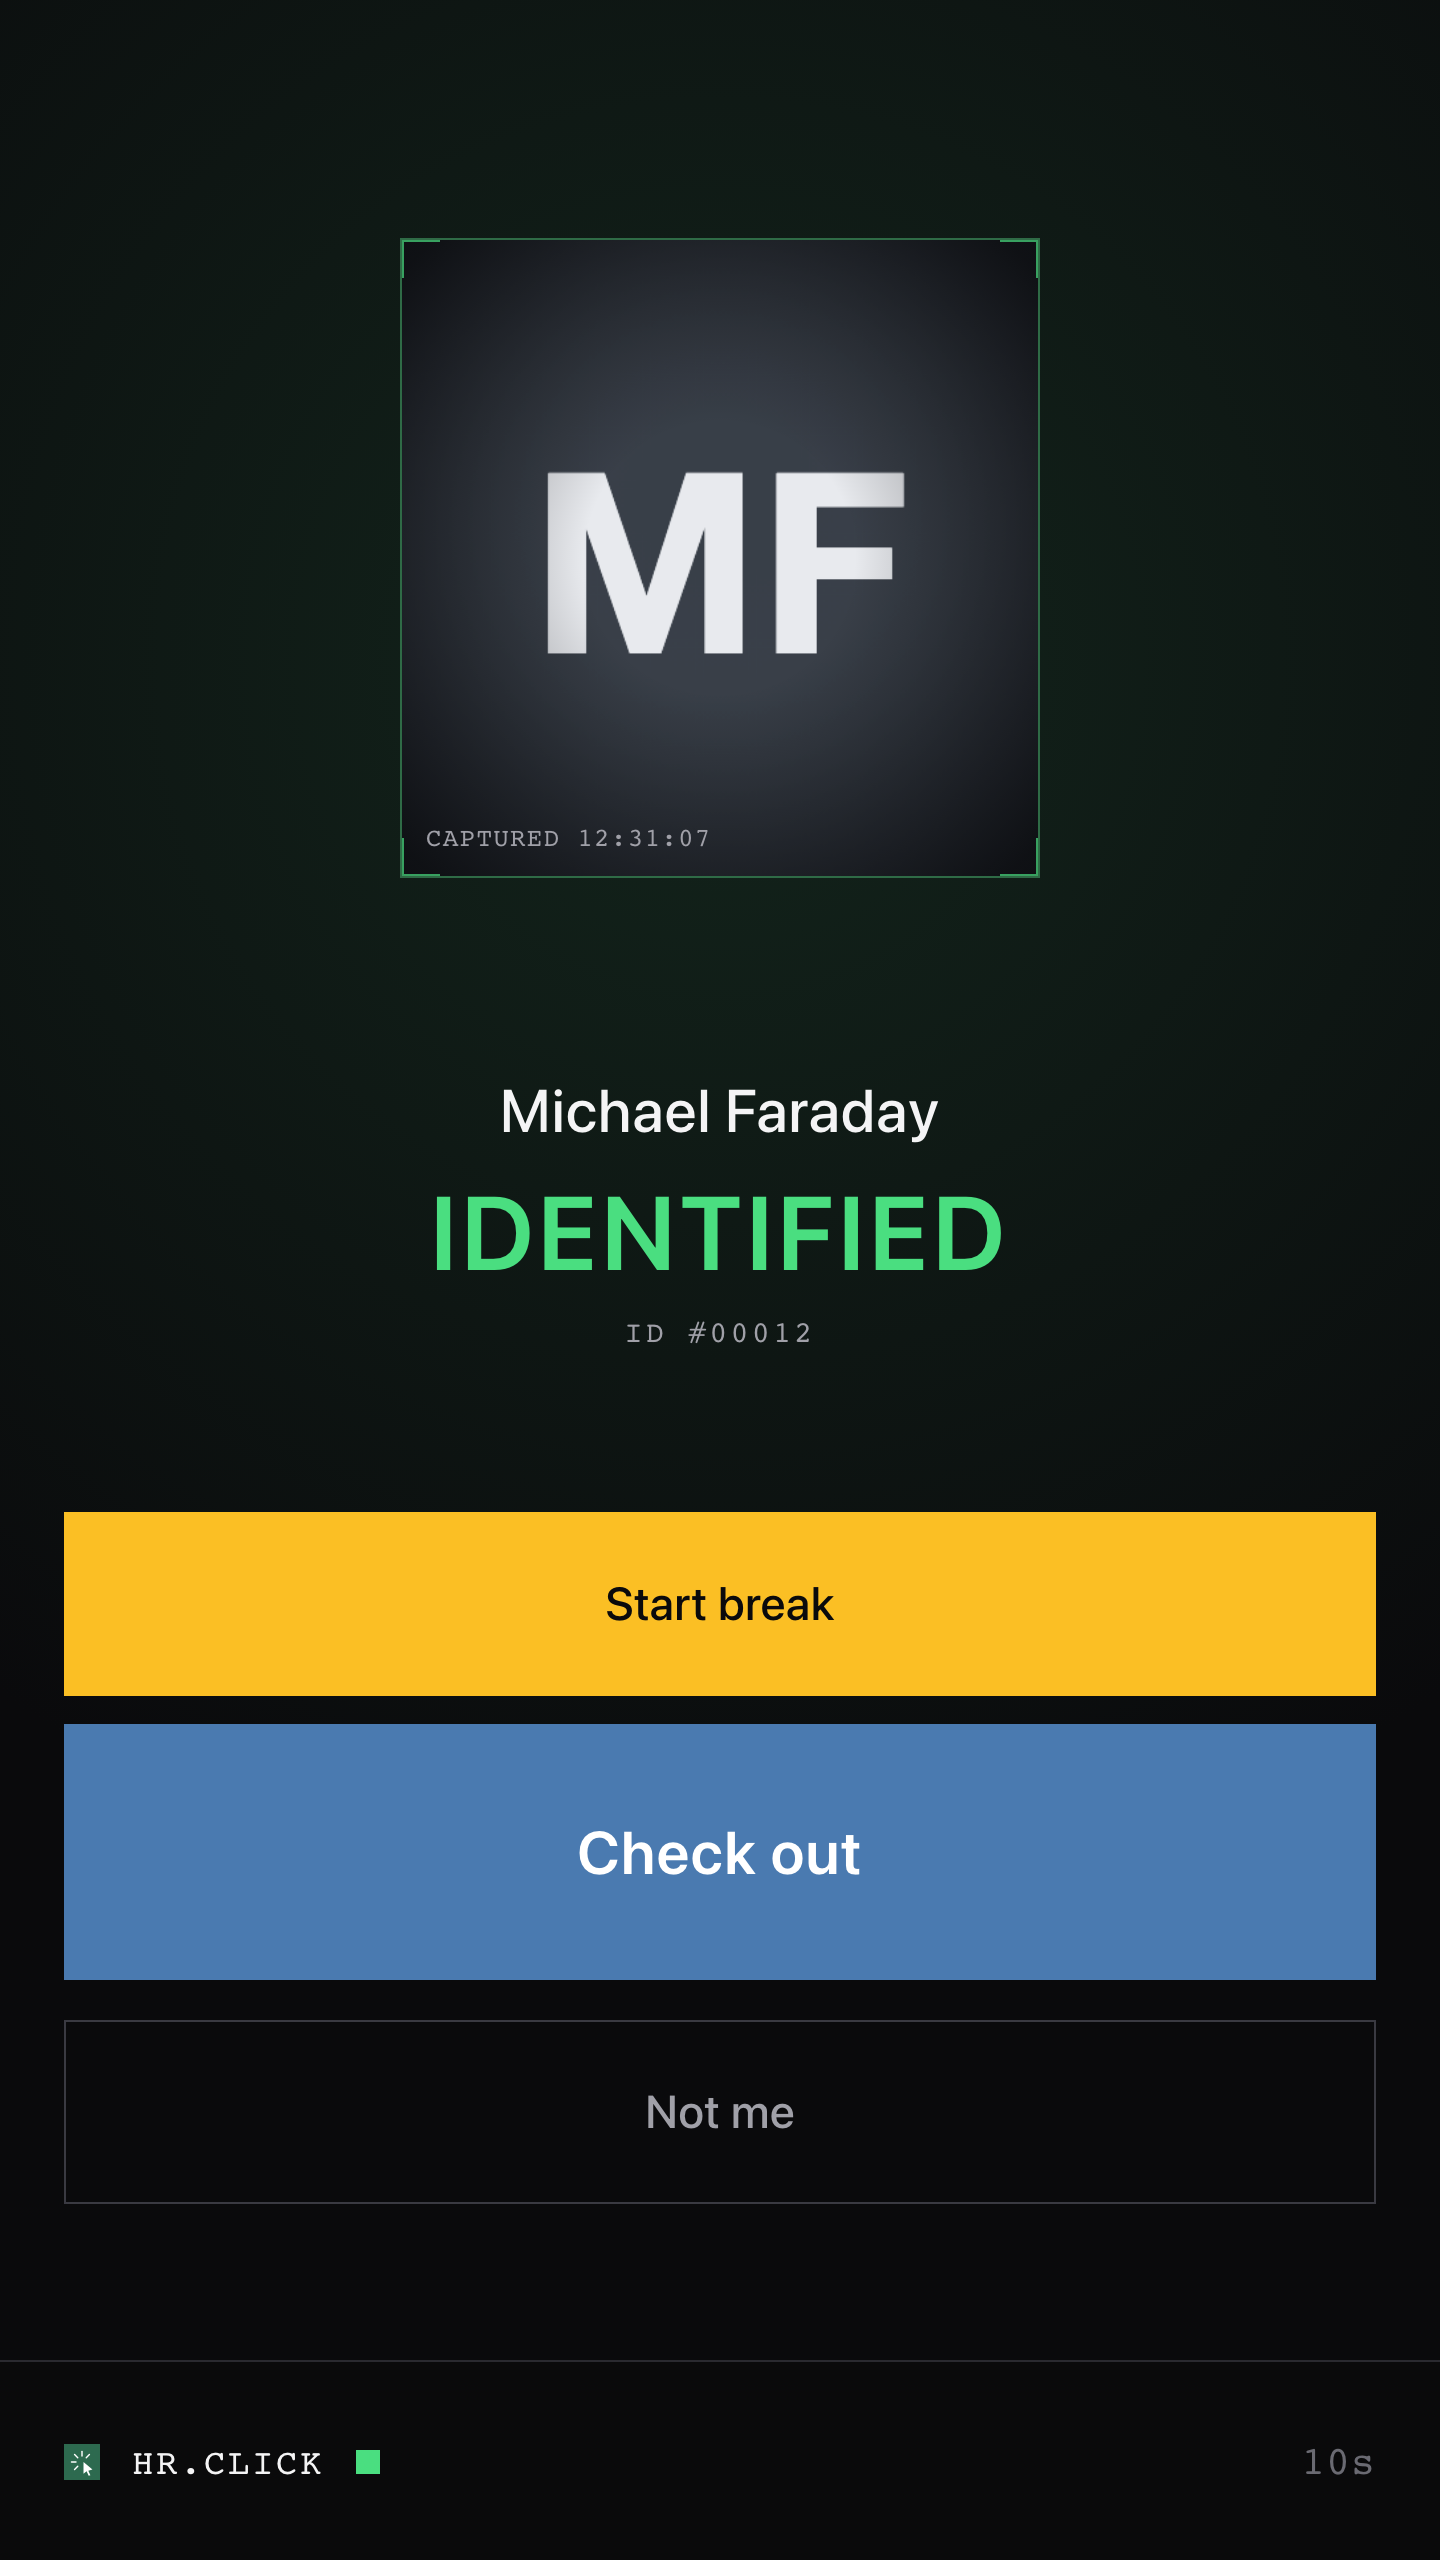
- Wait a moment. When you are recognised, the screen shows your name, your photo, and one or two large buttons. Which buttons you see depends on what you are doing right now:
- Not working yet → Check in. It confirms automatically after 5 seconds — you don’t even have to touch the screen.
- Currently working → Start break or Check out. Tap the one you want.
- On a break → Finish break.
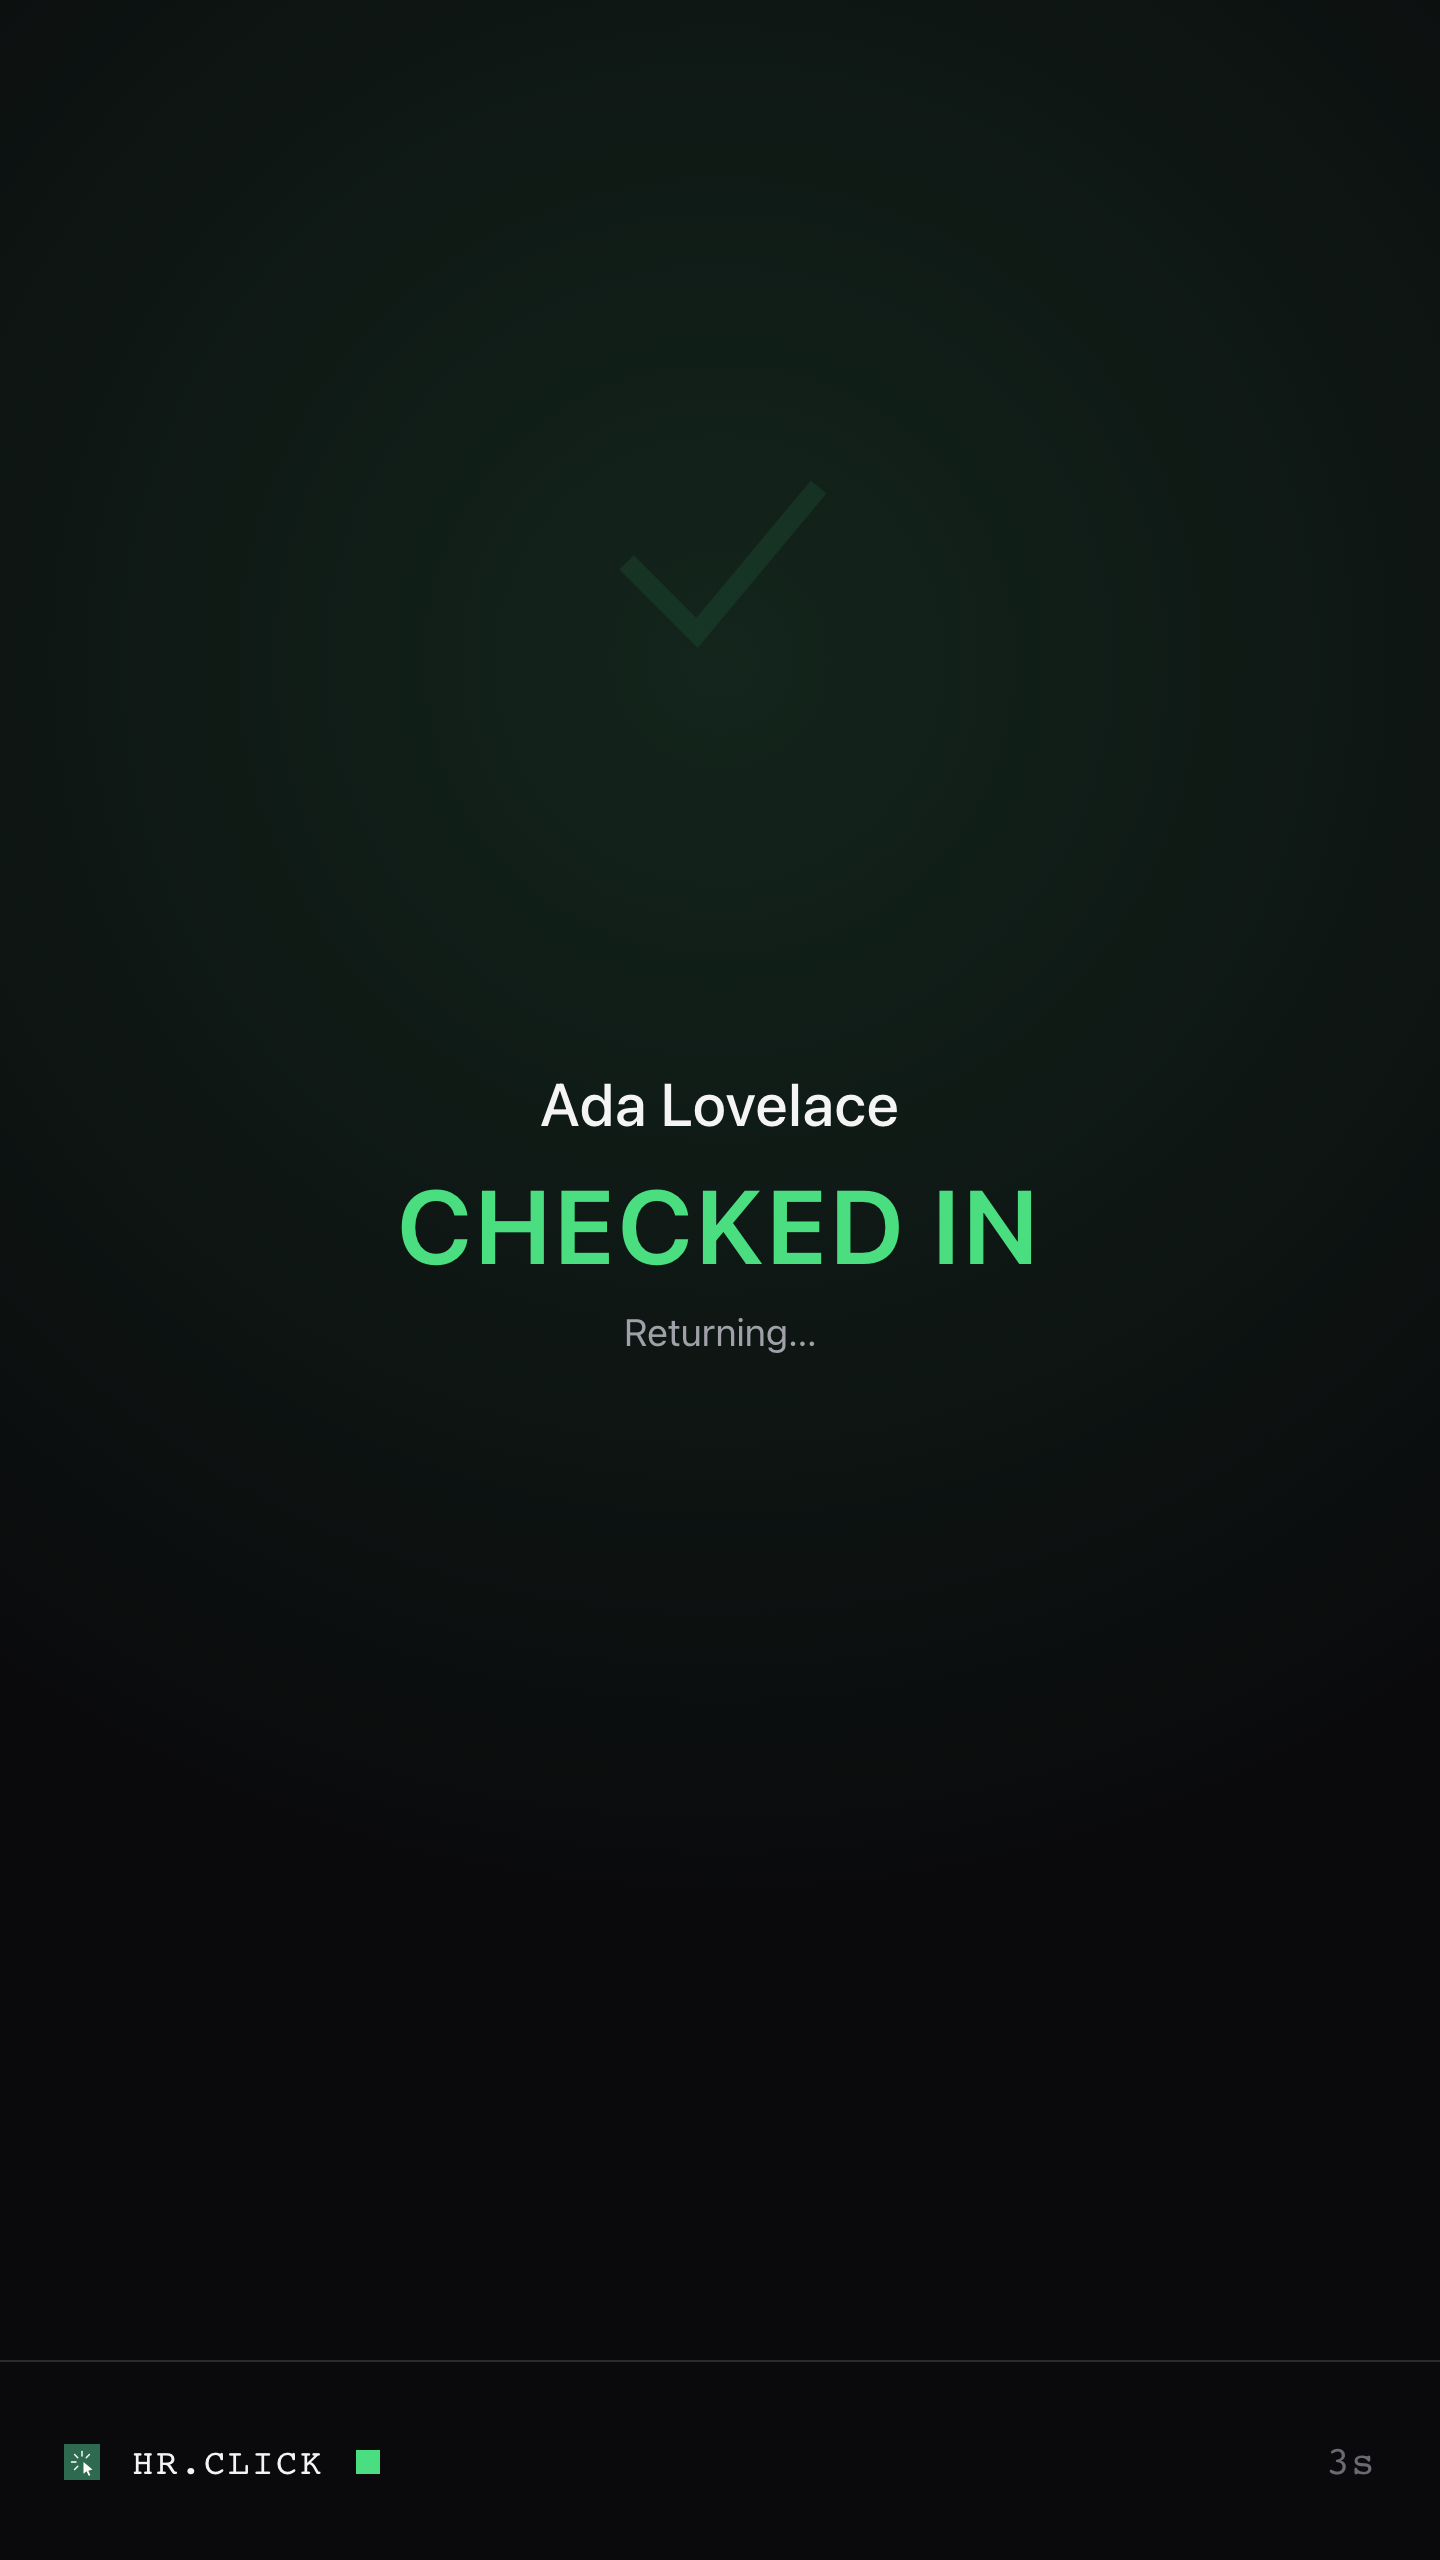
- Done. A large confirmation (“CHECKED IN”, “CHECKED OUT”…) appears and the terminal returns to the resting screen for the next person.
A check-out that the terminal could confirm online shows a short summary card in place of the plain confirmation: how long you worked today, a bar of your day (work, break and away), and a break line if you punched one. It stays up for about 8 seconds — tap anywhere to dismiss it early. If the terminal was offline or couldn’t summarise your day, you get the plain “CHECKED OUT” confirmation instead.
Tap Not me on the result screen and try again. If it keeps happening, tell your administrator — your face profile may need to be re-recorded.
3If something doesn’t work
| What you see | What to do |
|---|---|
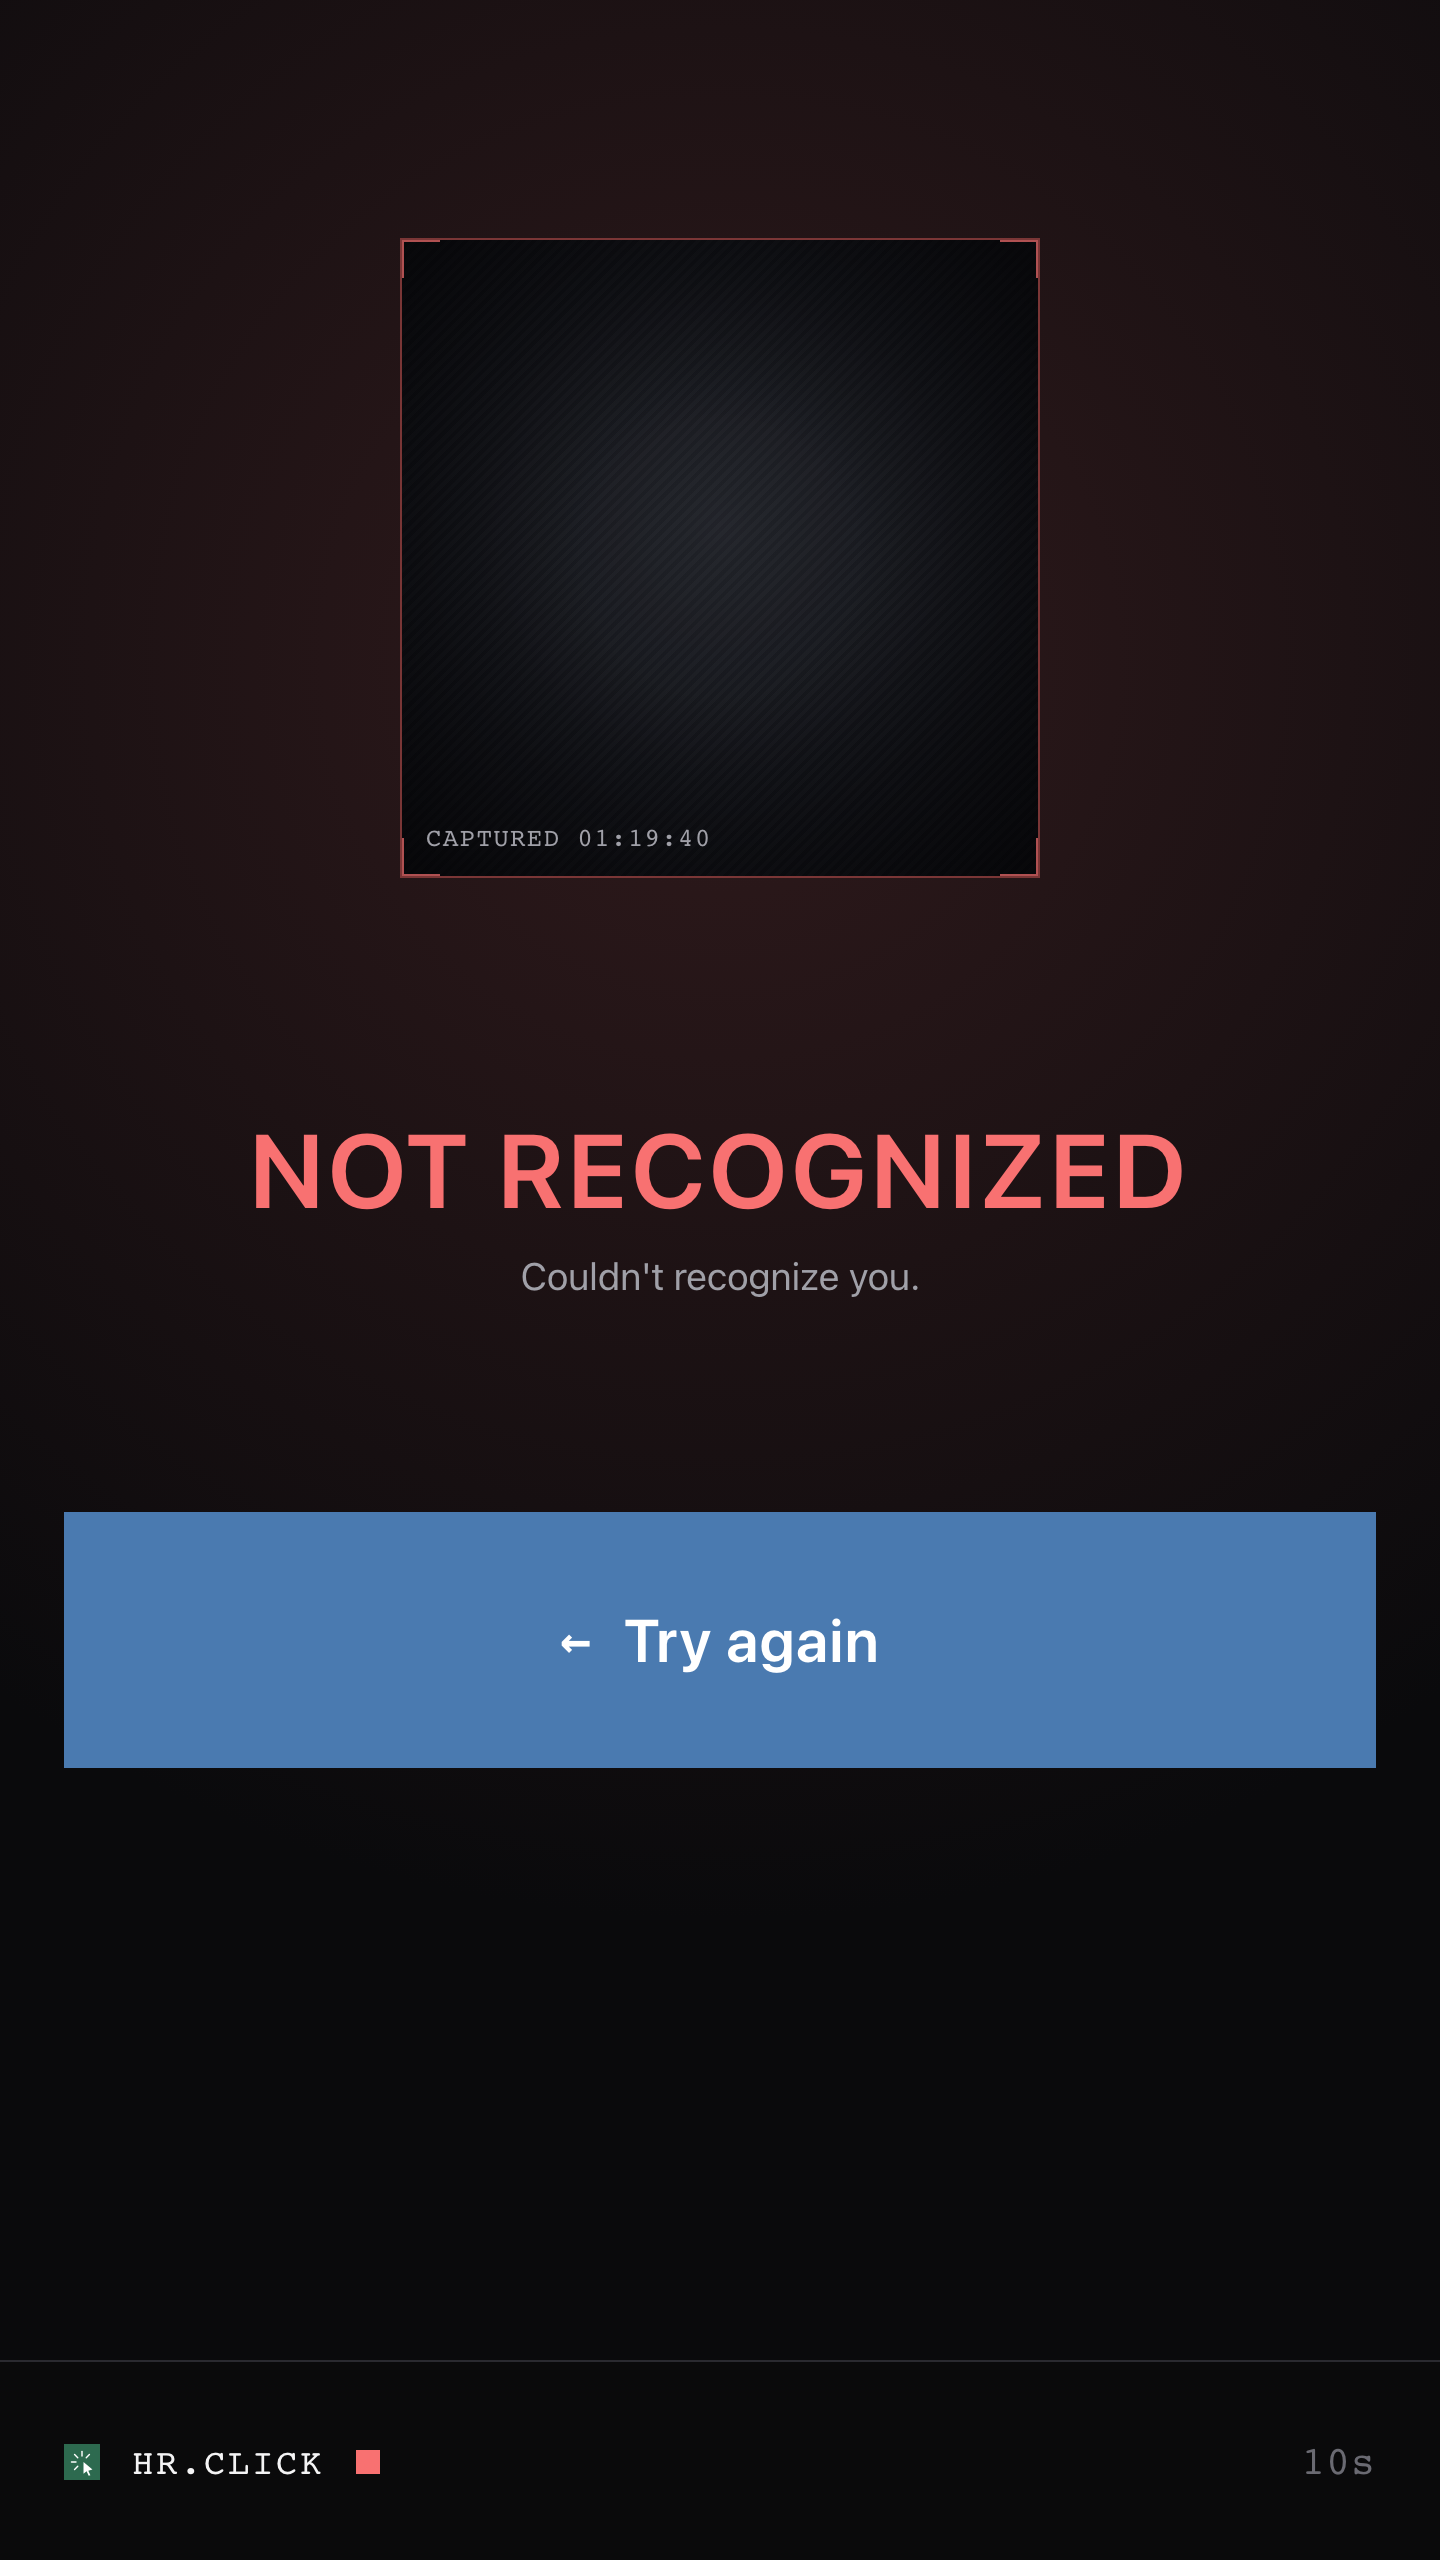
| NOT RECOGNIZED | Tap Try again. Stand about an arm’s length away, face the camera straight on, and remove sunglasses or anything covering your face. If it fails repeatedly, ask your administrator to re-enrol you. |
| SPOOF DETECTED | The camera double-checks that it sees a real, live person — this message is nothing to worry about. Put your phone away, step back half a step, and simply try again looking straight at the camera. |
| Your name never appears | You may not be enrolled on this terminal yet. Ask your administrator. |
| FACE SCAN UNAVAILABLE | The terminal has temporarily locked scanning for security reasons. Tell your administrator — only they can unlock it. |
| Screen is dark or frozen | Tell your administrator. The terminal usually recovers by itself within a couple of minutes. |
For anything else — wrong recorded time, a check-in you forgot to make, questions about your hours — contact your administrator or HR team. The terminal itself only records events; corrections are made in HR.Click.
Part 2 · For administratorsAdministrator guide
4Hardware at a glance
| Component | Details |
|---|---|
| Display | 5.5″ portrait touchscreen, 720 × 1280 |
| Camera | Intel RealSense ID depth + infrared face module with built-in anti-spoofing (photos and videos of a face are rejected) |
| Computer | Embedded ARM board (RK3399), 4 GB RAM, 32 GB storage |
| Network | Wi-Fi or Ethernet. Outbound HTTPS only — the terminal never accepts incoming connections, so no firewall ports need to be opened. |
| Power | 12 V / 2 A adapter, or PoE (802.3at) with a PoE splitter |
| Power button | Recessed in a small hole on the bottom edge, next to the Ethernet port and the status lights. Normally not needed — see “Power-cycling” in section 12. |
| Cooling | Small temperature-controlled fan; keep the vents unobstructed |
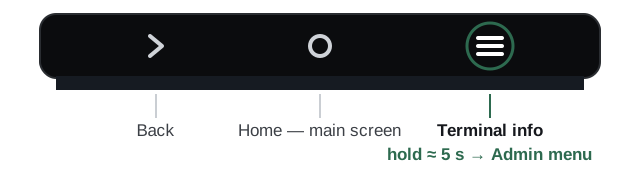
| Buttons above the screen | Three touch buttons on the top bezel: › back, ○ home, ≡ terminal info. Holding ≡ opens the admin menu (section 8). |
Mount indoors at face height (≈ 1.4–1.6 m). Avoid pointing the camera at a bright window or direct sunlight behind the person. Clean the screen and camera window with a soft, dry cloth. Do not disassemble the unit.
5First boot and network setup
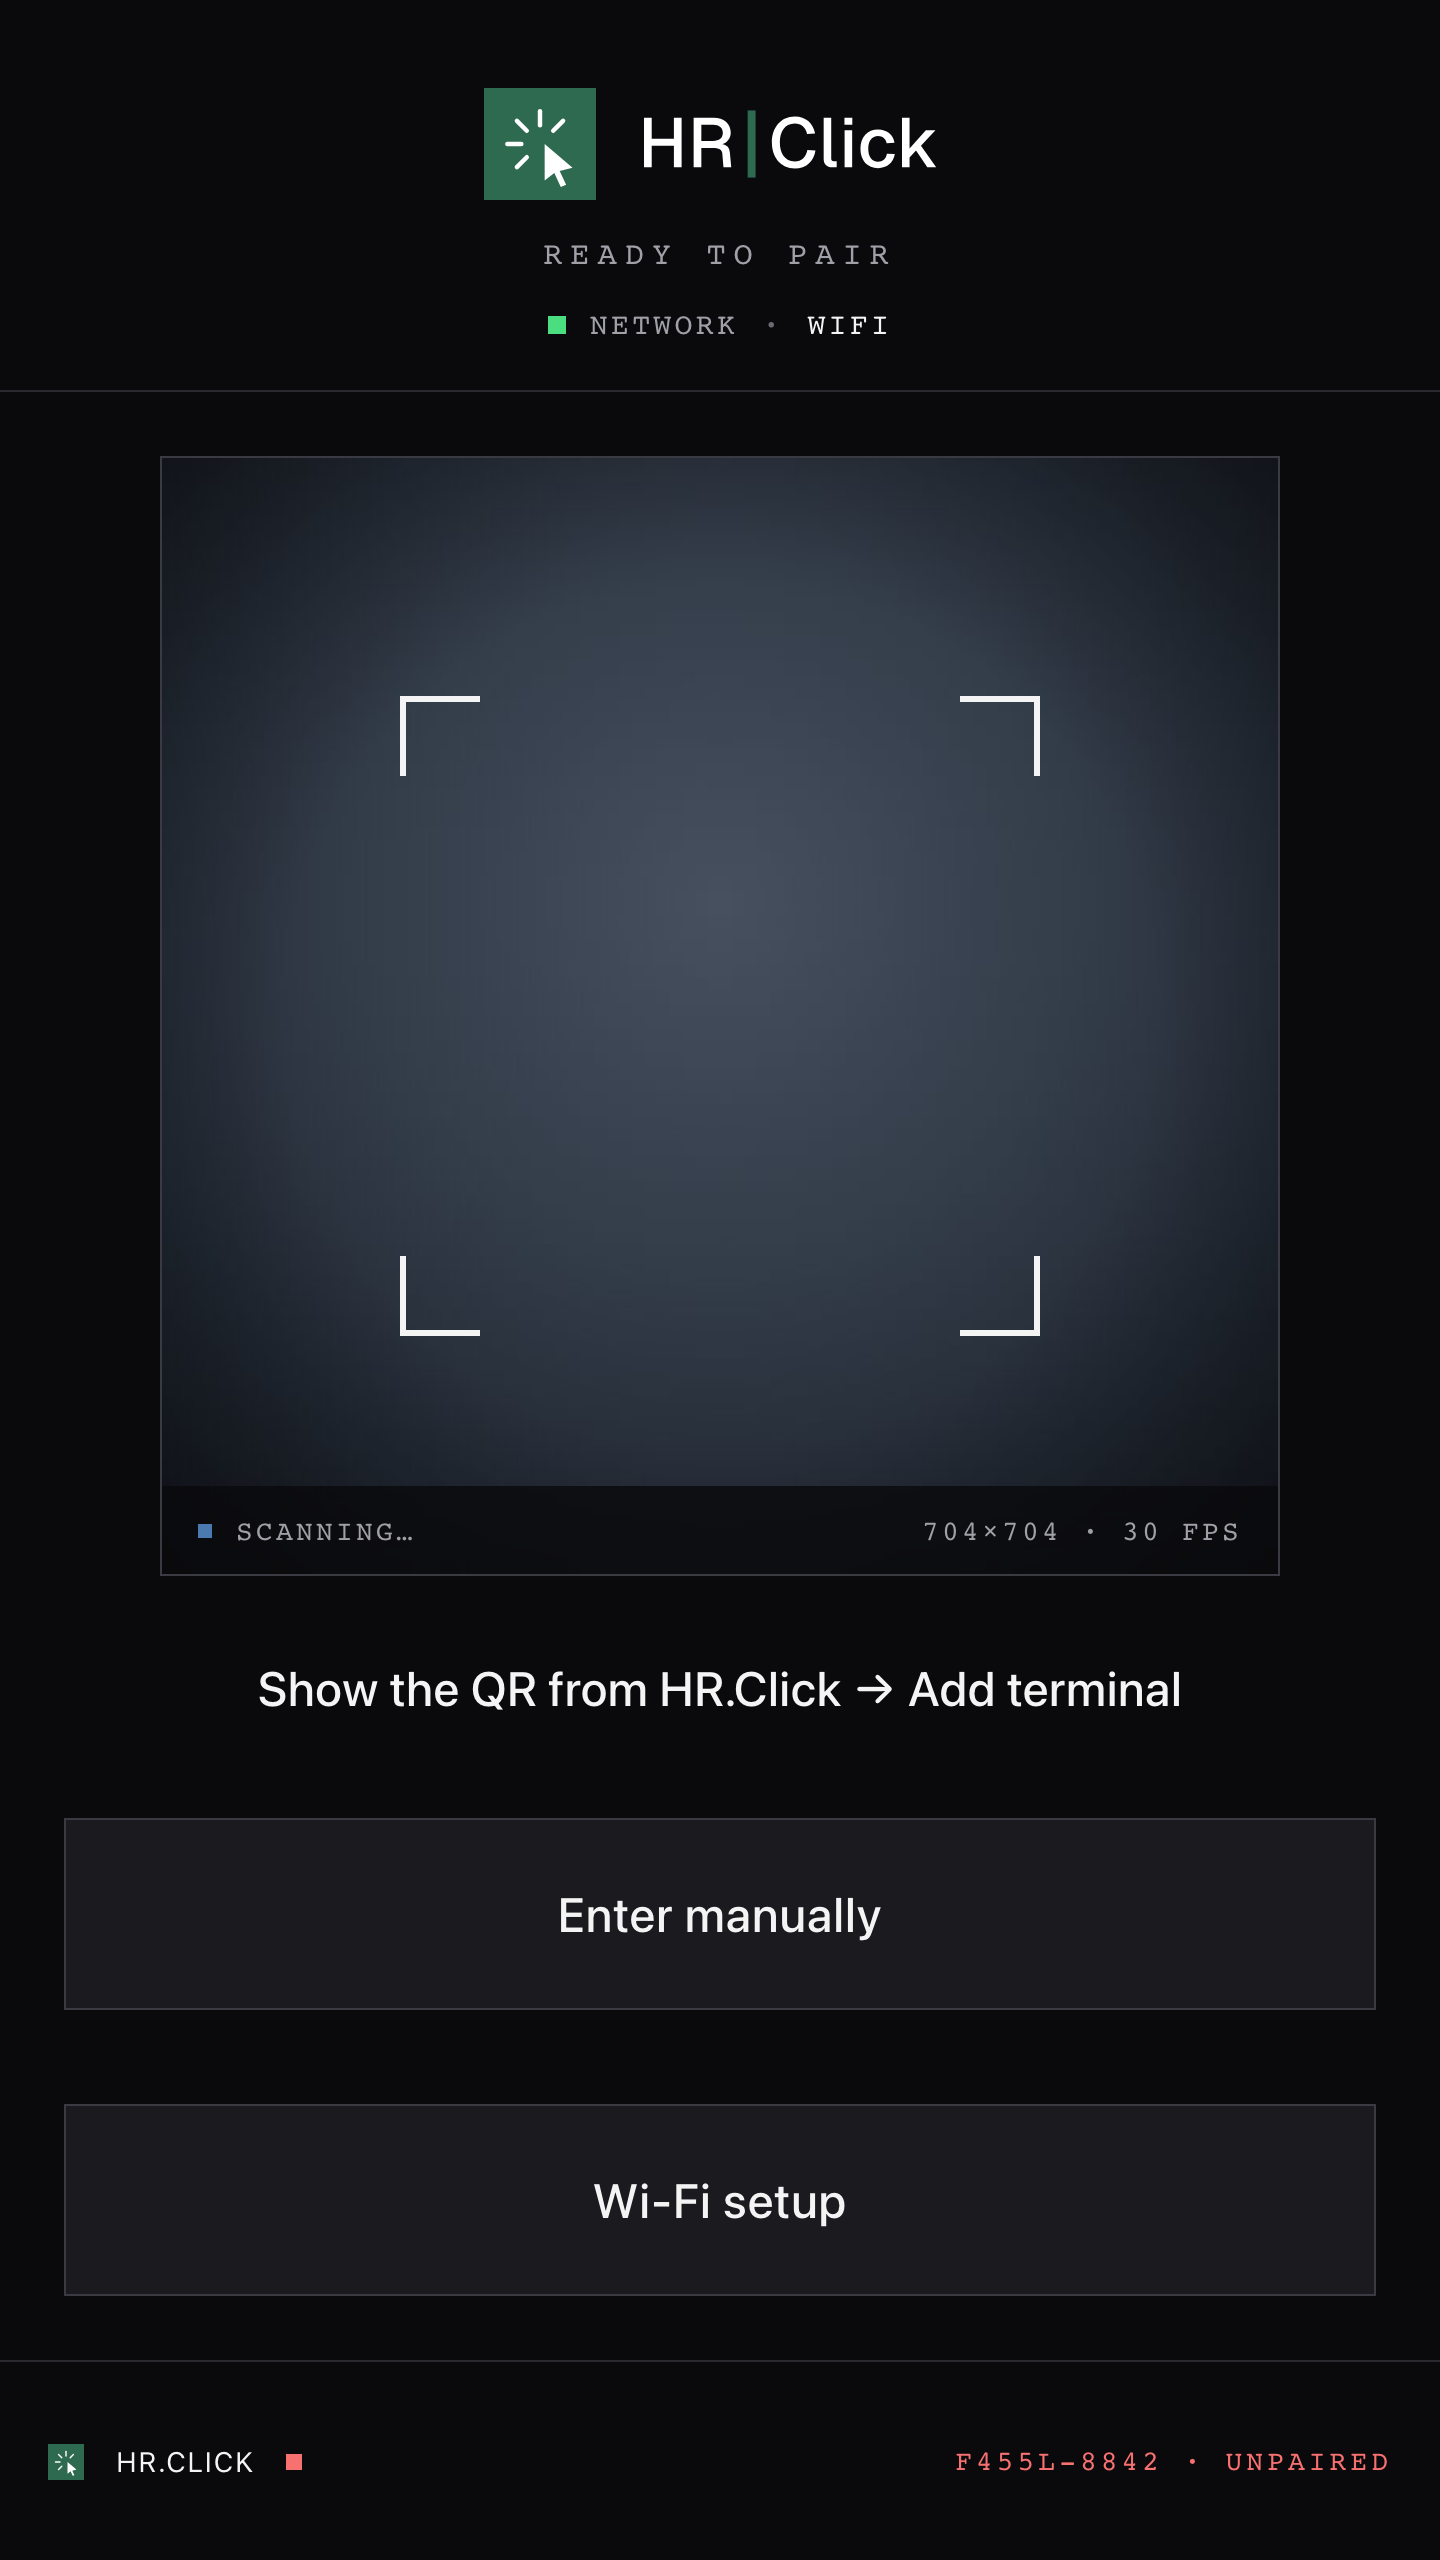
The terminal ships ready to use. Mount it, connect power, and it boots into the pairing screen (“UNPAIRED” in the footer) — the device is waiting to be connected to your HR.Click instance.
Ethernet
Plug in the cable — no configuration is needed. The terminal picks up the network automatically.
Wi-Fi
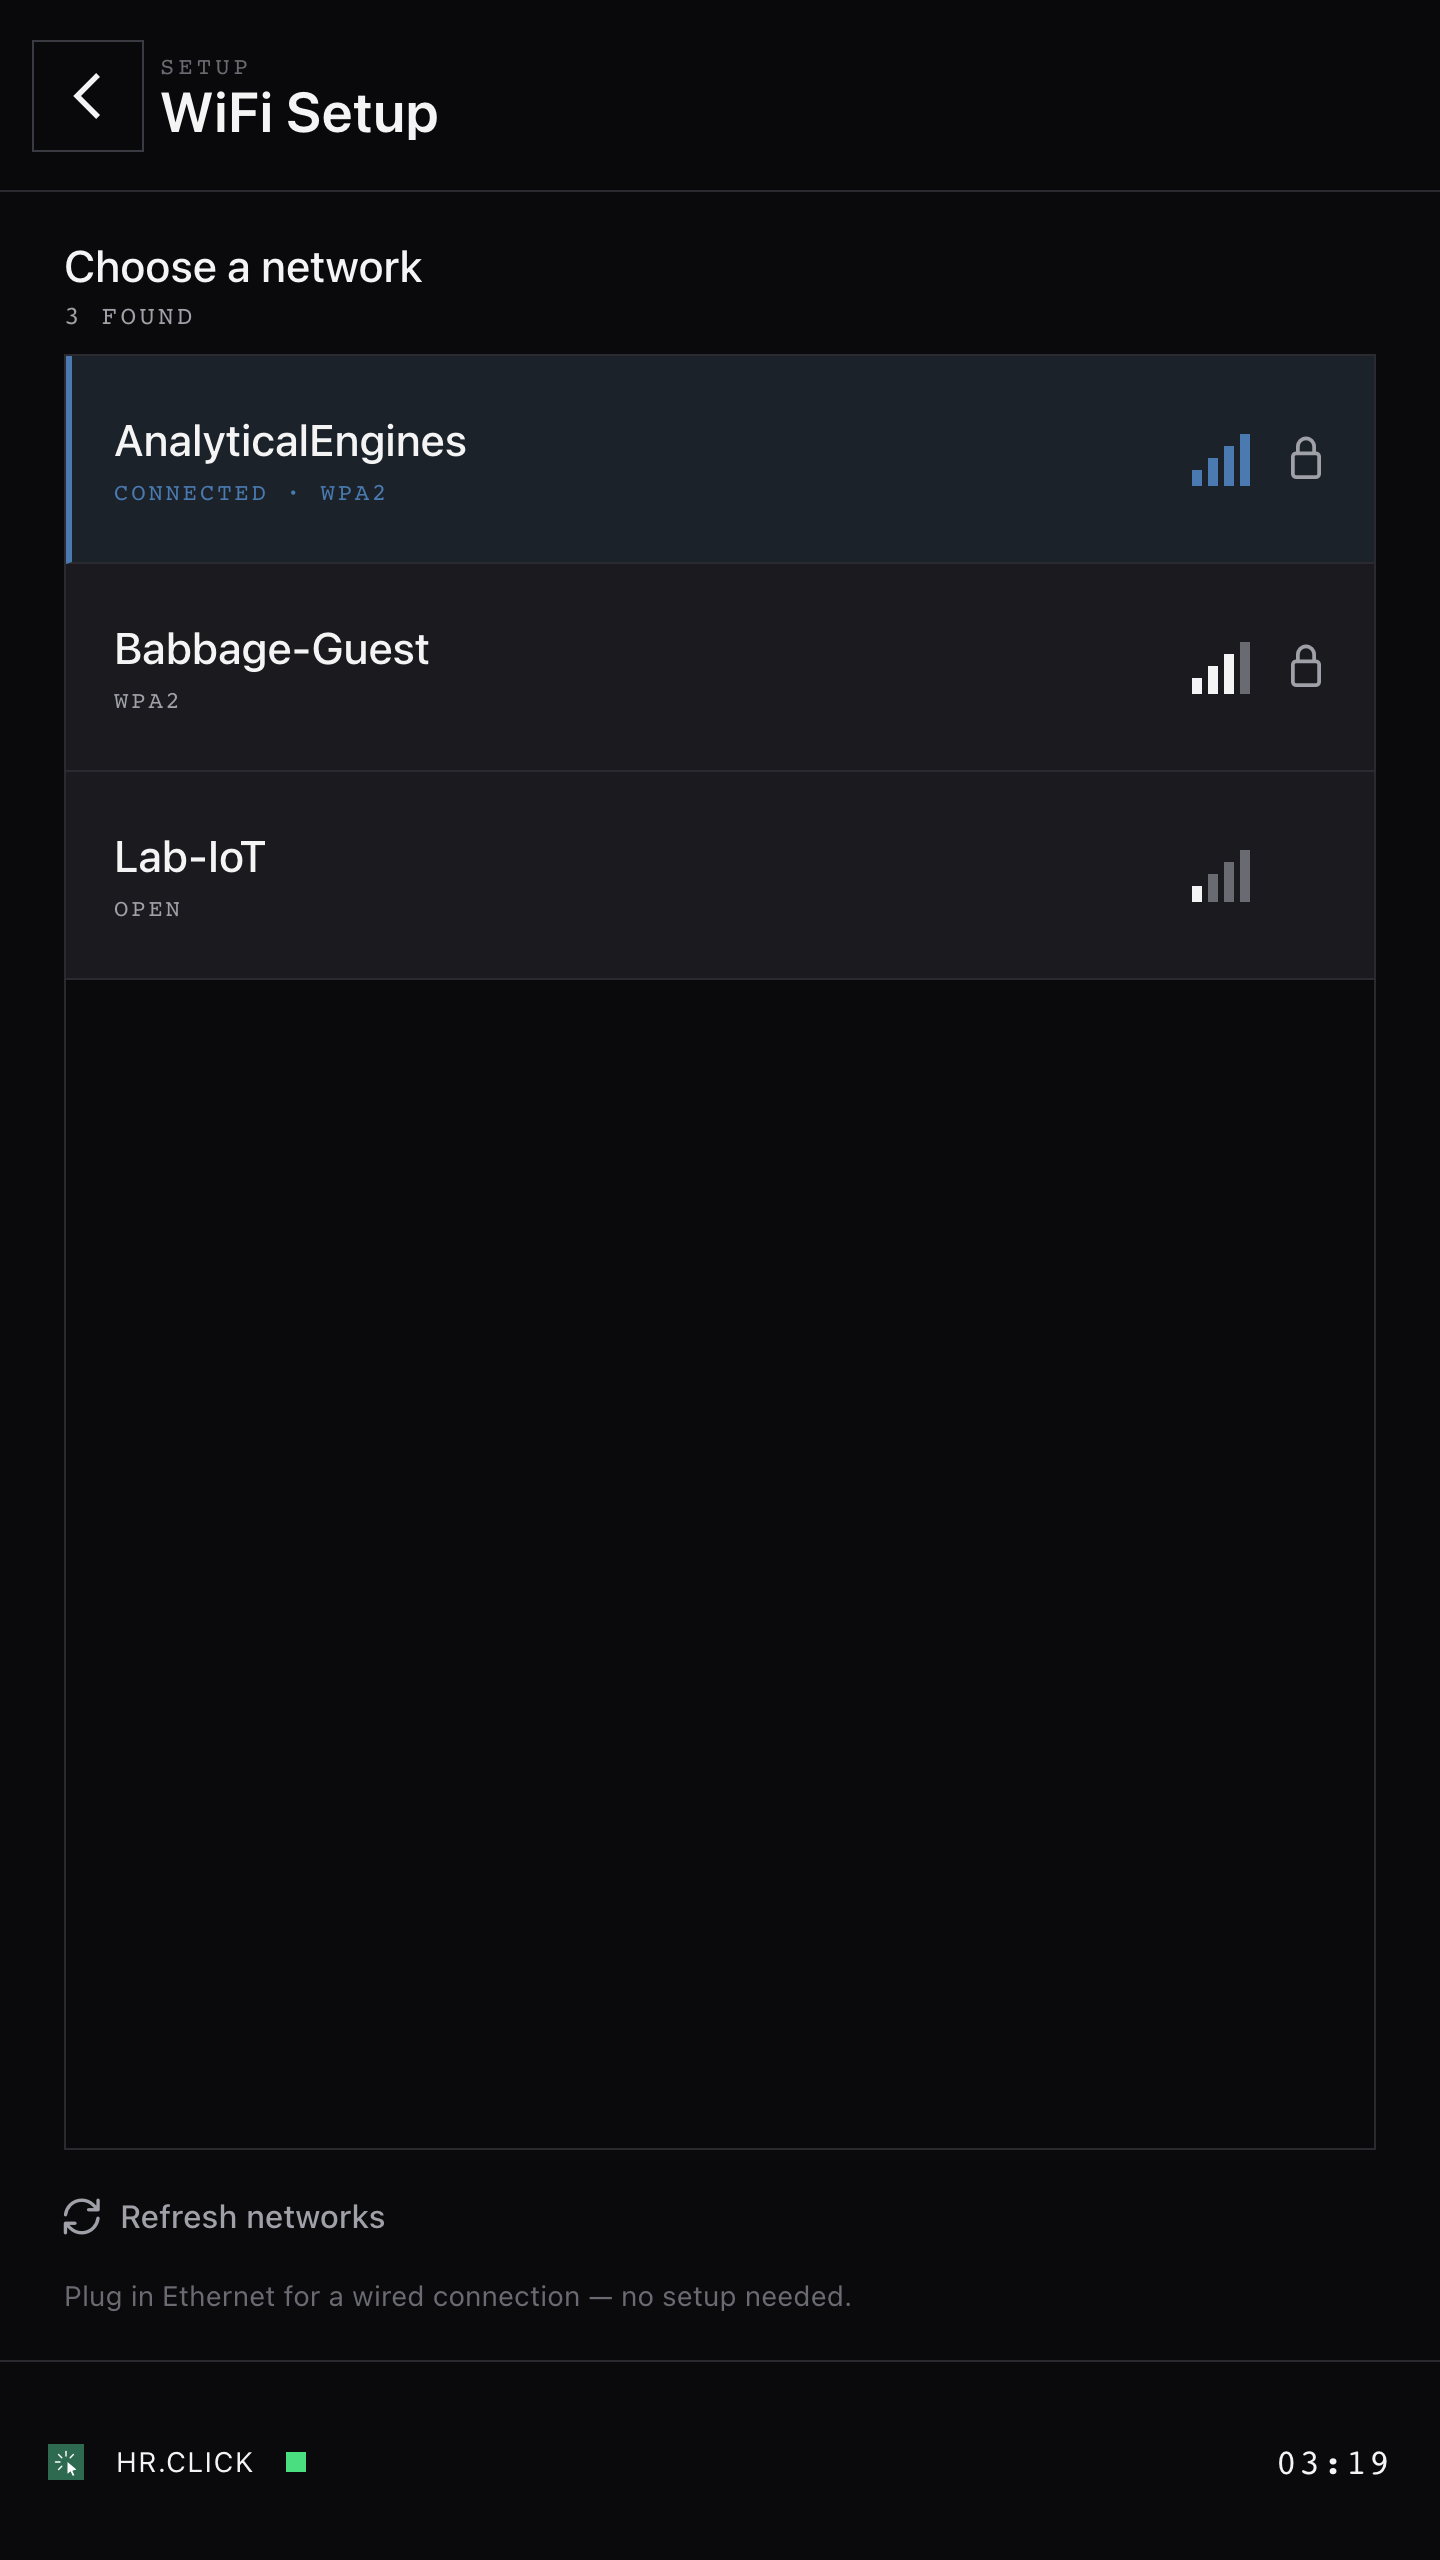
Tap Wi-Fi setup on the pairing screen (if the terminal has no network at all, this screen opens by itself). Pick your network from the list, enter the password using the on-screen keyboard, and tap Connect.
When you generate a pairing code in the web app you can embed the Wi-Fi credentials into the pairing QR code (section 6). A brand-new terminal then joins Wi-Fi and pairs in one scan.
6Pairing the terminal with HR.Click
Pairing links the physical device to your HR.Click instance and one of your offices. You will need the terminal in front of you and a browser session in HR.Click (role: administrator).
In the web app
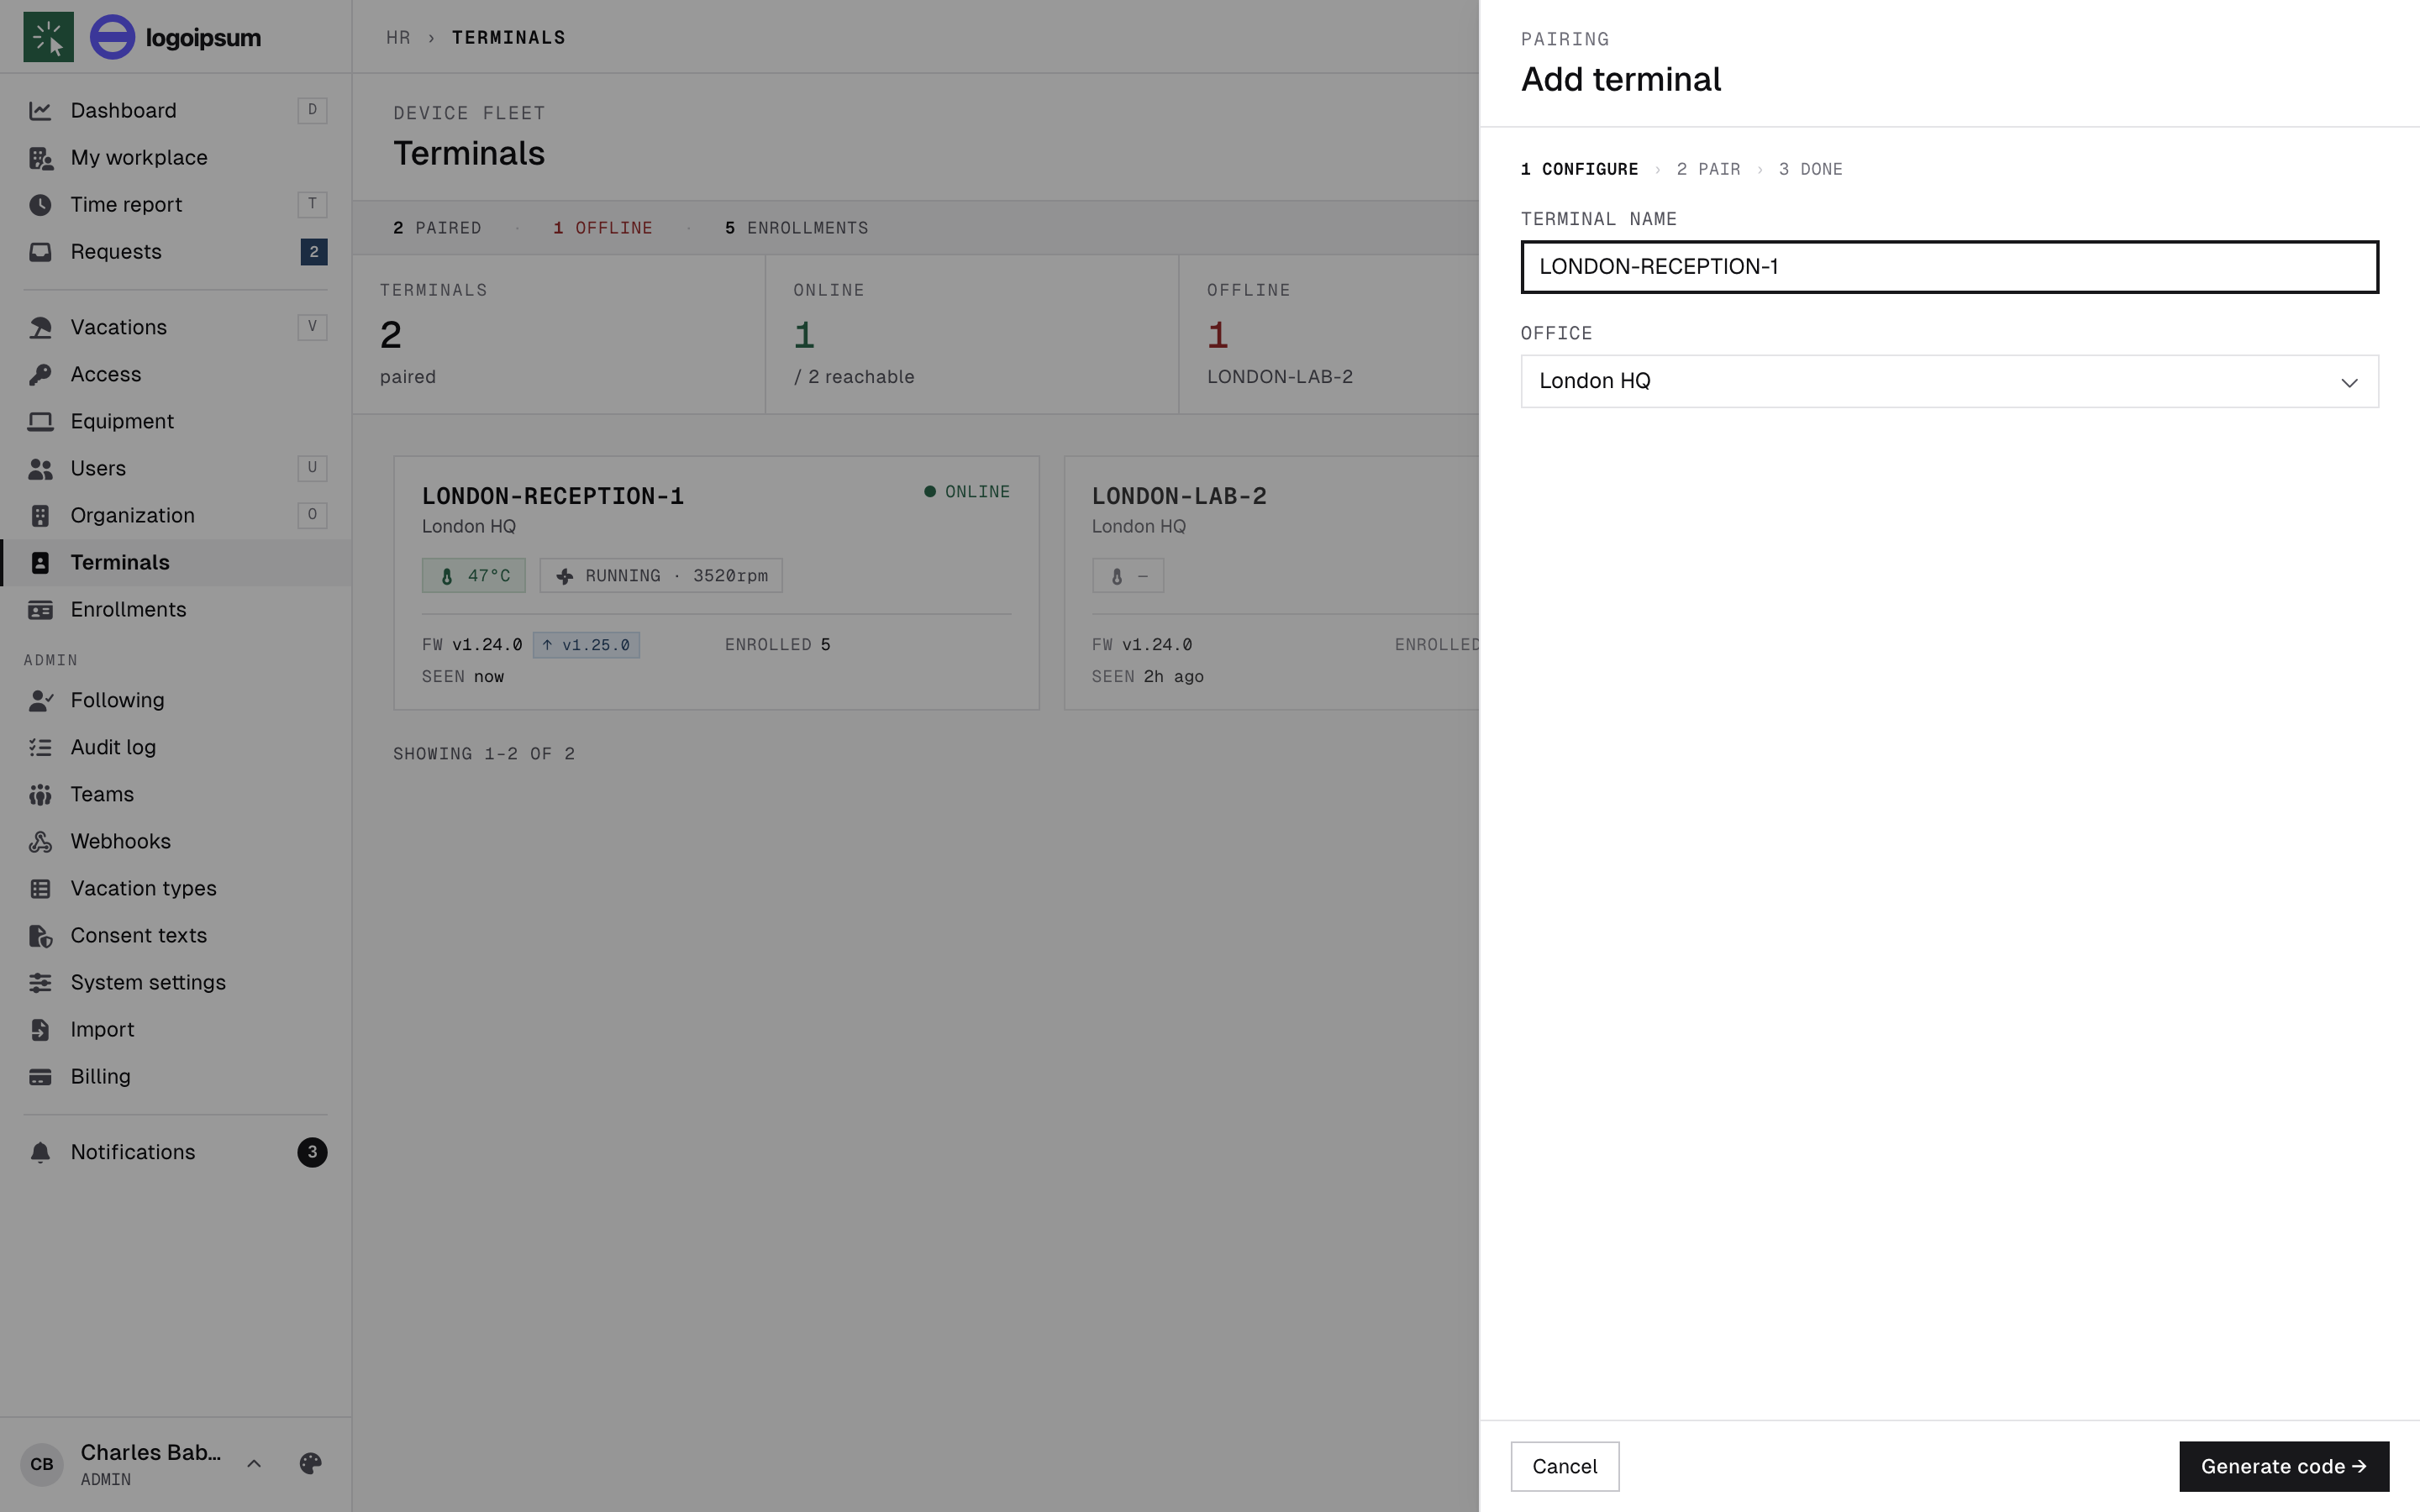
- Open Terminals in the sidebar and click Add terminal.
- Enter a terminal name (e.g.
LONDON-RECEPTION-1), choose the office it belongs to, and click Generate code. - The next screen shows everything the terminal needs: a QR code, a 6-digit PIN, and your instance address.
- Embed Wi-Fi (optional): enter your Wi-Fi network name and password — they are encrypted into the QR code, and a freshly unboxed terminal will join the network automatically when it scans it. The password is never shown or sent in plain text.
- Email it to myself: sends the QR code and instructions to your mailbox — handy when the person installing the terminal is somewhere else.
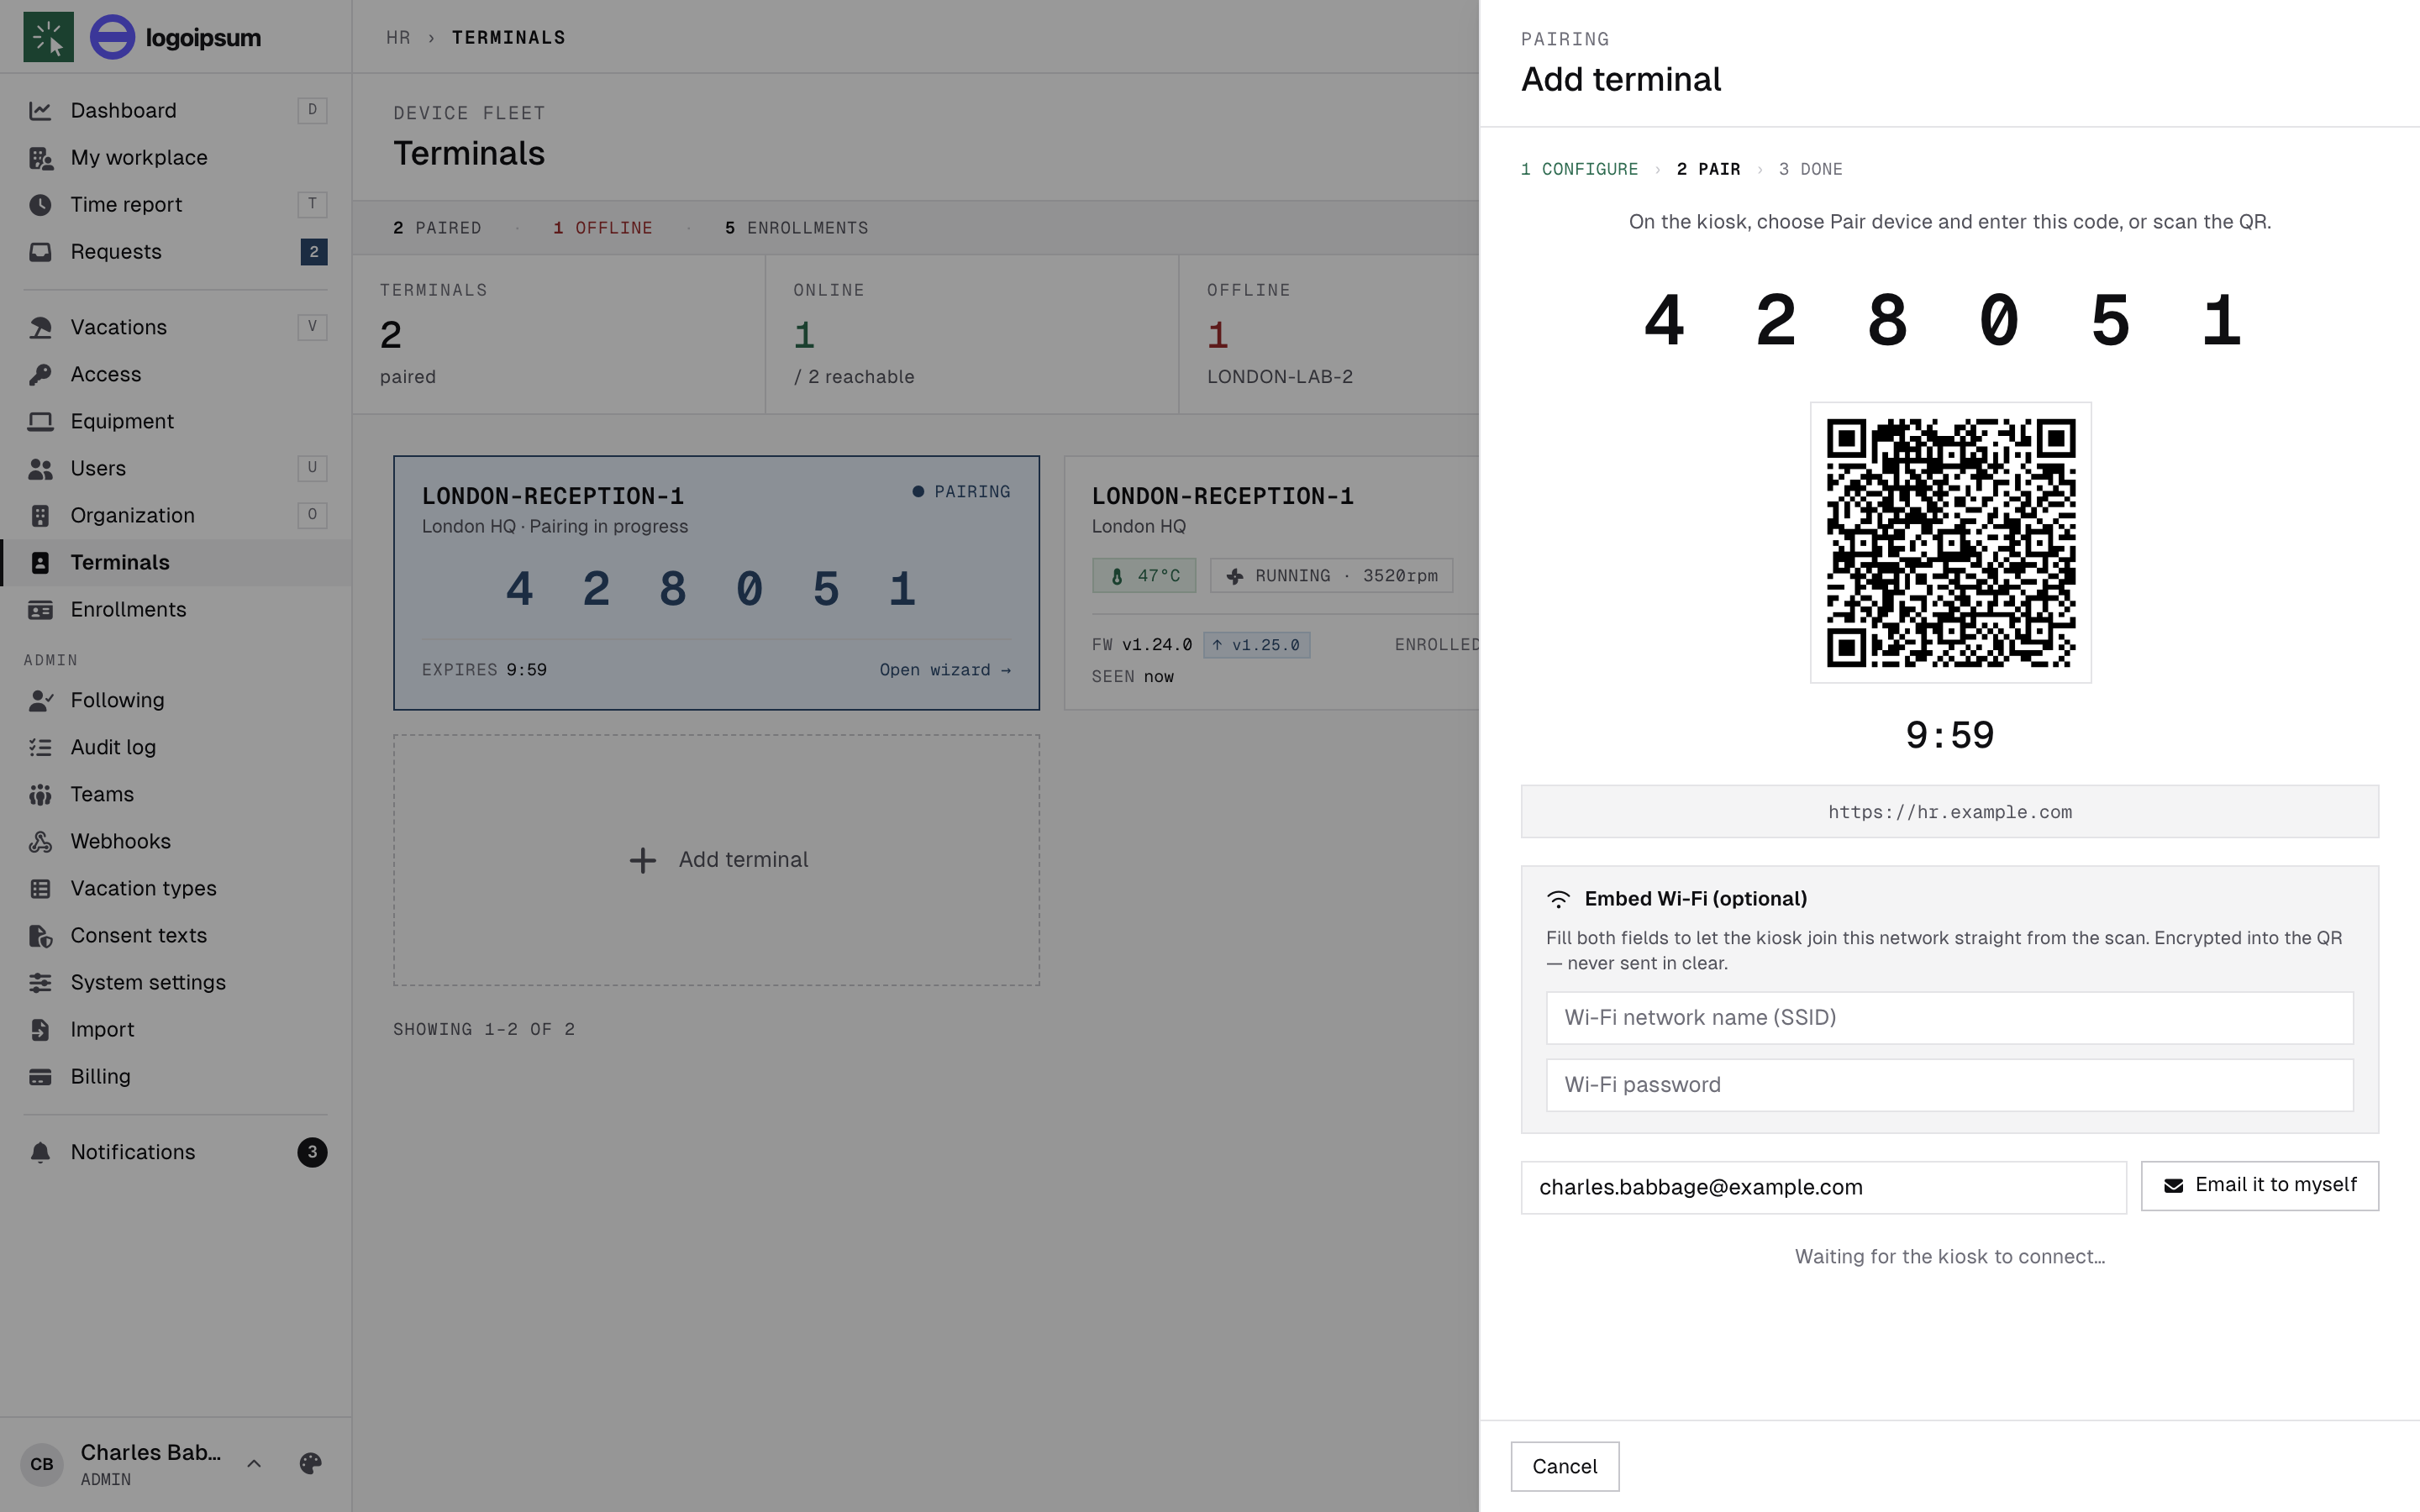
A pairing code is valid for 10 minutes. If it runs out, click Regenerate code — nothing else changes.
On the terminal
- Scan the QR code shown in the web app (or emailed to you) — hold it up to the terminal’s camera. This is the fastest way: the address, PIN and (optionally) Wi-Fi are all in the code.
- Or pair manually: tap Enter manually, type your instance address (e.g.
https://yourcompany.hr.click), then the 6-digit PIN. - The terminal connects, confirms the instance address, and reports “Terminal is online”. The web wizard flips to Done on its own, and the new terminal appears in the fleet list.
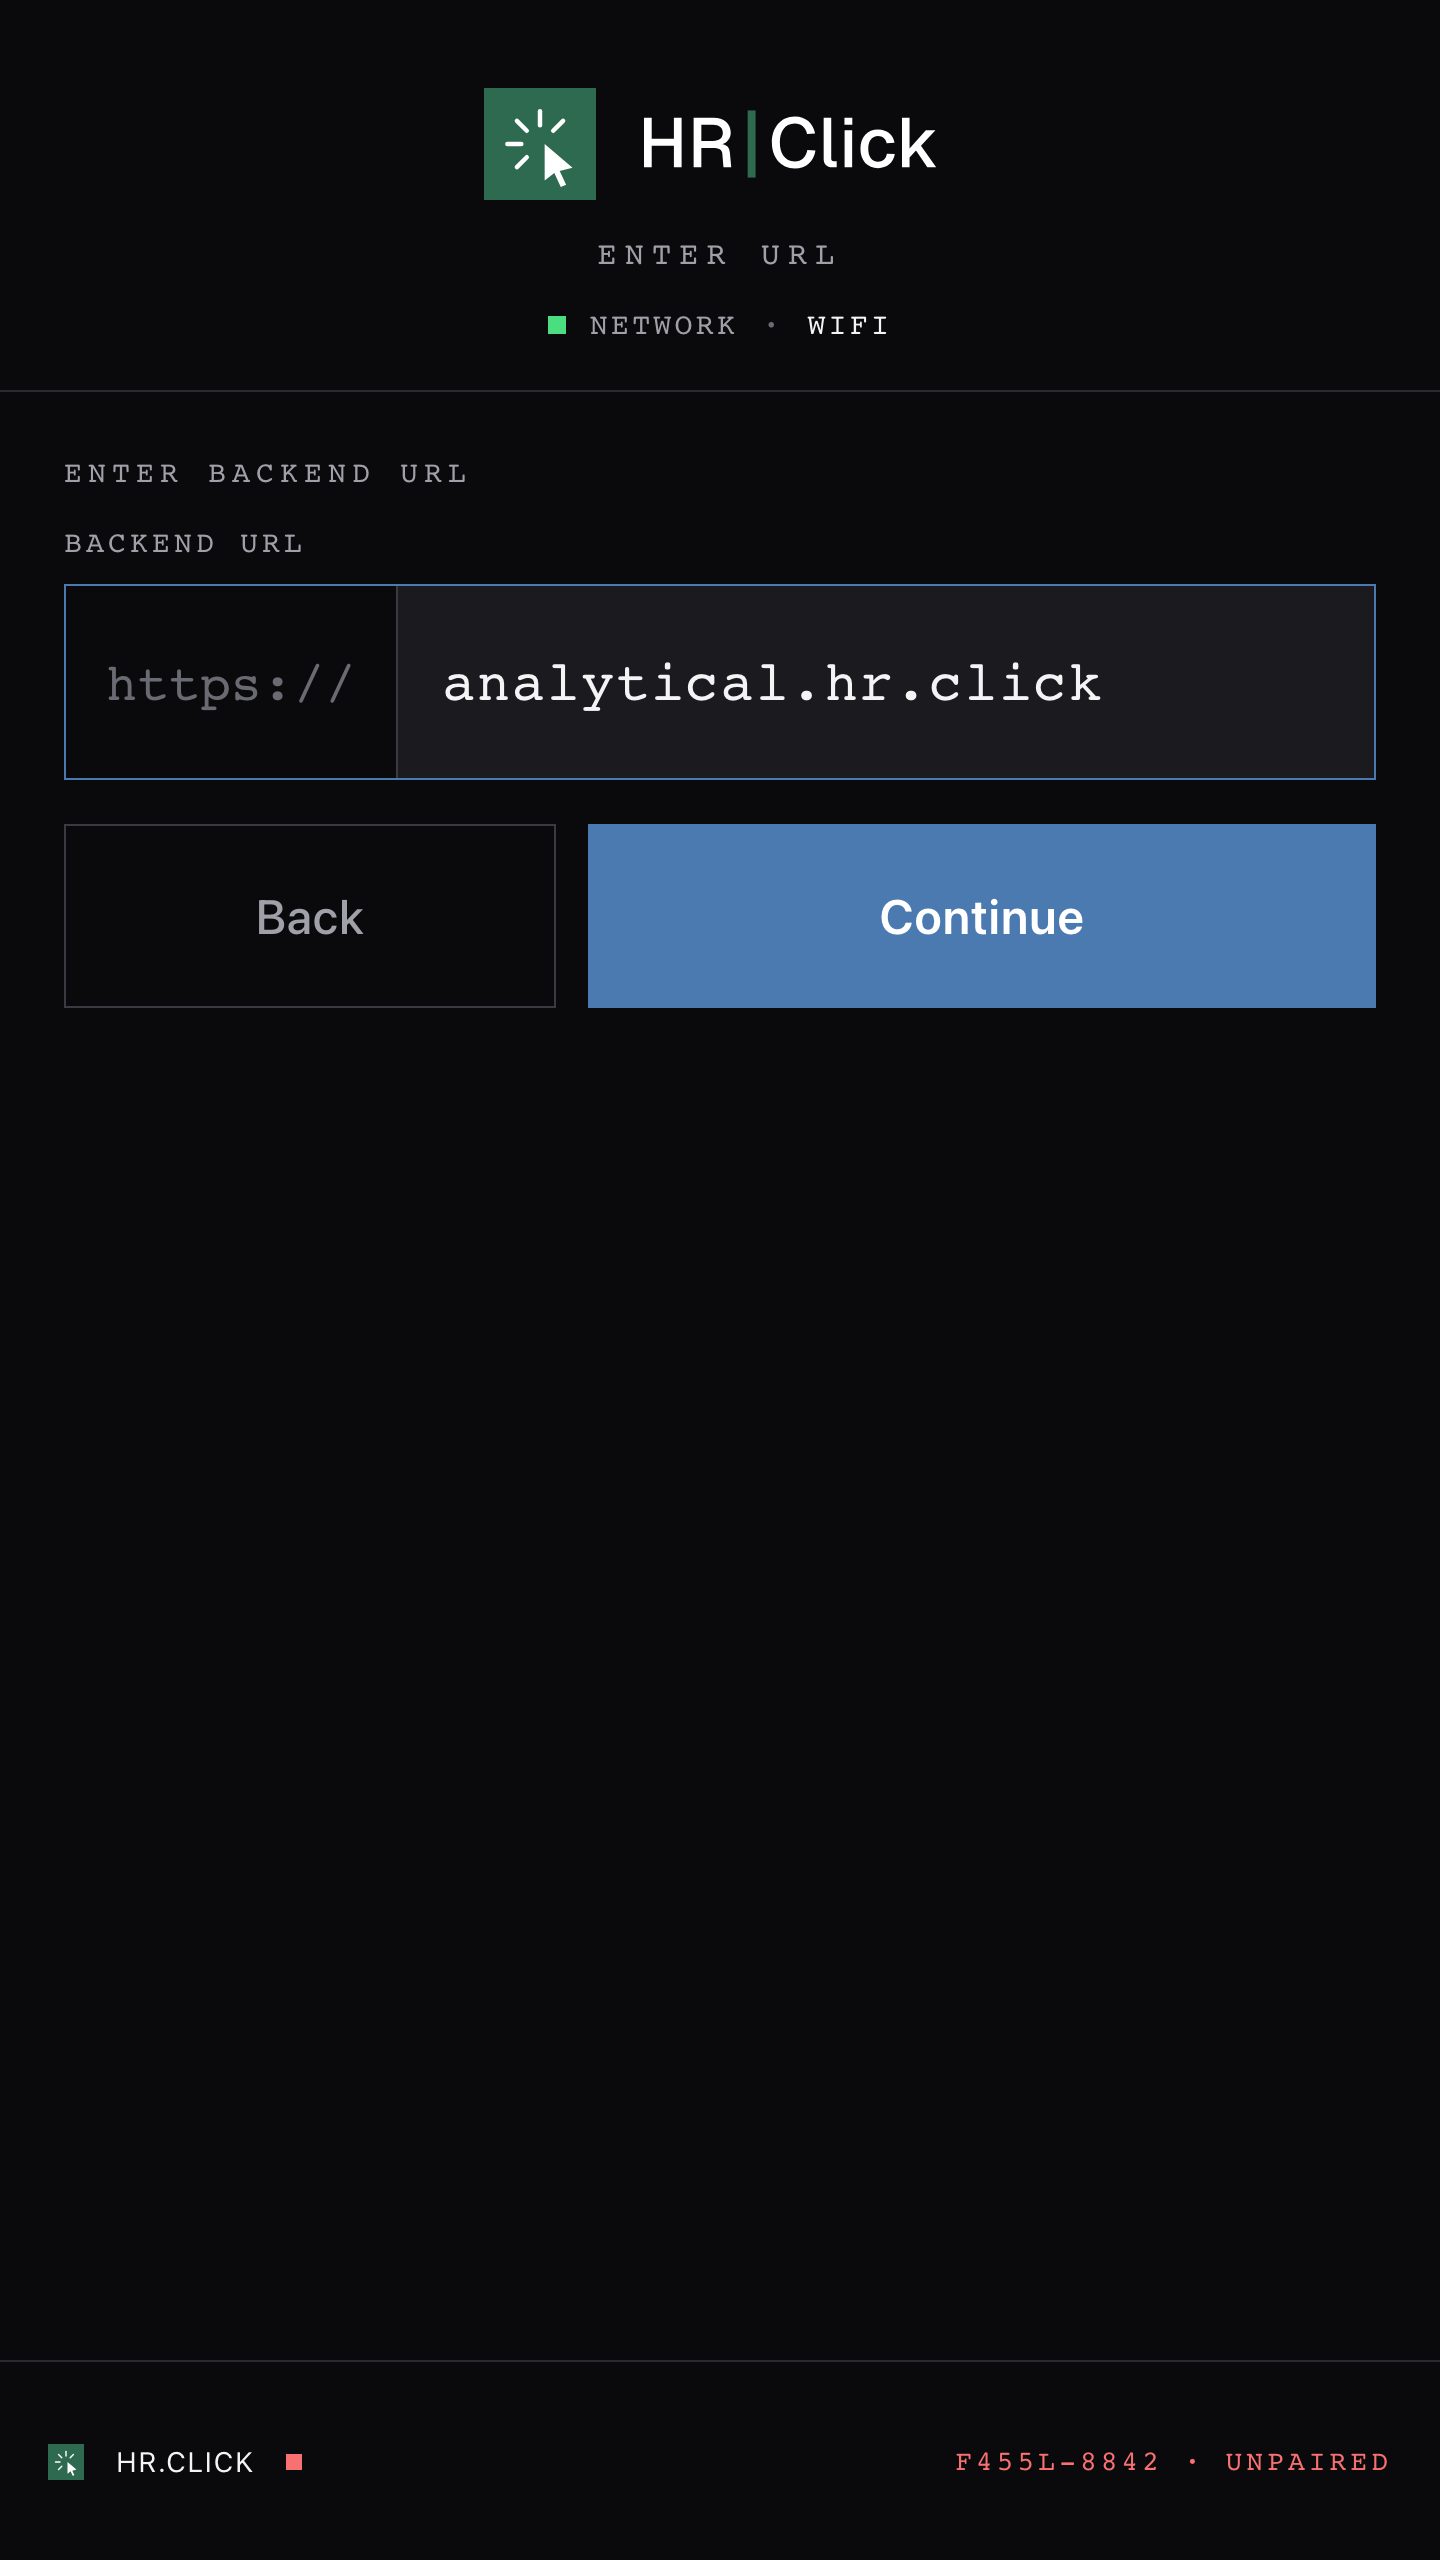
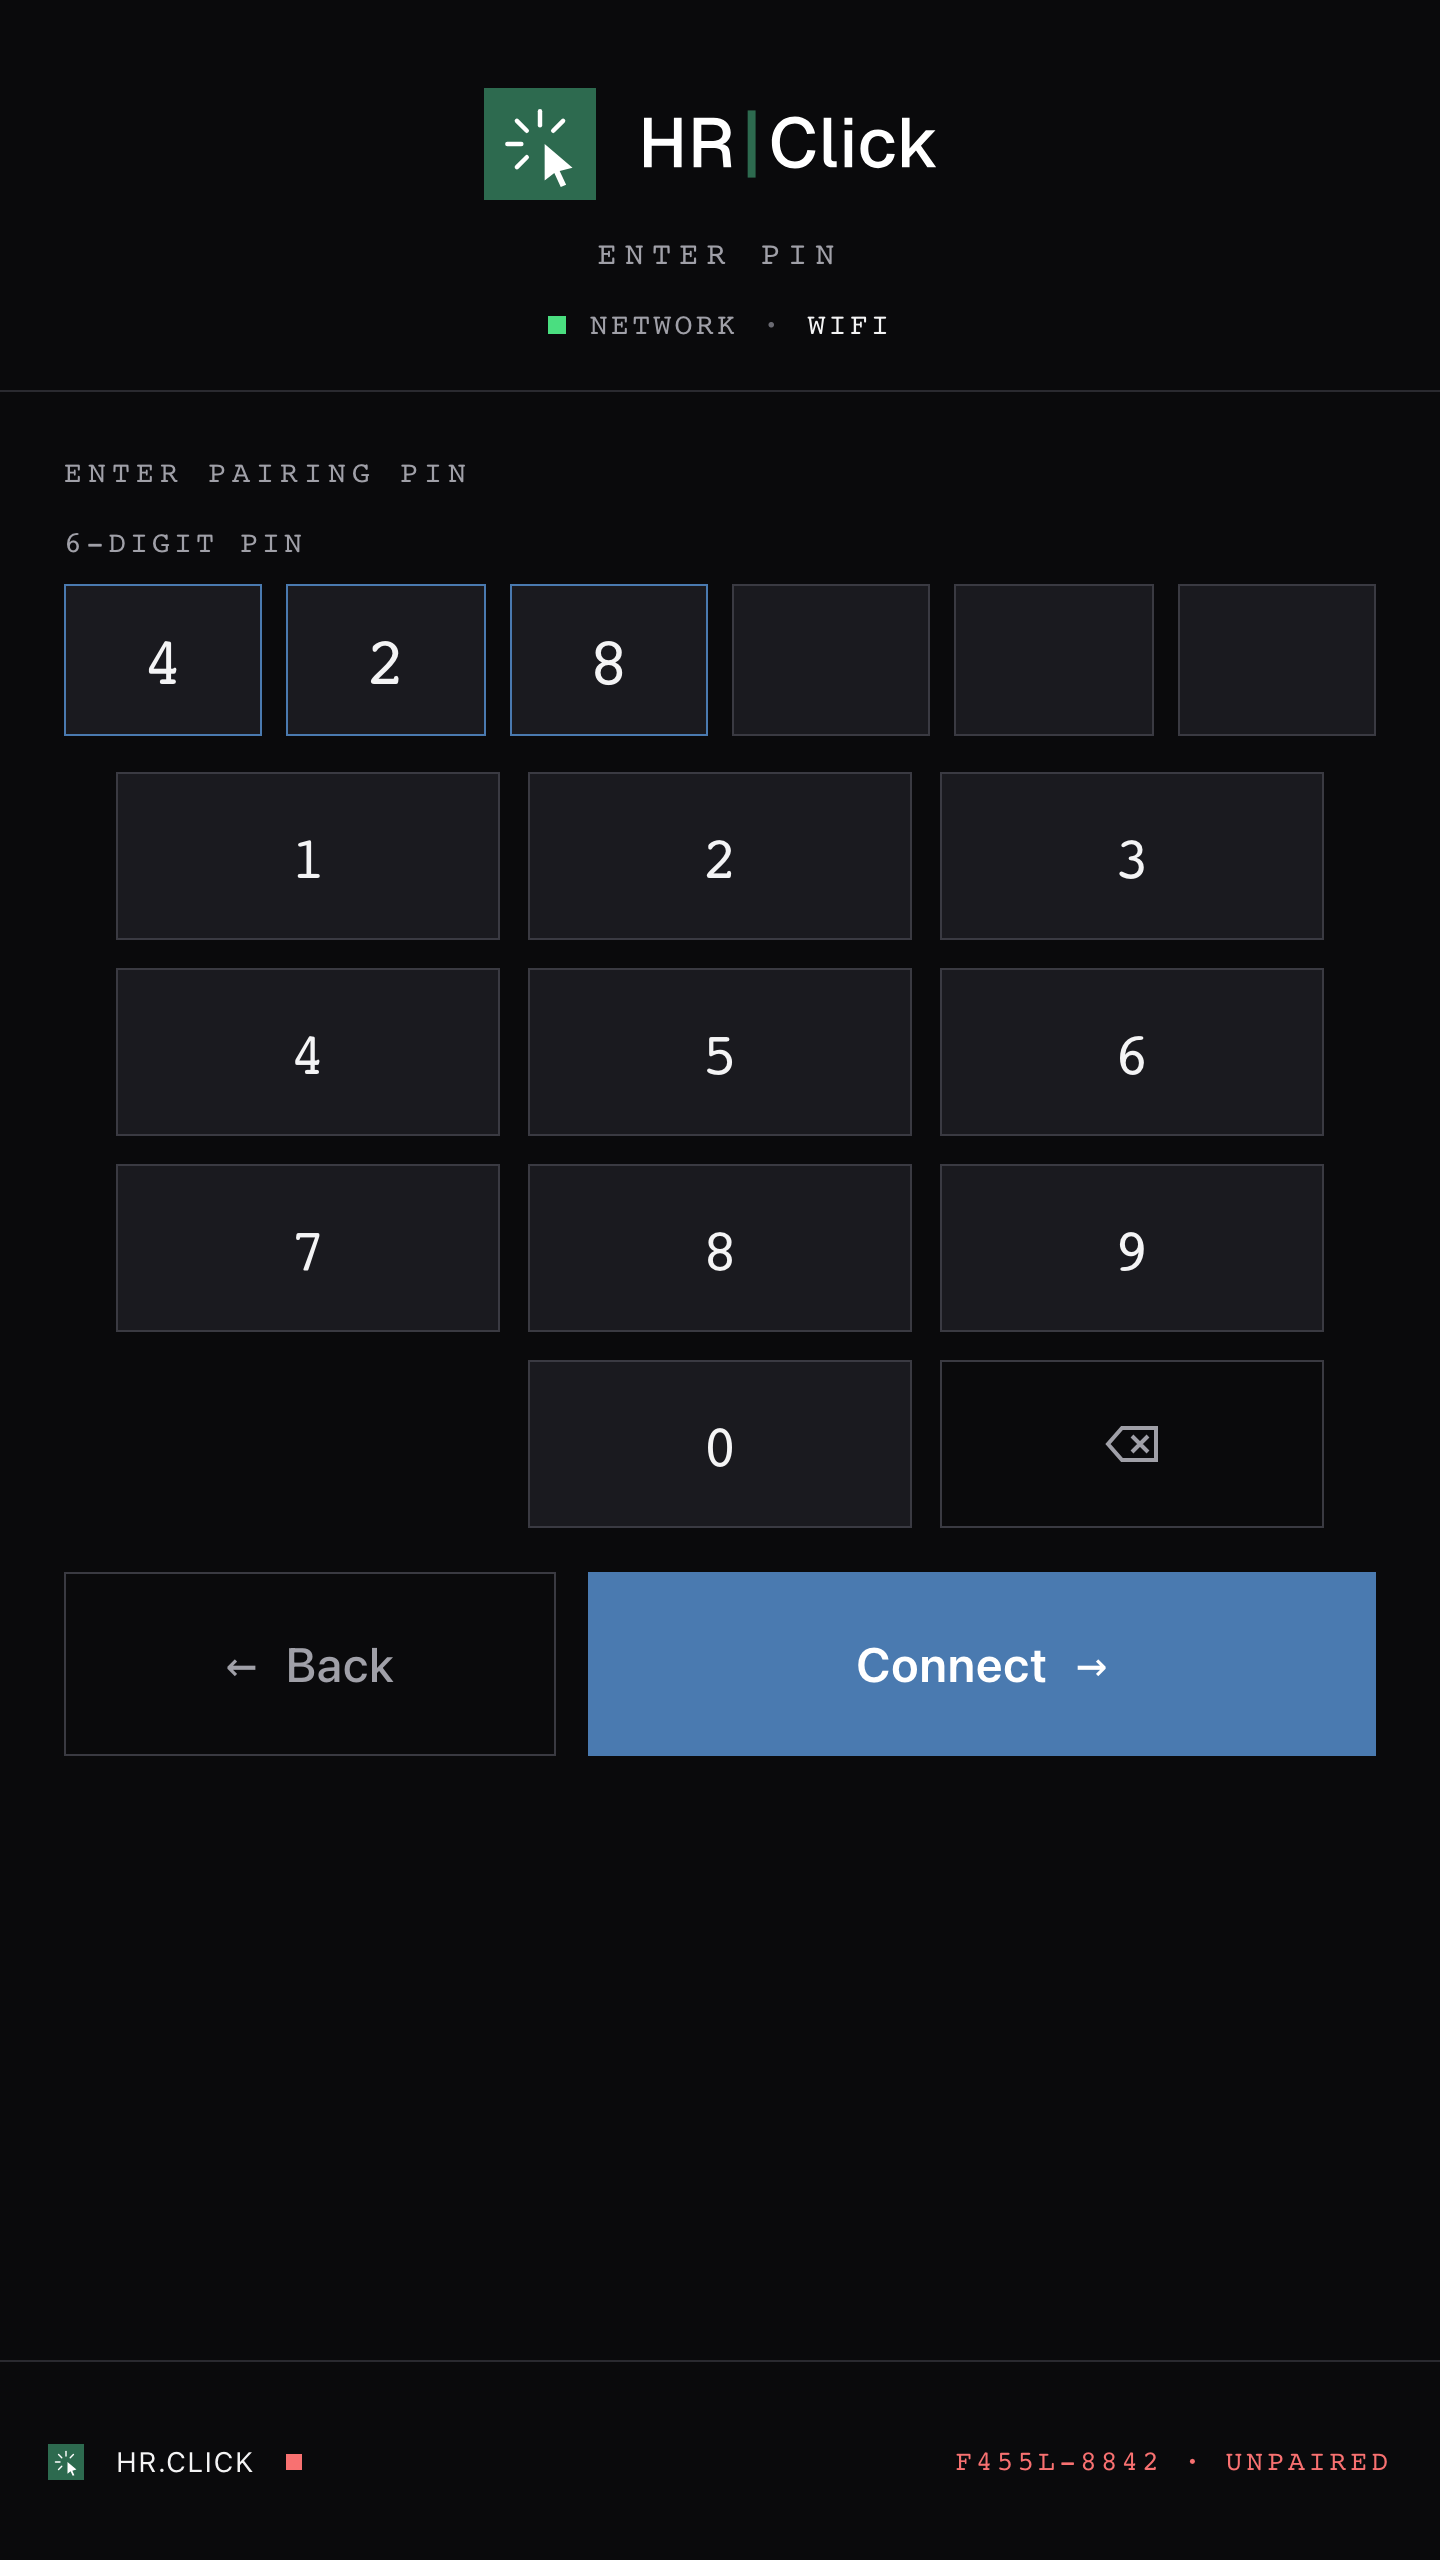
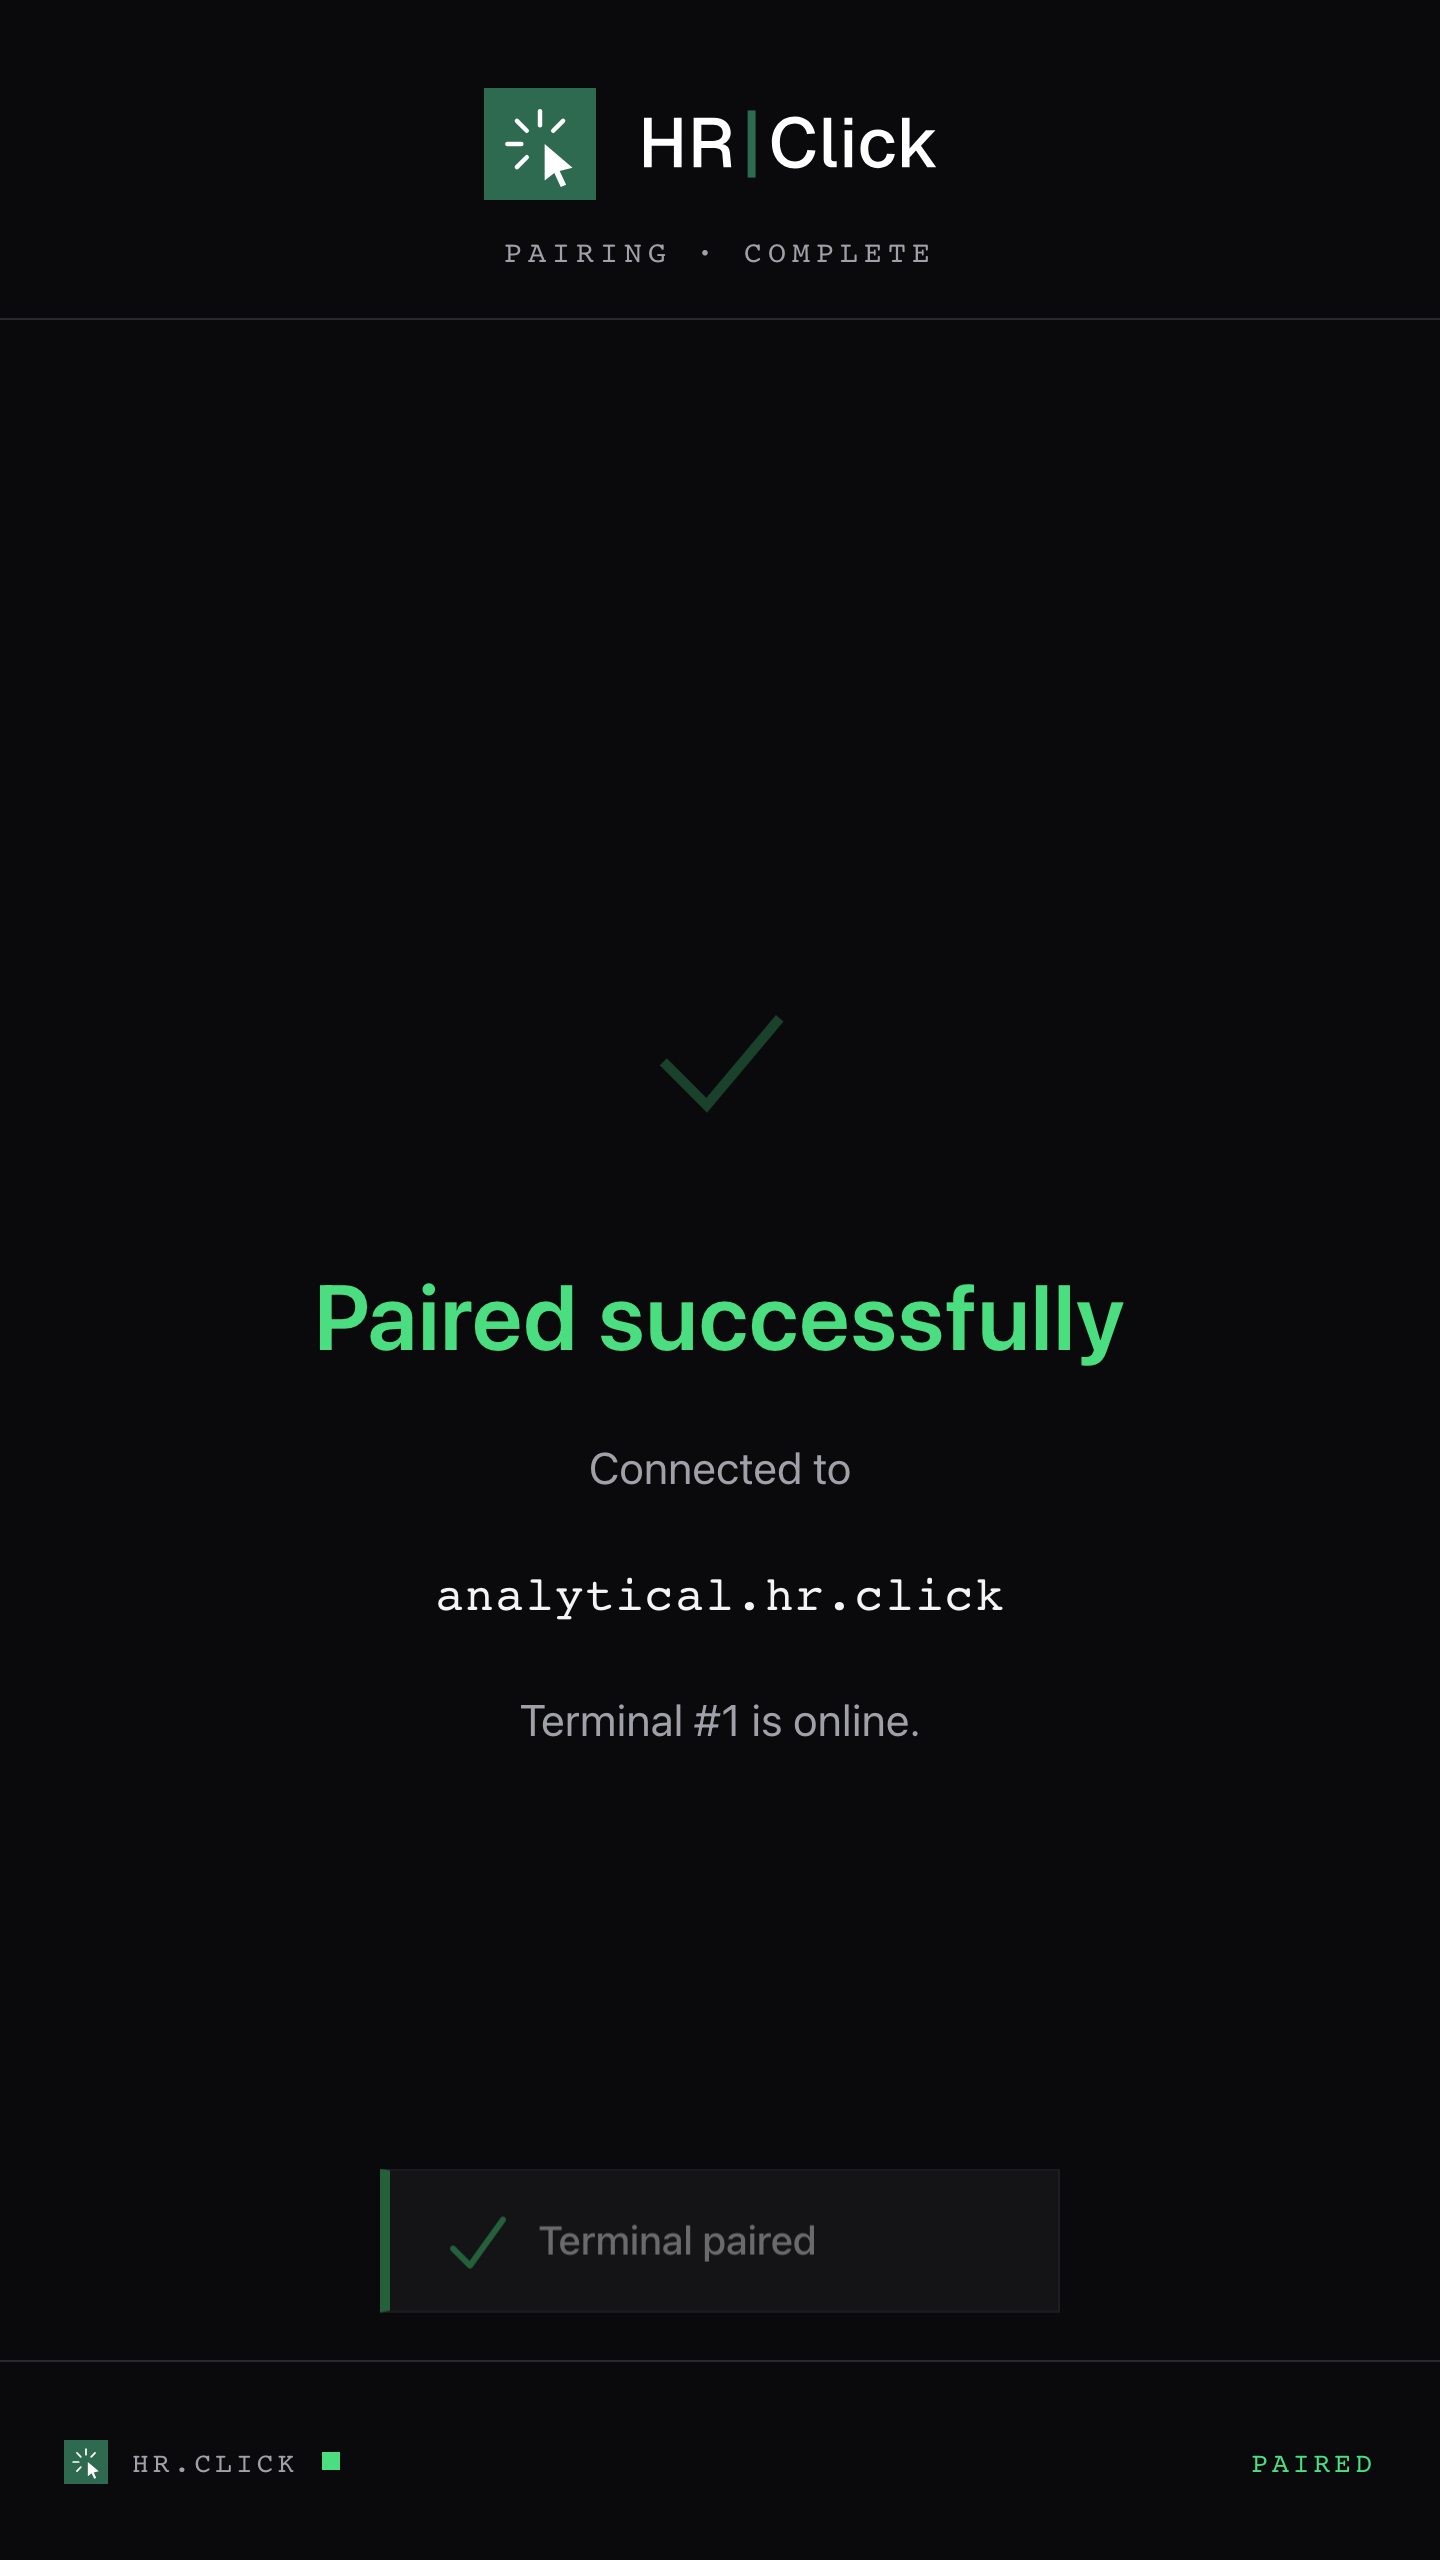
After pairing the terminal automatically downloads the employee list for its office and starts reporting its status to the web every couple of minutes. It is now ready to enrol employees.
7Enrolling employees
Enrollment records an employee’s face template so the terminal can recognise them. It always happens on the terminal, with the employee present — faces cannot be enrolled from the web or from photos.
Before you start
- The employee must already exist in HR.Click and be assigned to the terminal’s office.
- The employee must have terminal access granted in their profile.
- The terminal must be online (enrollment and employee-list sync need connectivity).
On the terminal
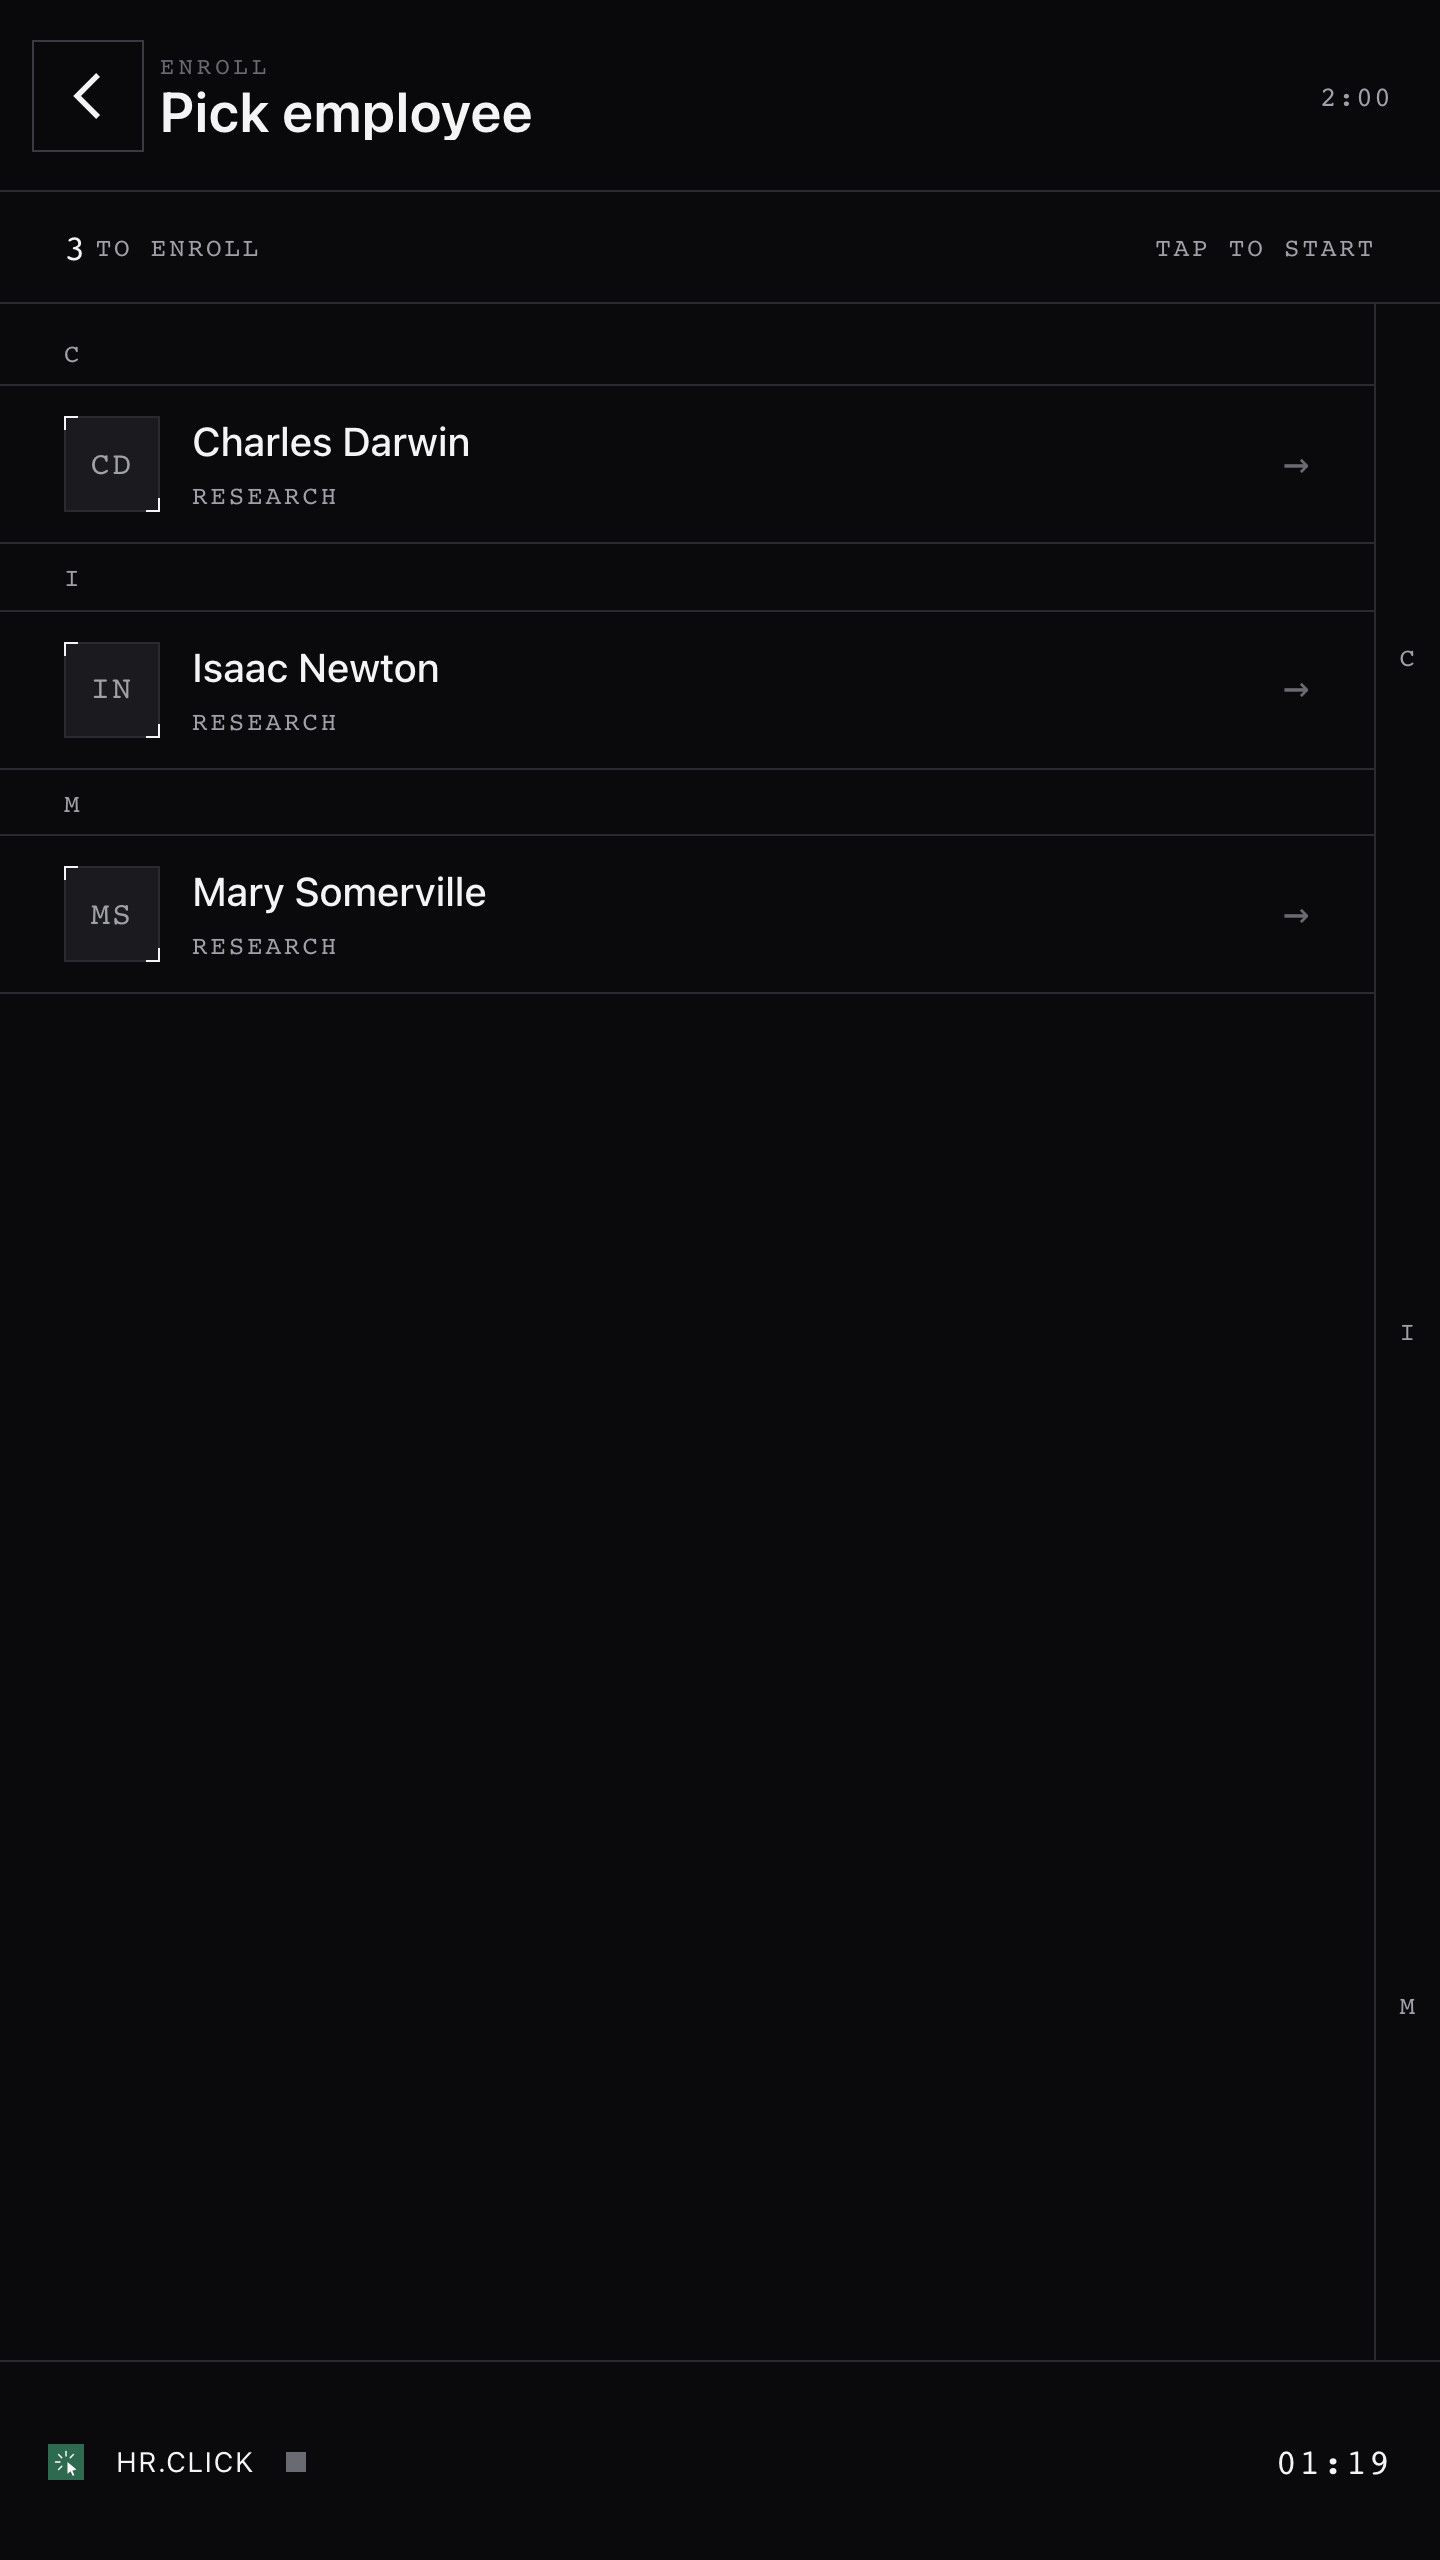
- Open the admin menu (section 8) and tap Enroll.
- Pick the employee from the list — it shows everyone from this office who is not enrolled yet.
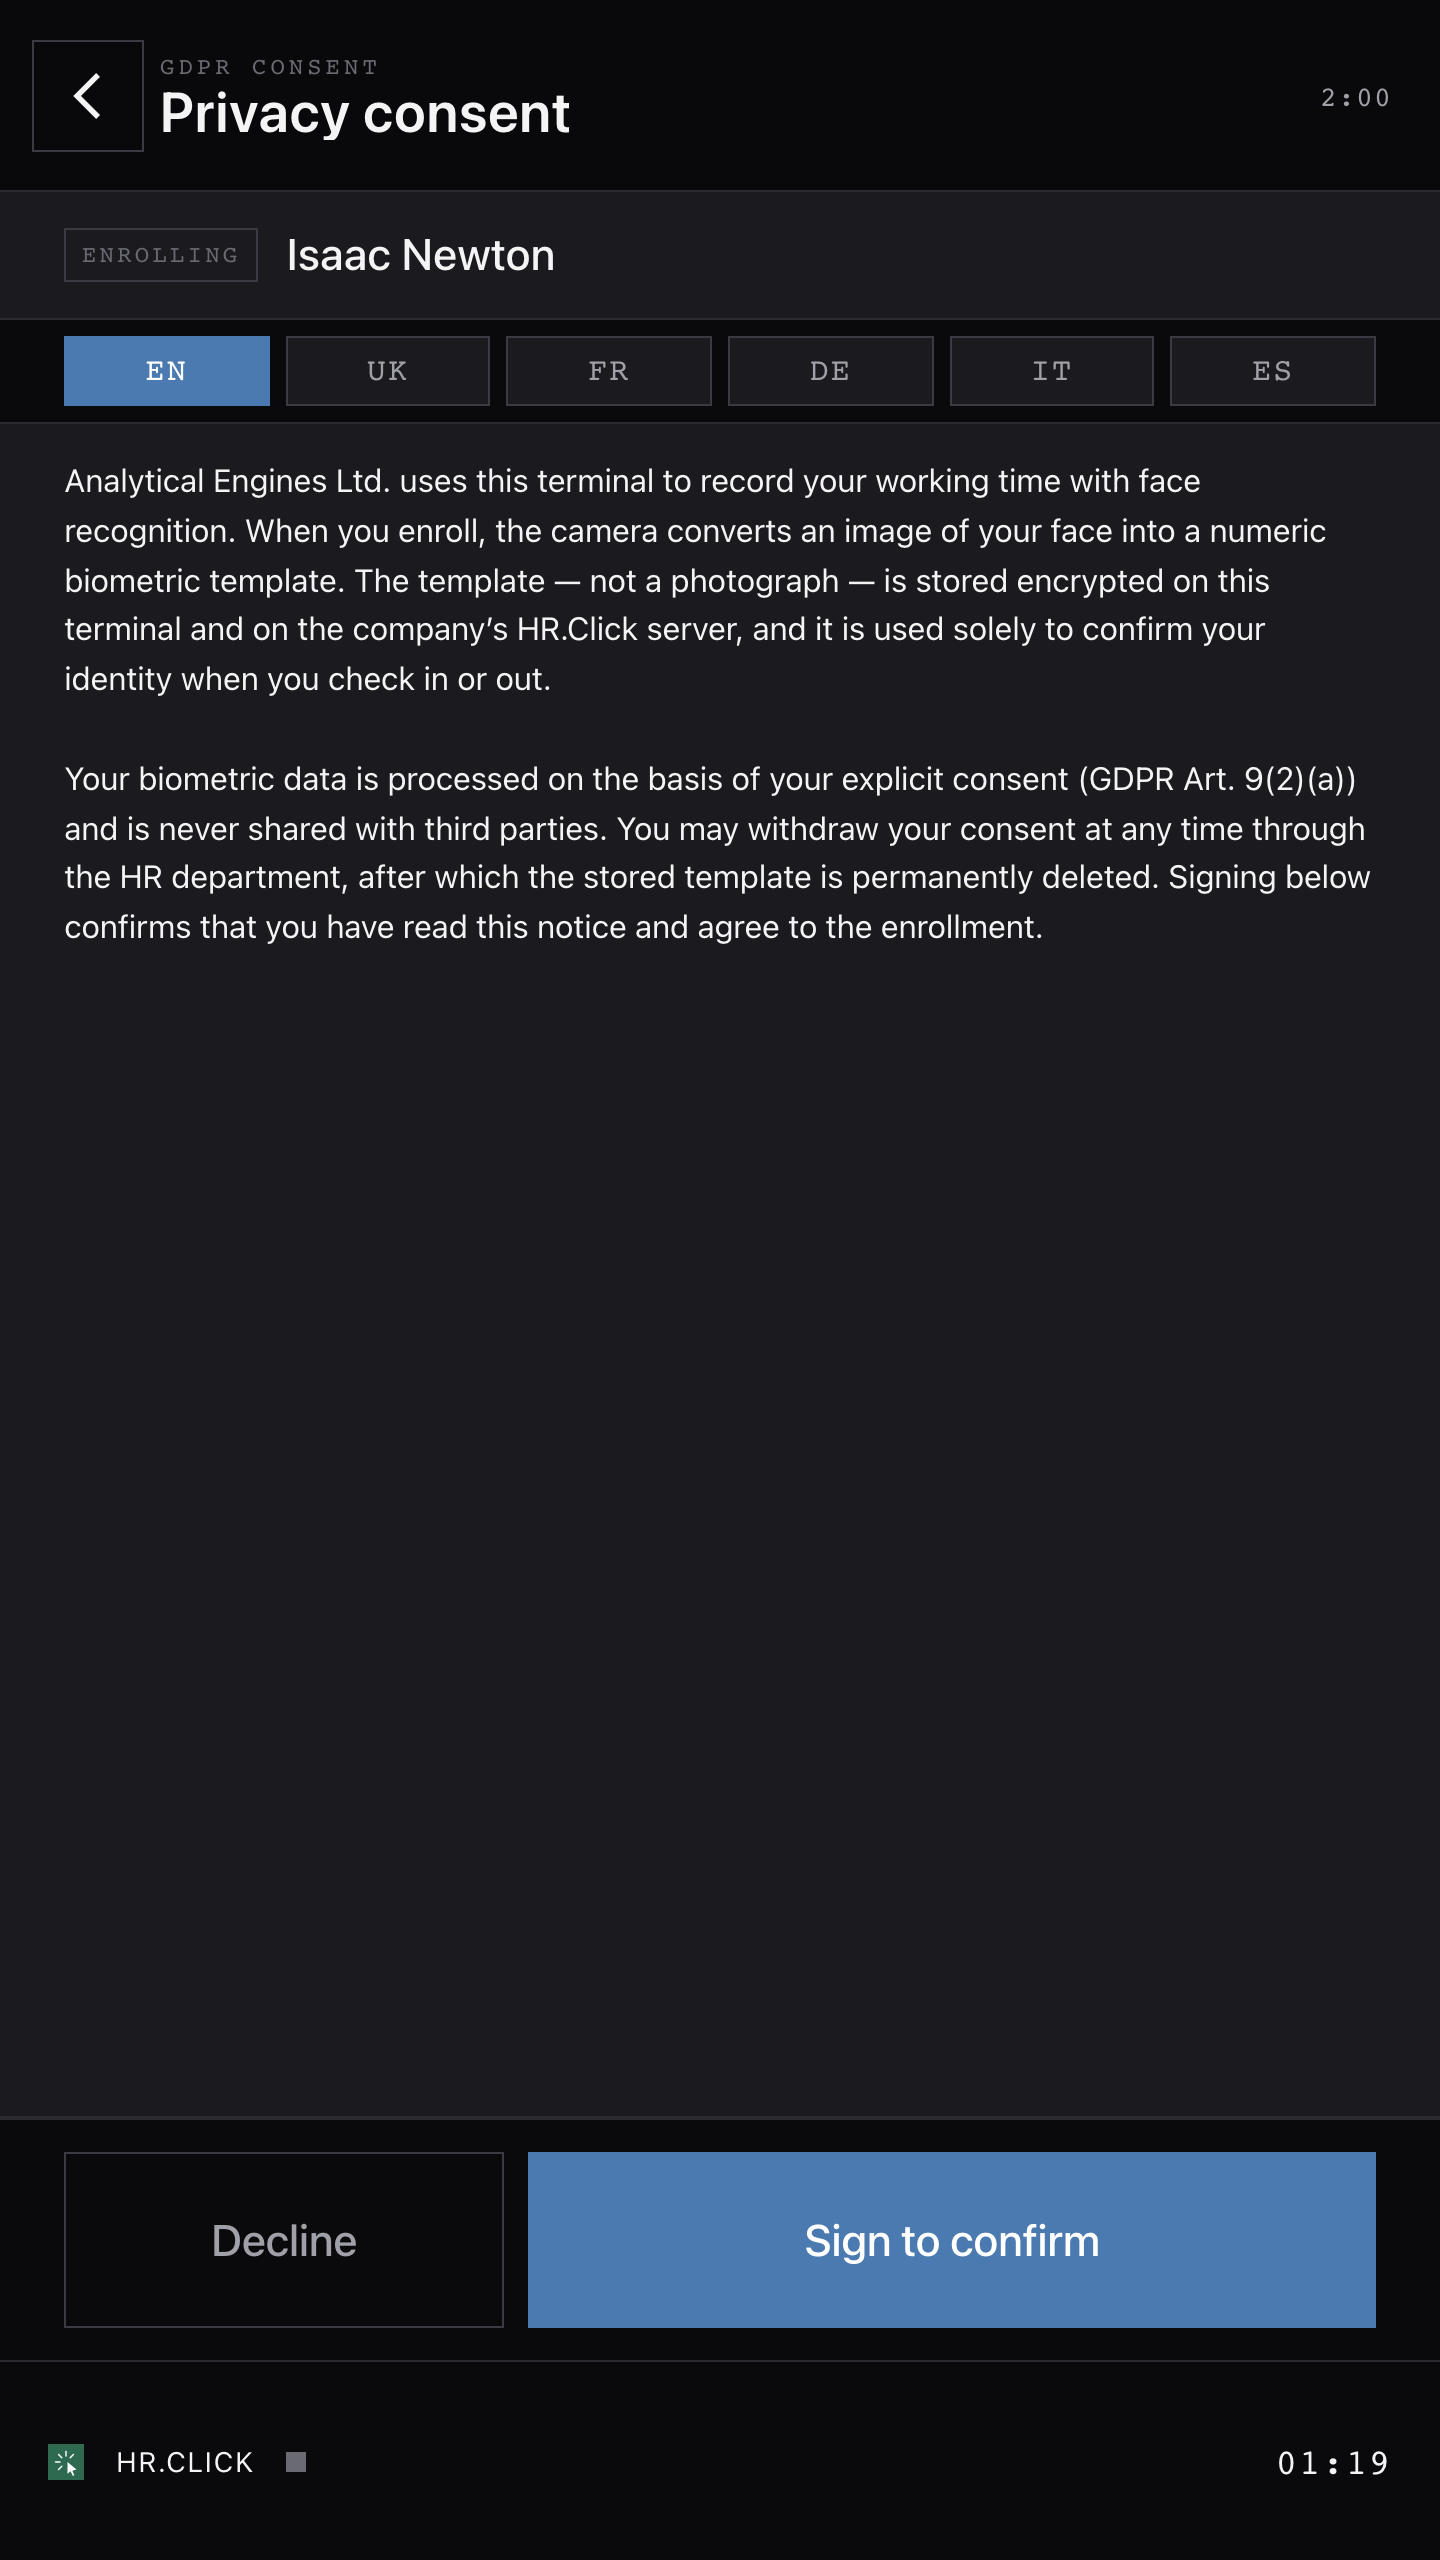
- Hand the terminal over to the employee: they read the privacy consent on screen, in their language, and sign it with their finger. Enrollment cannot proceed without consent.
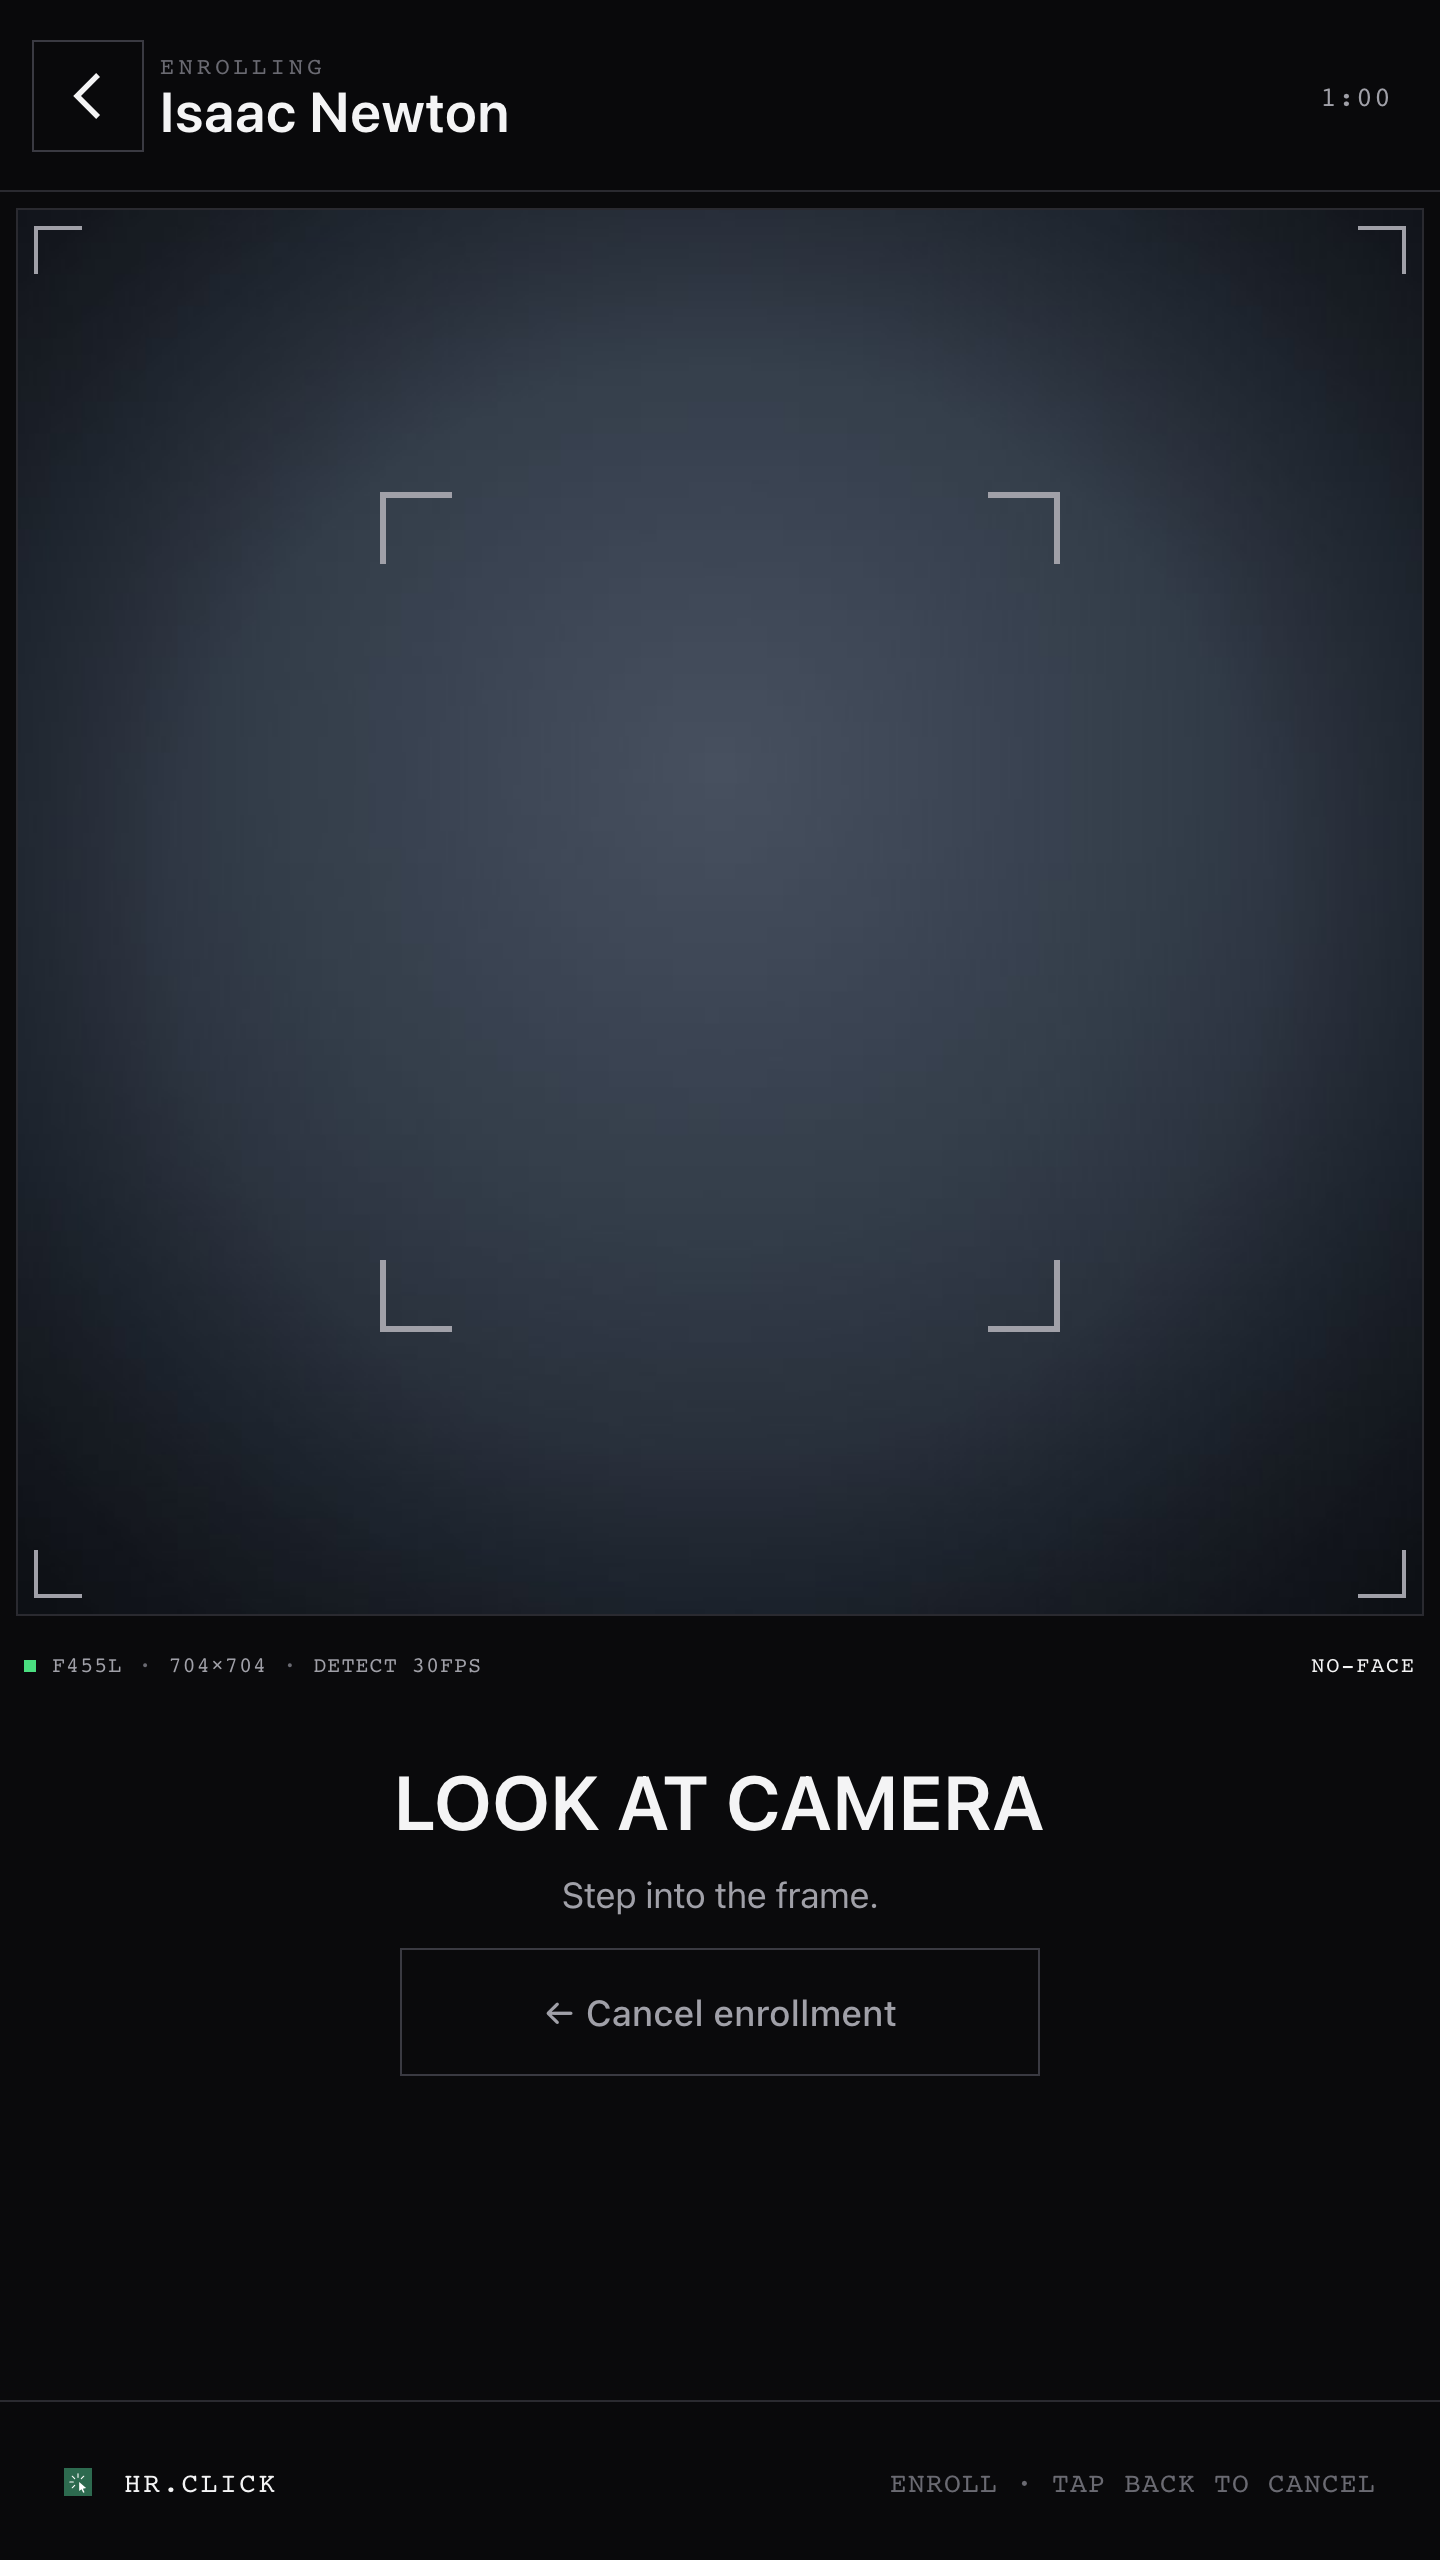
- The employee looks at the camera; the capture takes a few seconds. Done — they can check in immediately, and the face works on every terminal in the same office (other terminals pick it up automatically).
Managing enrollments in the web
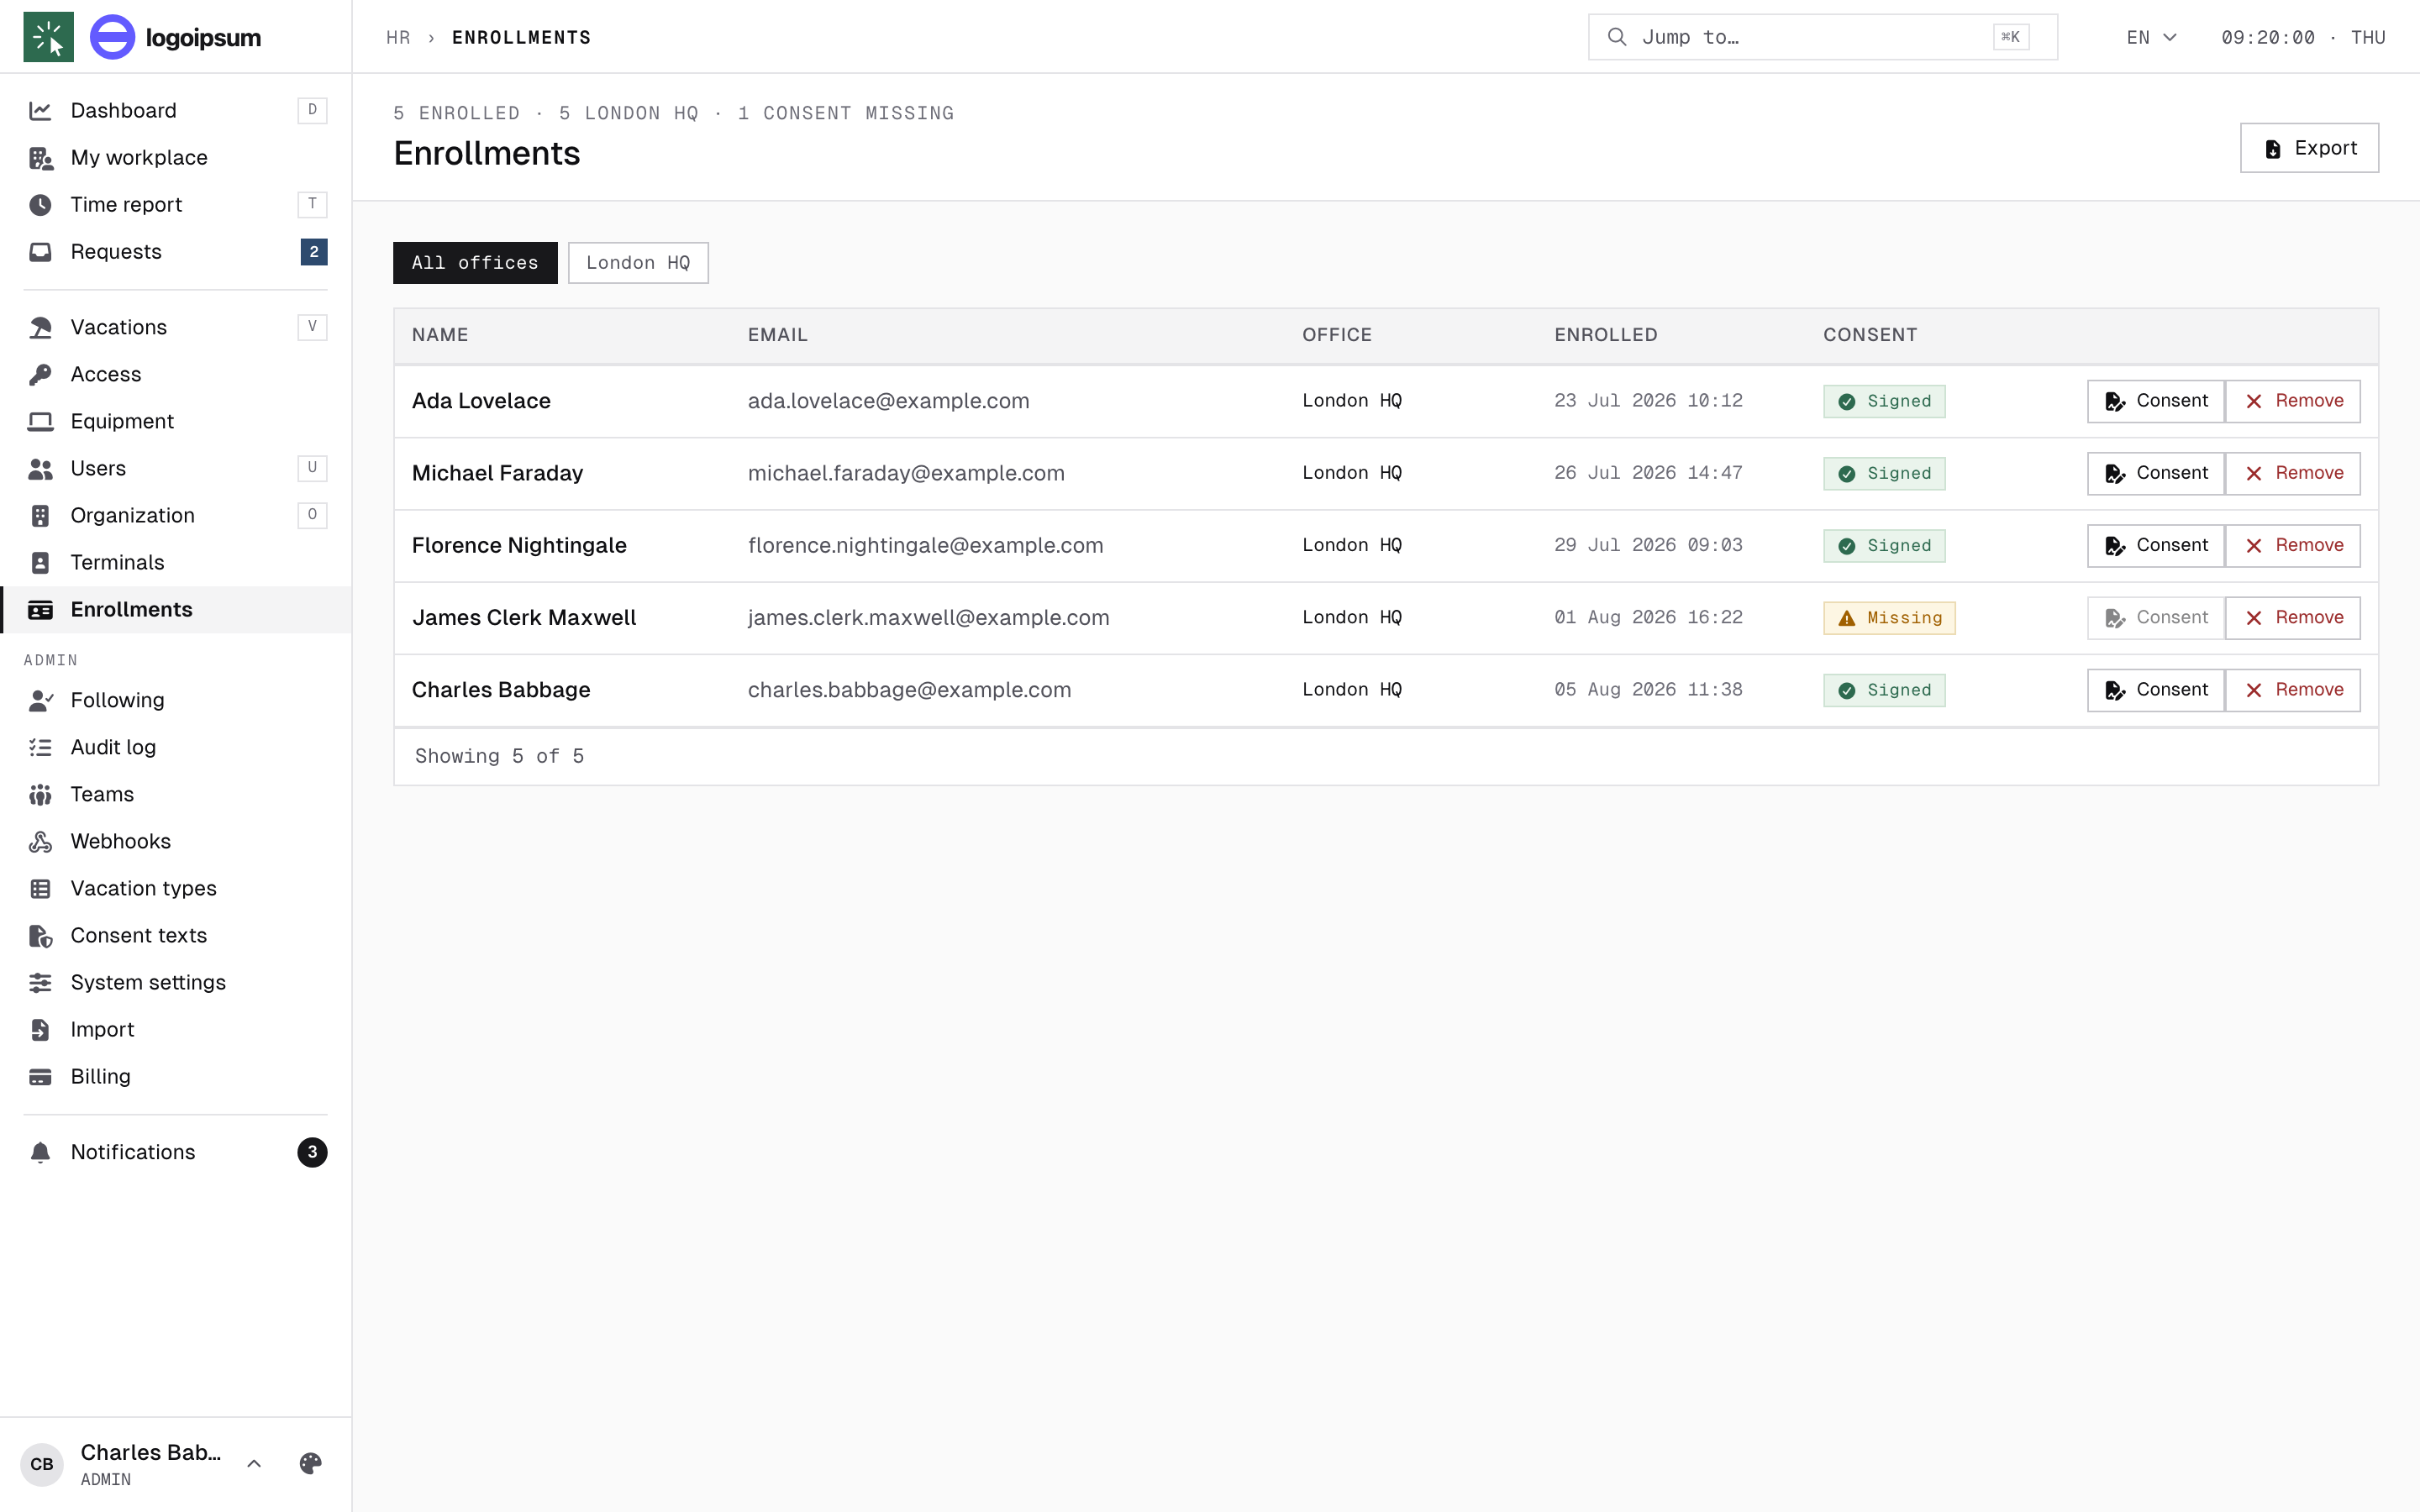
The Enrollments page in the sidebar lists everyone with a face on file, per office, together with their consent status. From here you can open the signed consent document, export the list, or remove an enrollment — this wipes the person’s face template from every terminal in the office (they would need to enrol again). The same list, per device, is available on each terminal’s Enrollments tab.
8The on-device admin menu
Opening it
Press and hold the ≡ button — the three-lines button above the screen, on the right — for about 5 seconds, until the admin authorisation screen appears. (A short press of the same button just shows the terminal info.)
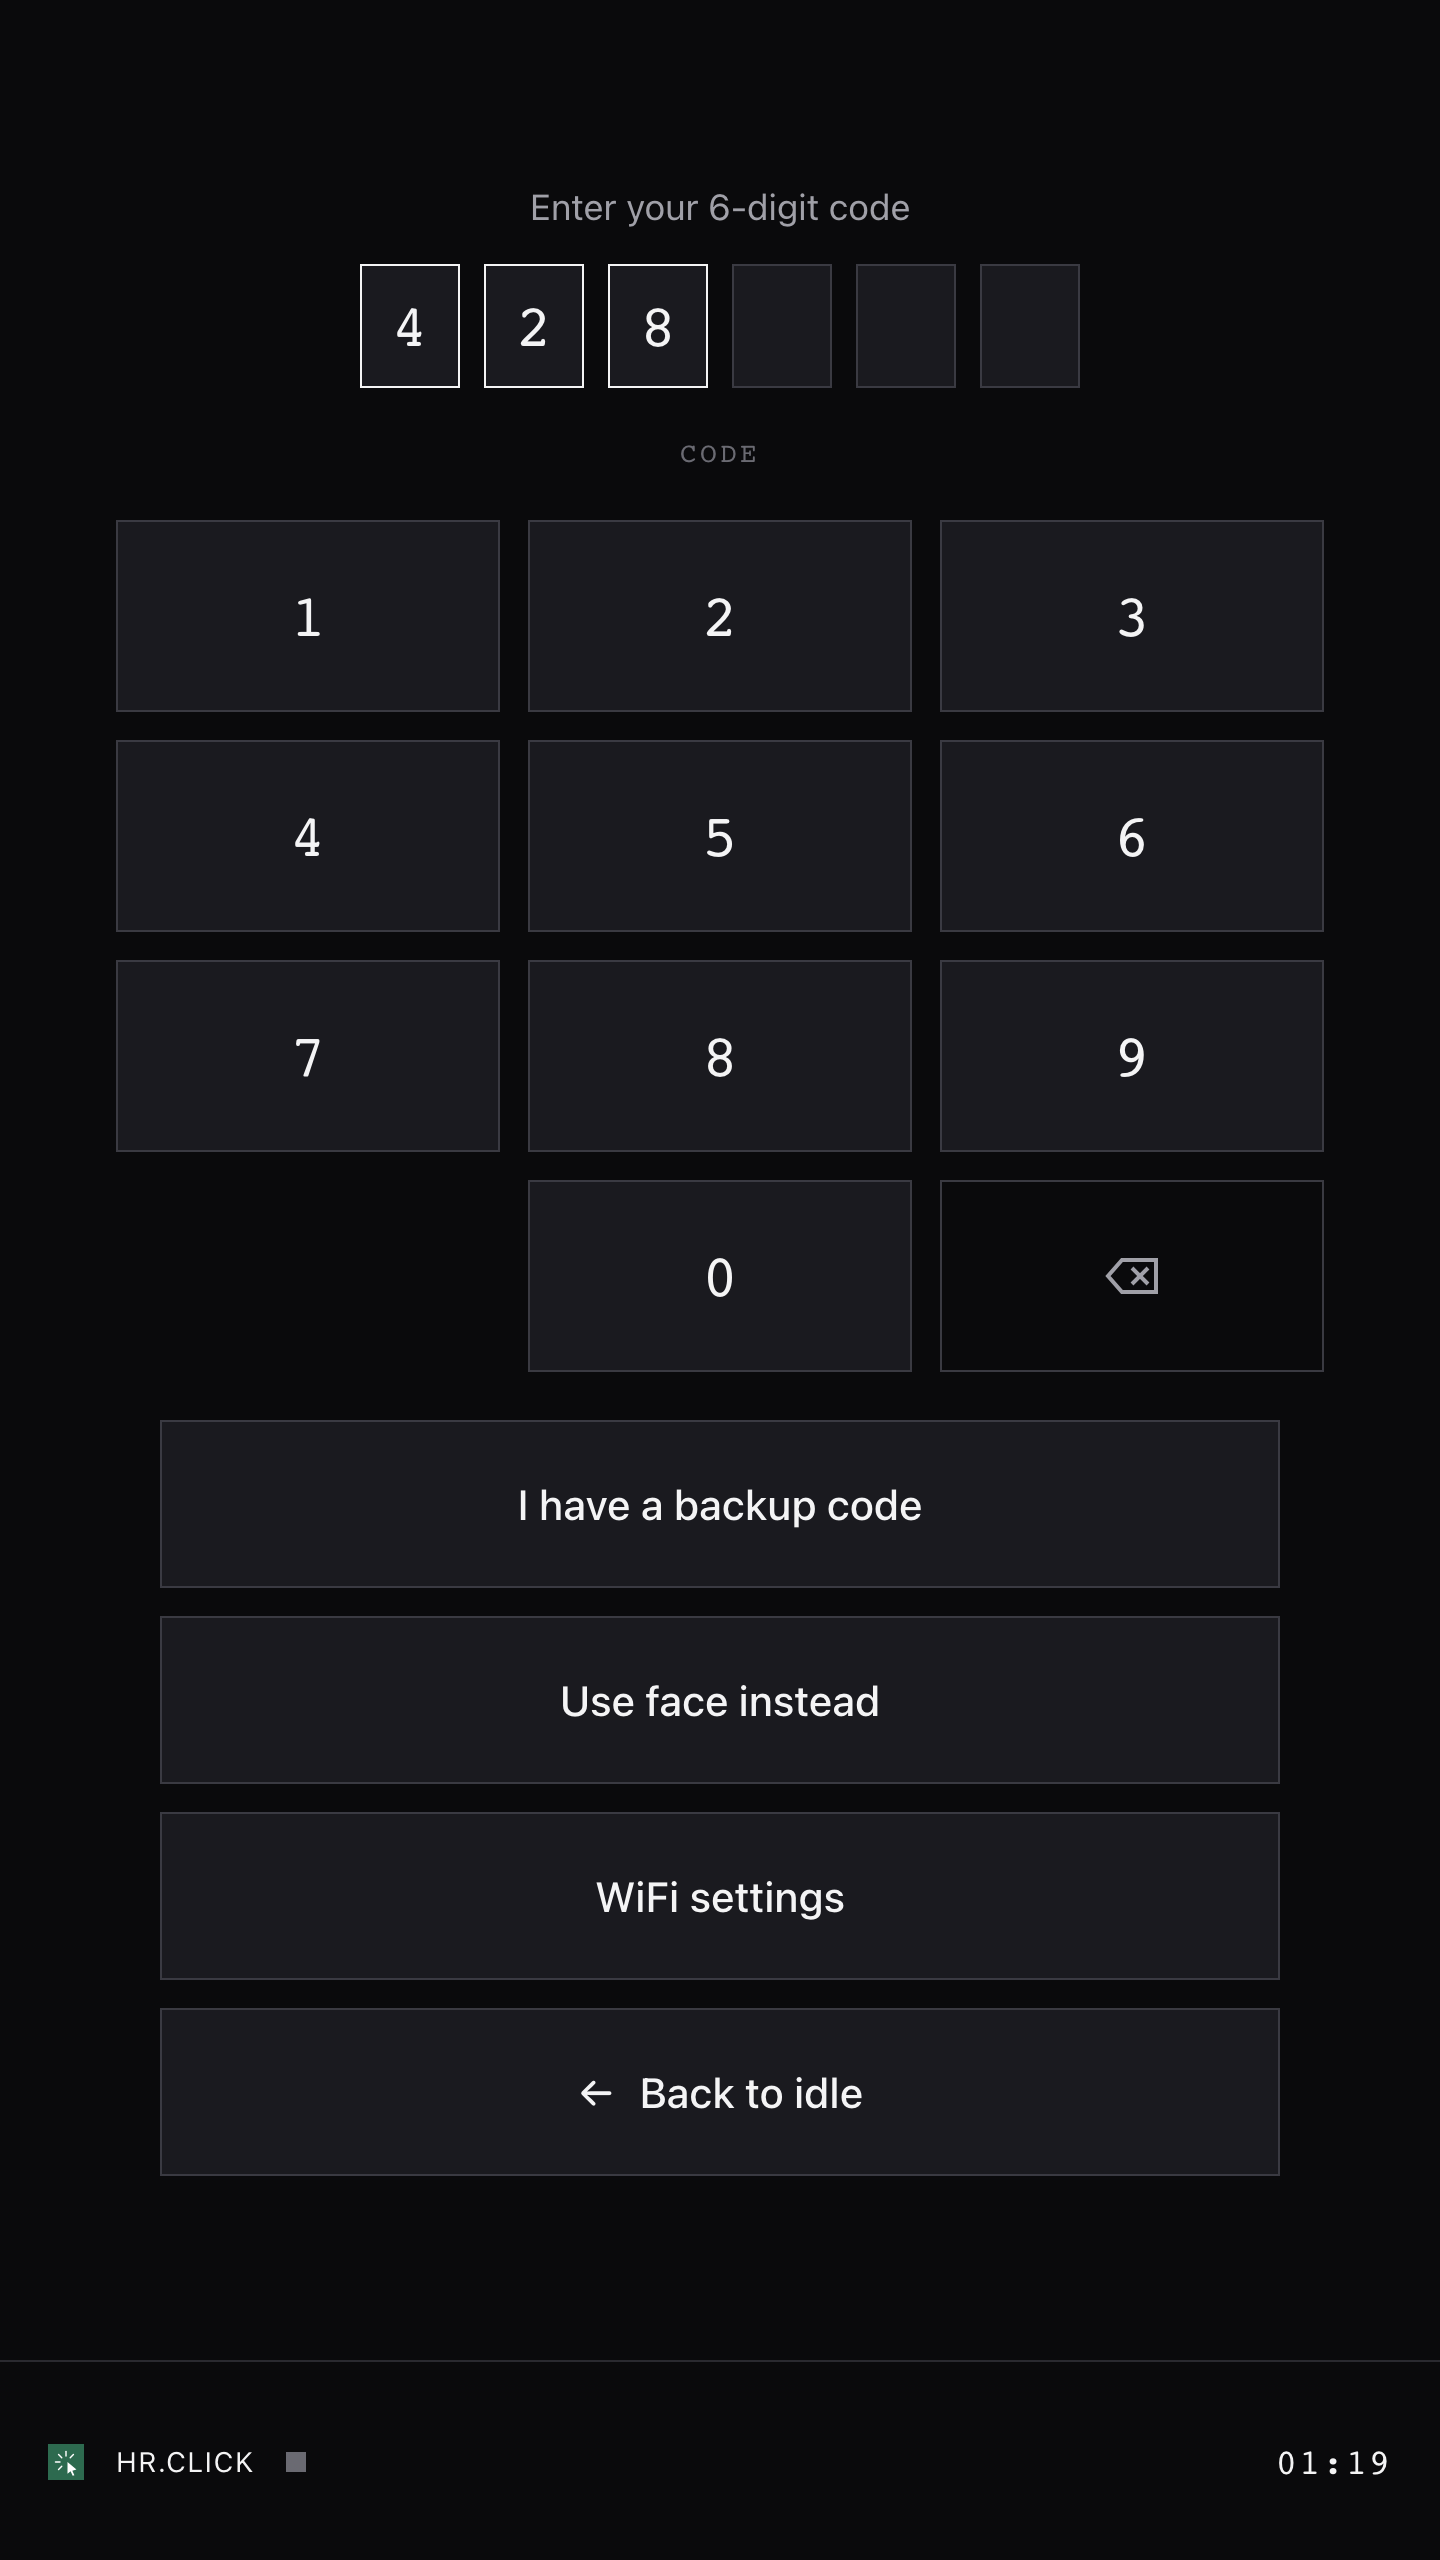
Three ways to prove you’re an admin:
- Face — if you are enrolled and have admin rights, just look at the camera. You’ll see “Checking access…”, then the menu.
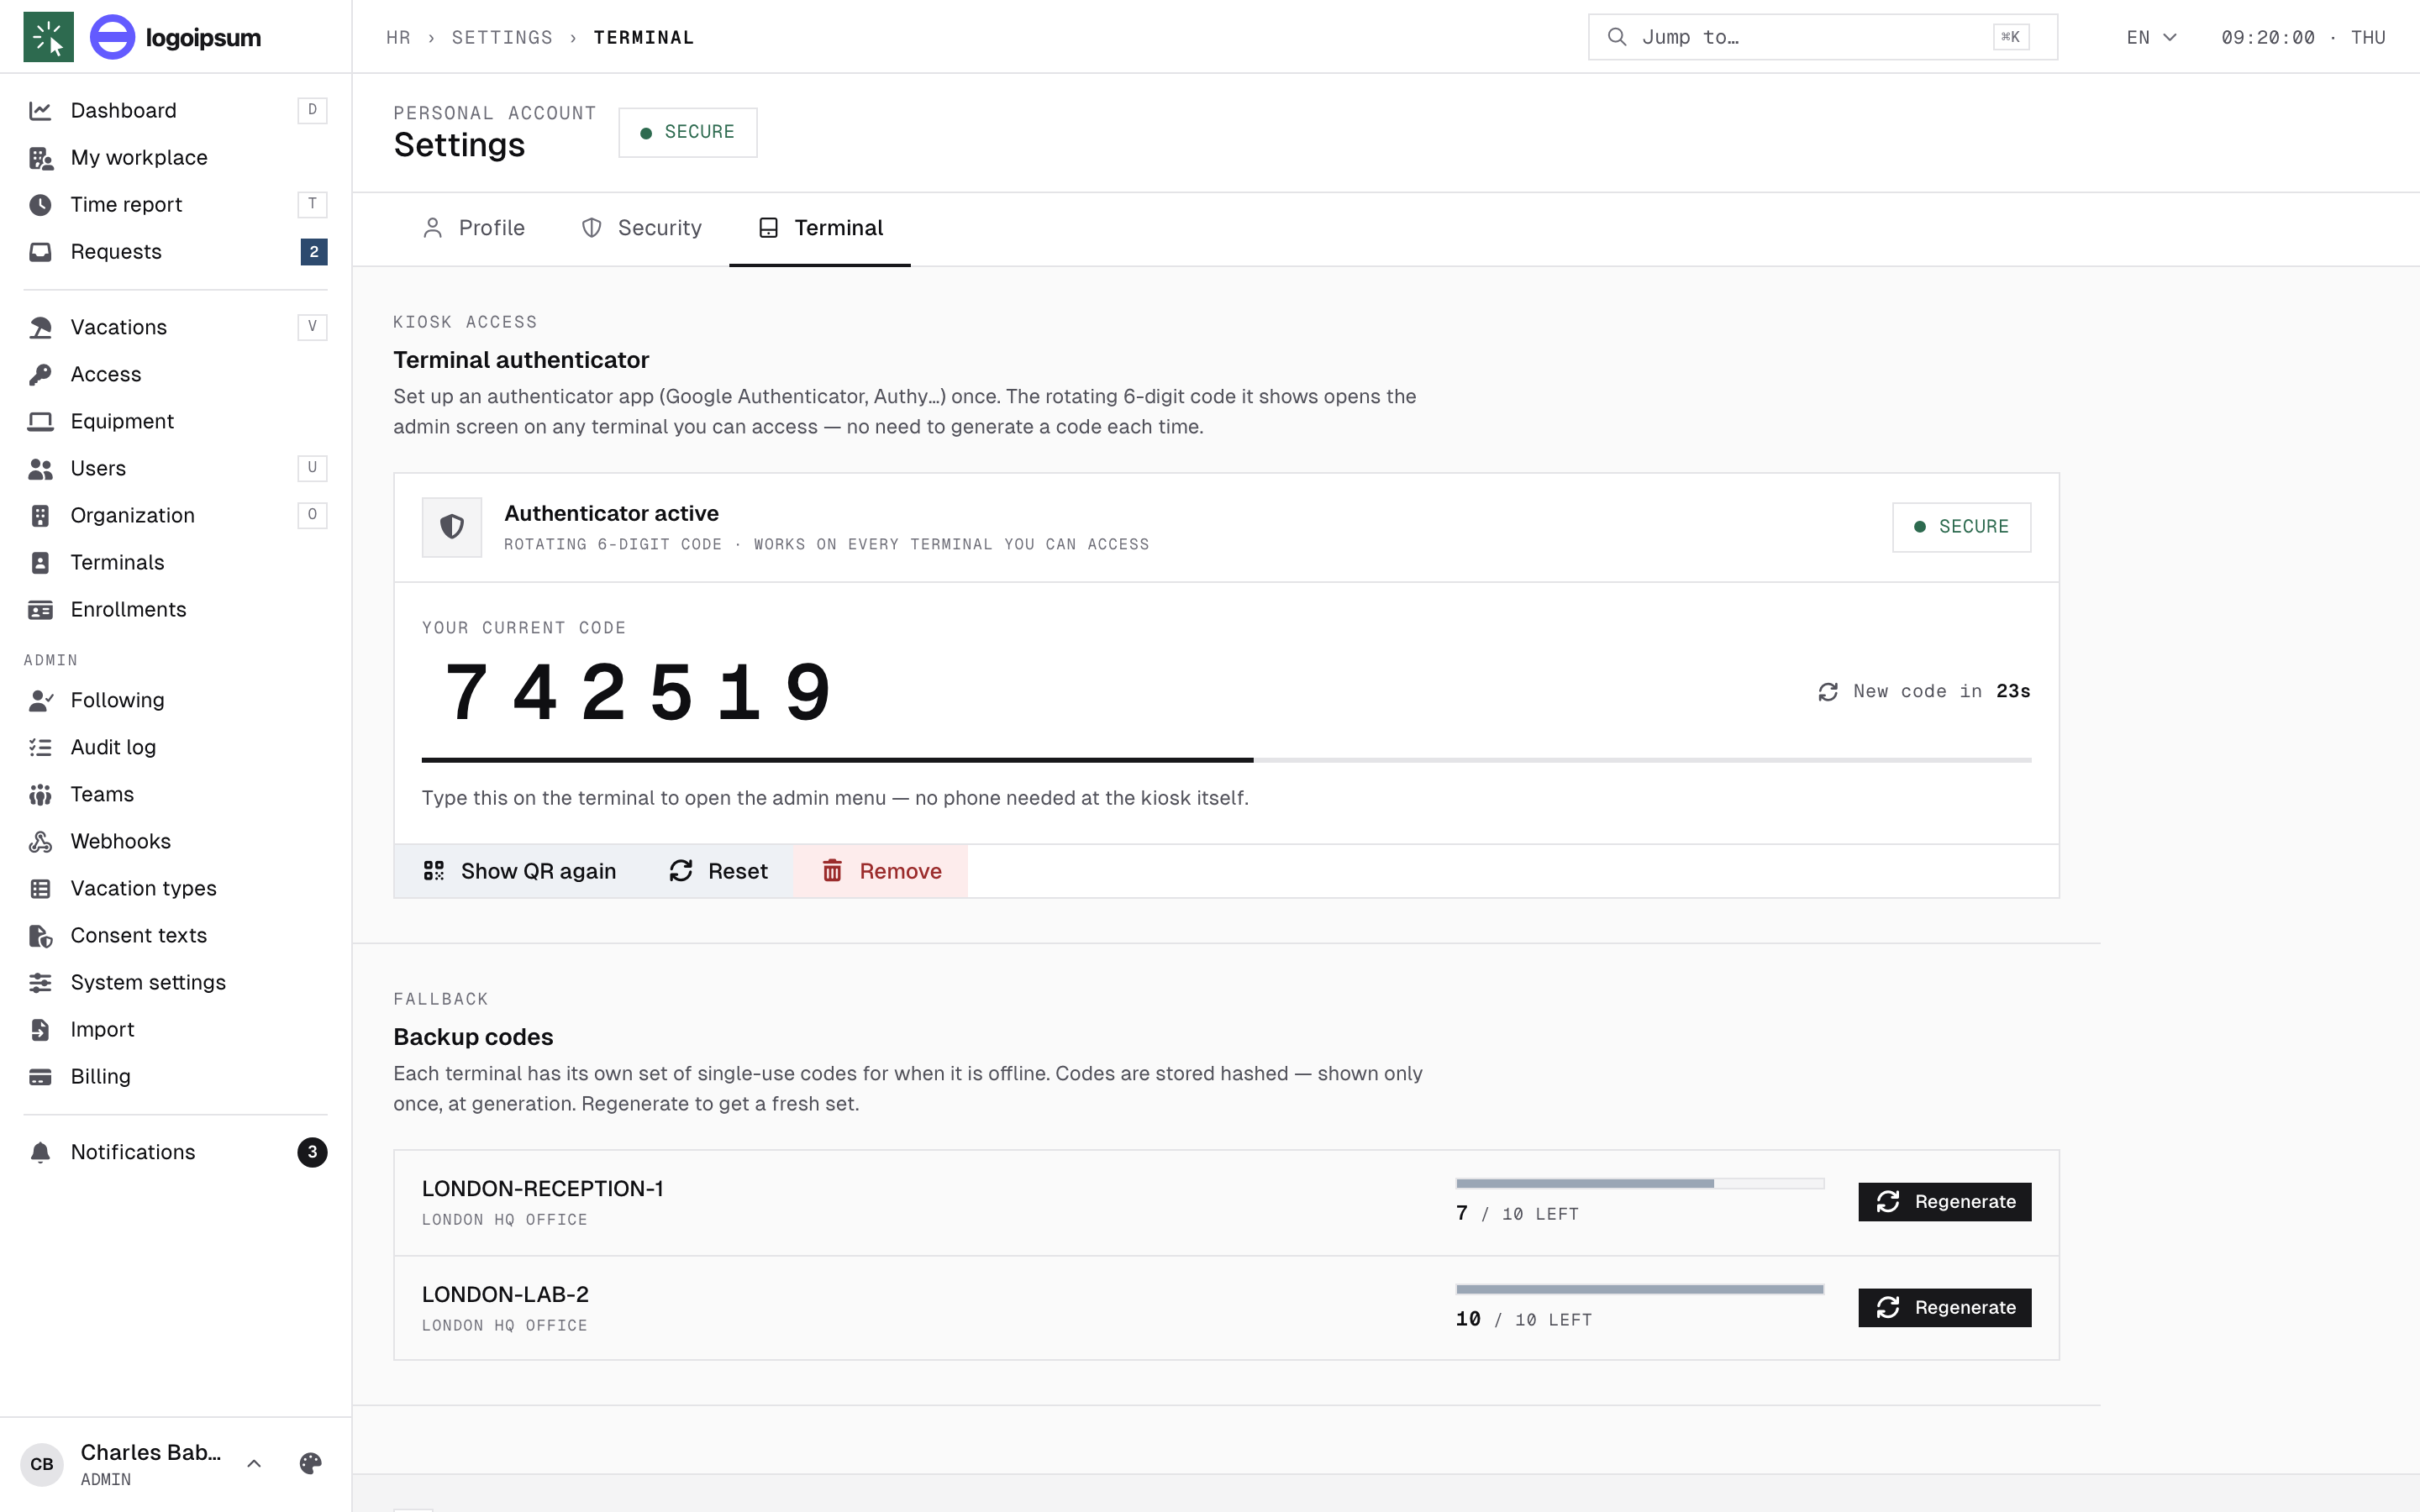
- 6-digit code — generated by an authenticator app on your phone (Google Authenticator or similar). Set it up once in the web app under Settings → Terminal — scan the QR with the app; from then on the app itself produces the code, and the same code works on all your terminals. The web page also shows the current code if you happen to have it open.
- 8-digit backup code — one-time emergency codes generated on the same settings page. Each code can be used once.
Both code methods are verified on the device itself, so they keep working even when the terminal has no internet at all.
Five wrong codes within a minute lock code entry for five minutes. Face authorisation keeps working during a code lockout.
What’s inside
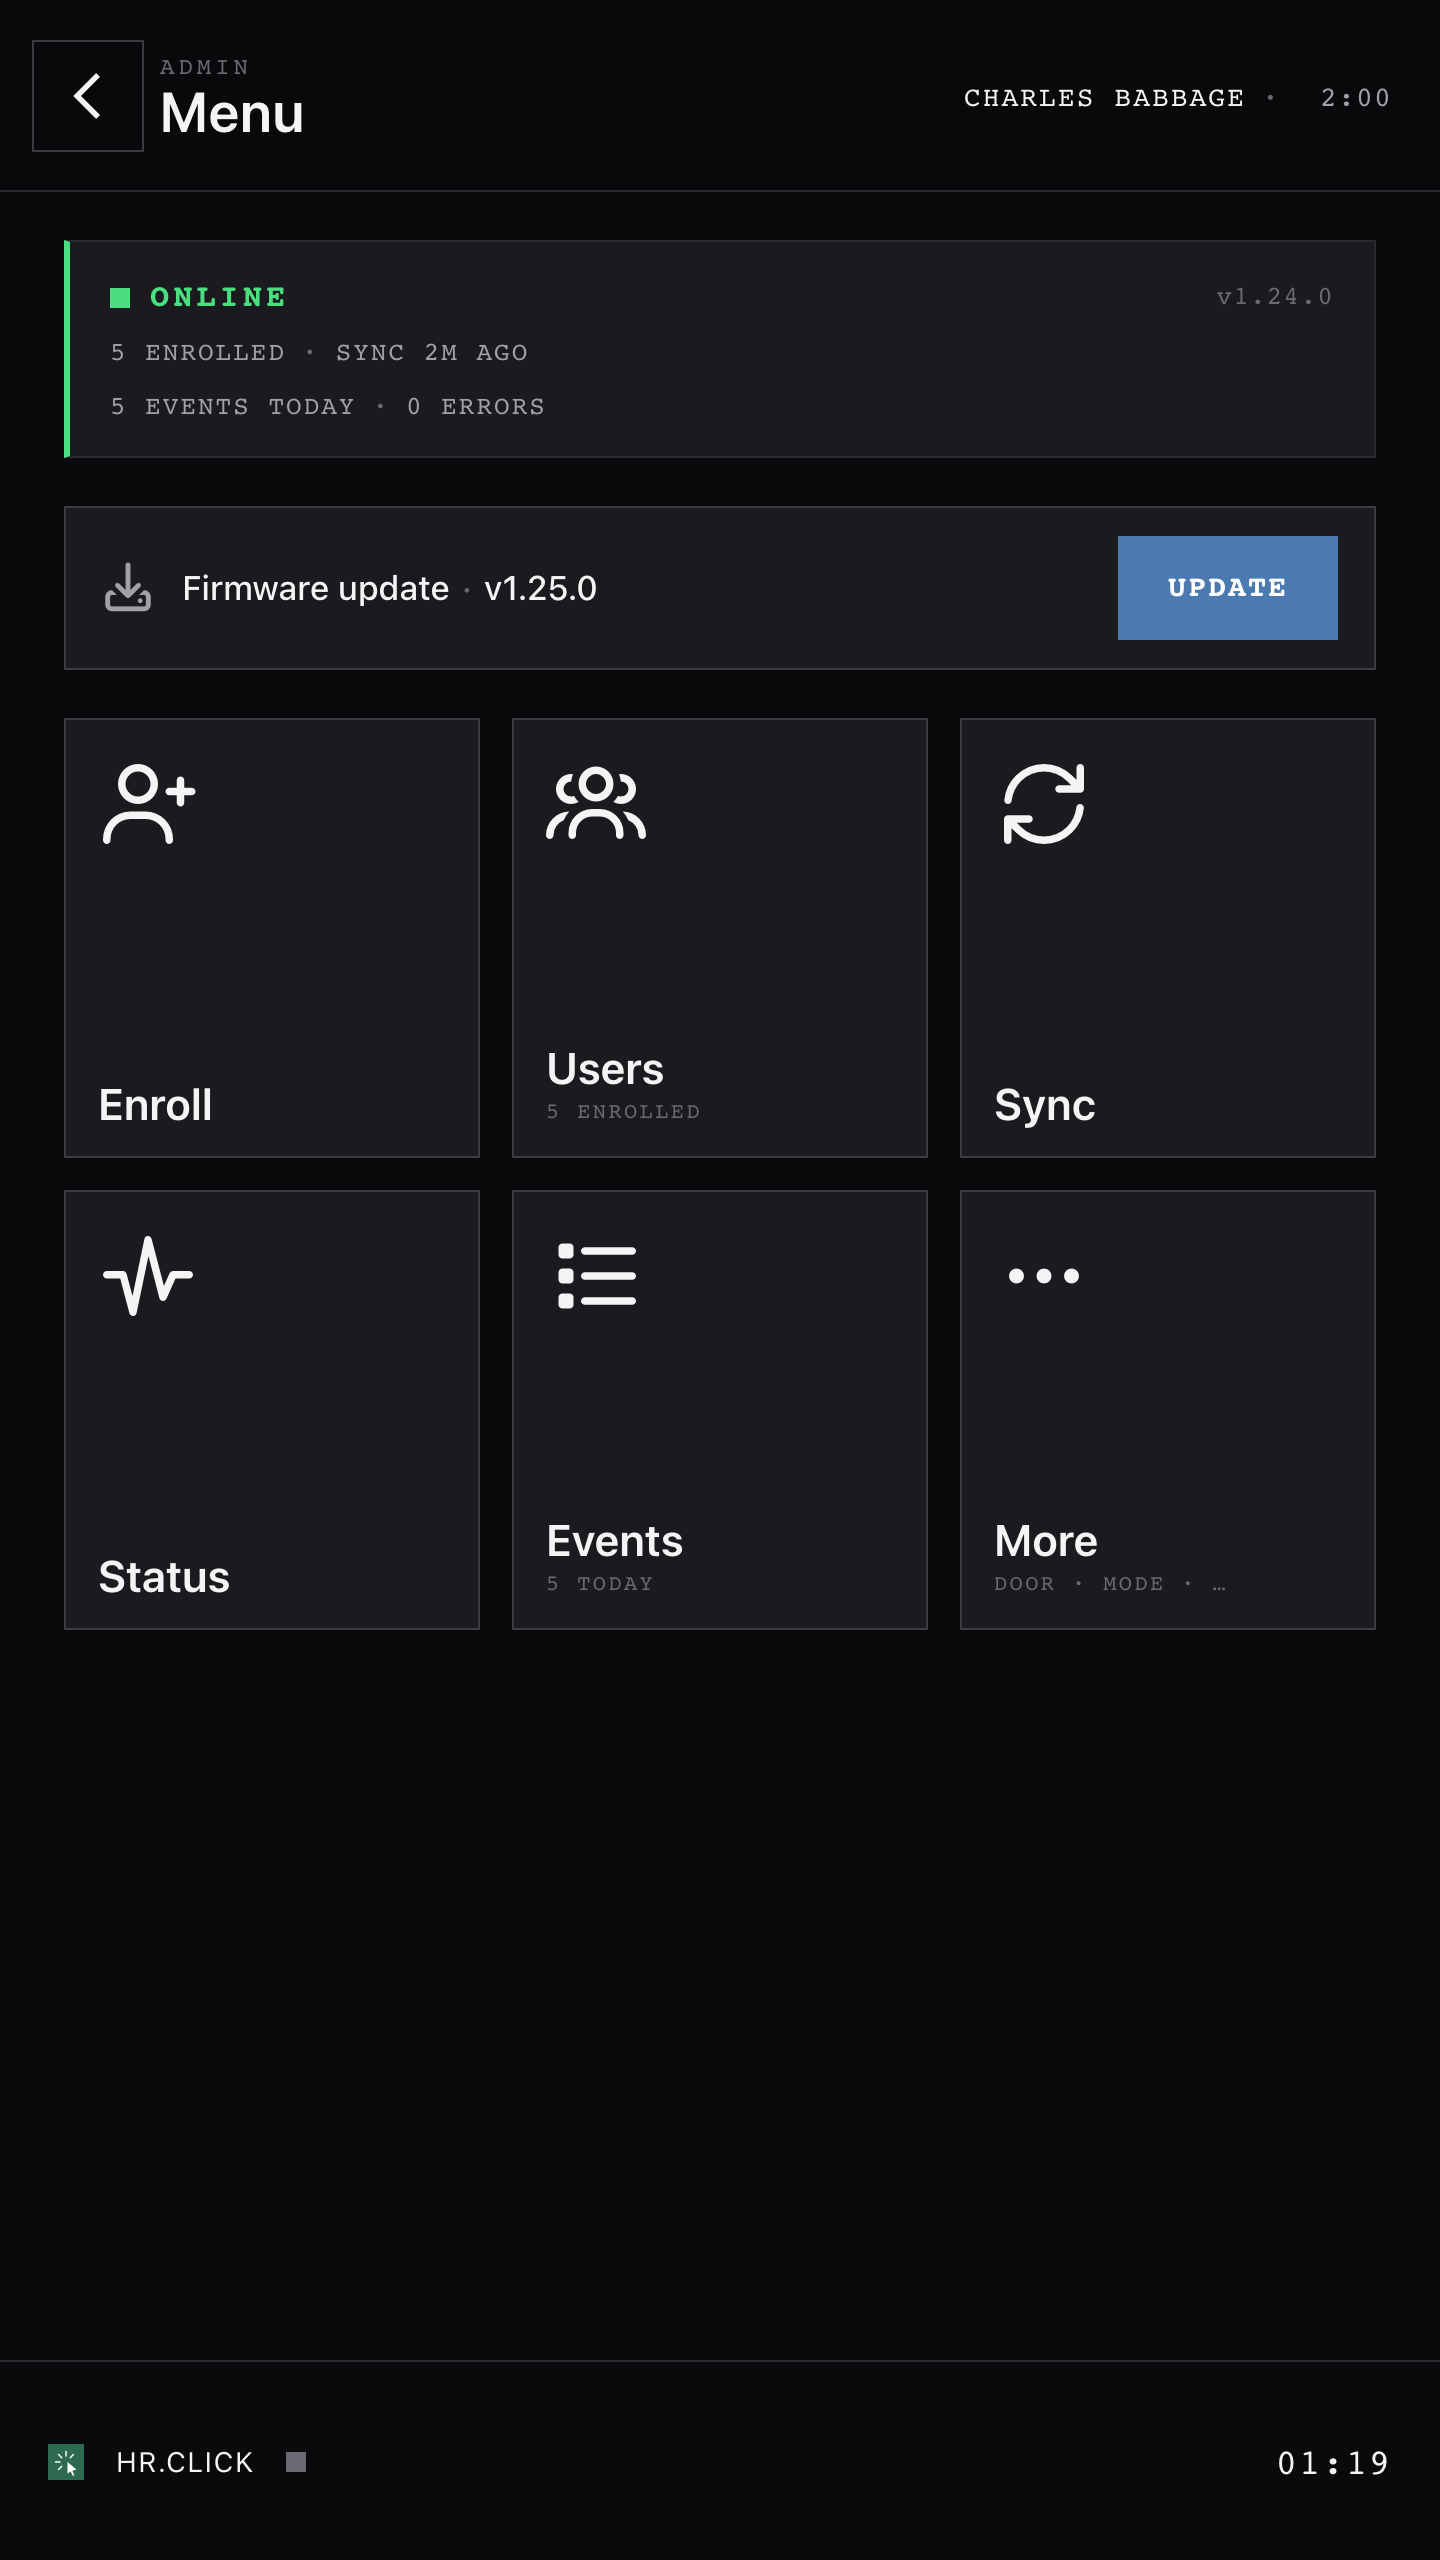
The menu opens with a status card (online state, firmware version, enrolled count, today’s events). If something needs attention — a pending firmware update, a security lock, a fan problem — a banner with a one-tap action appears right under it.
| Tile | What it does |
|---|---|
| Enroll | Add an employee’s face (section 7). |
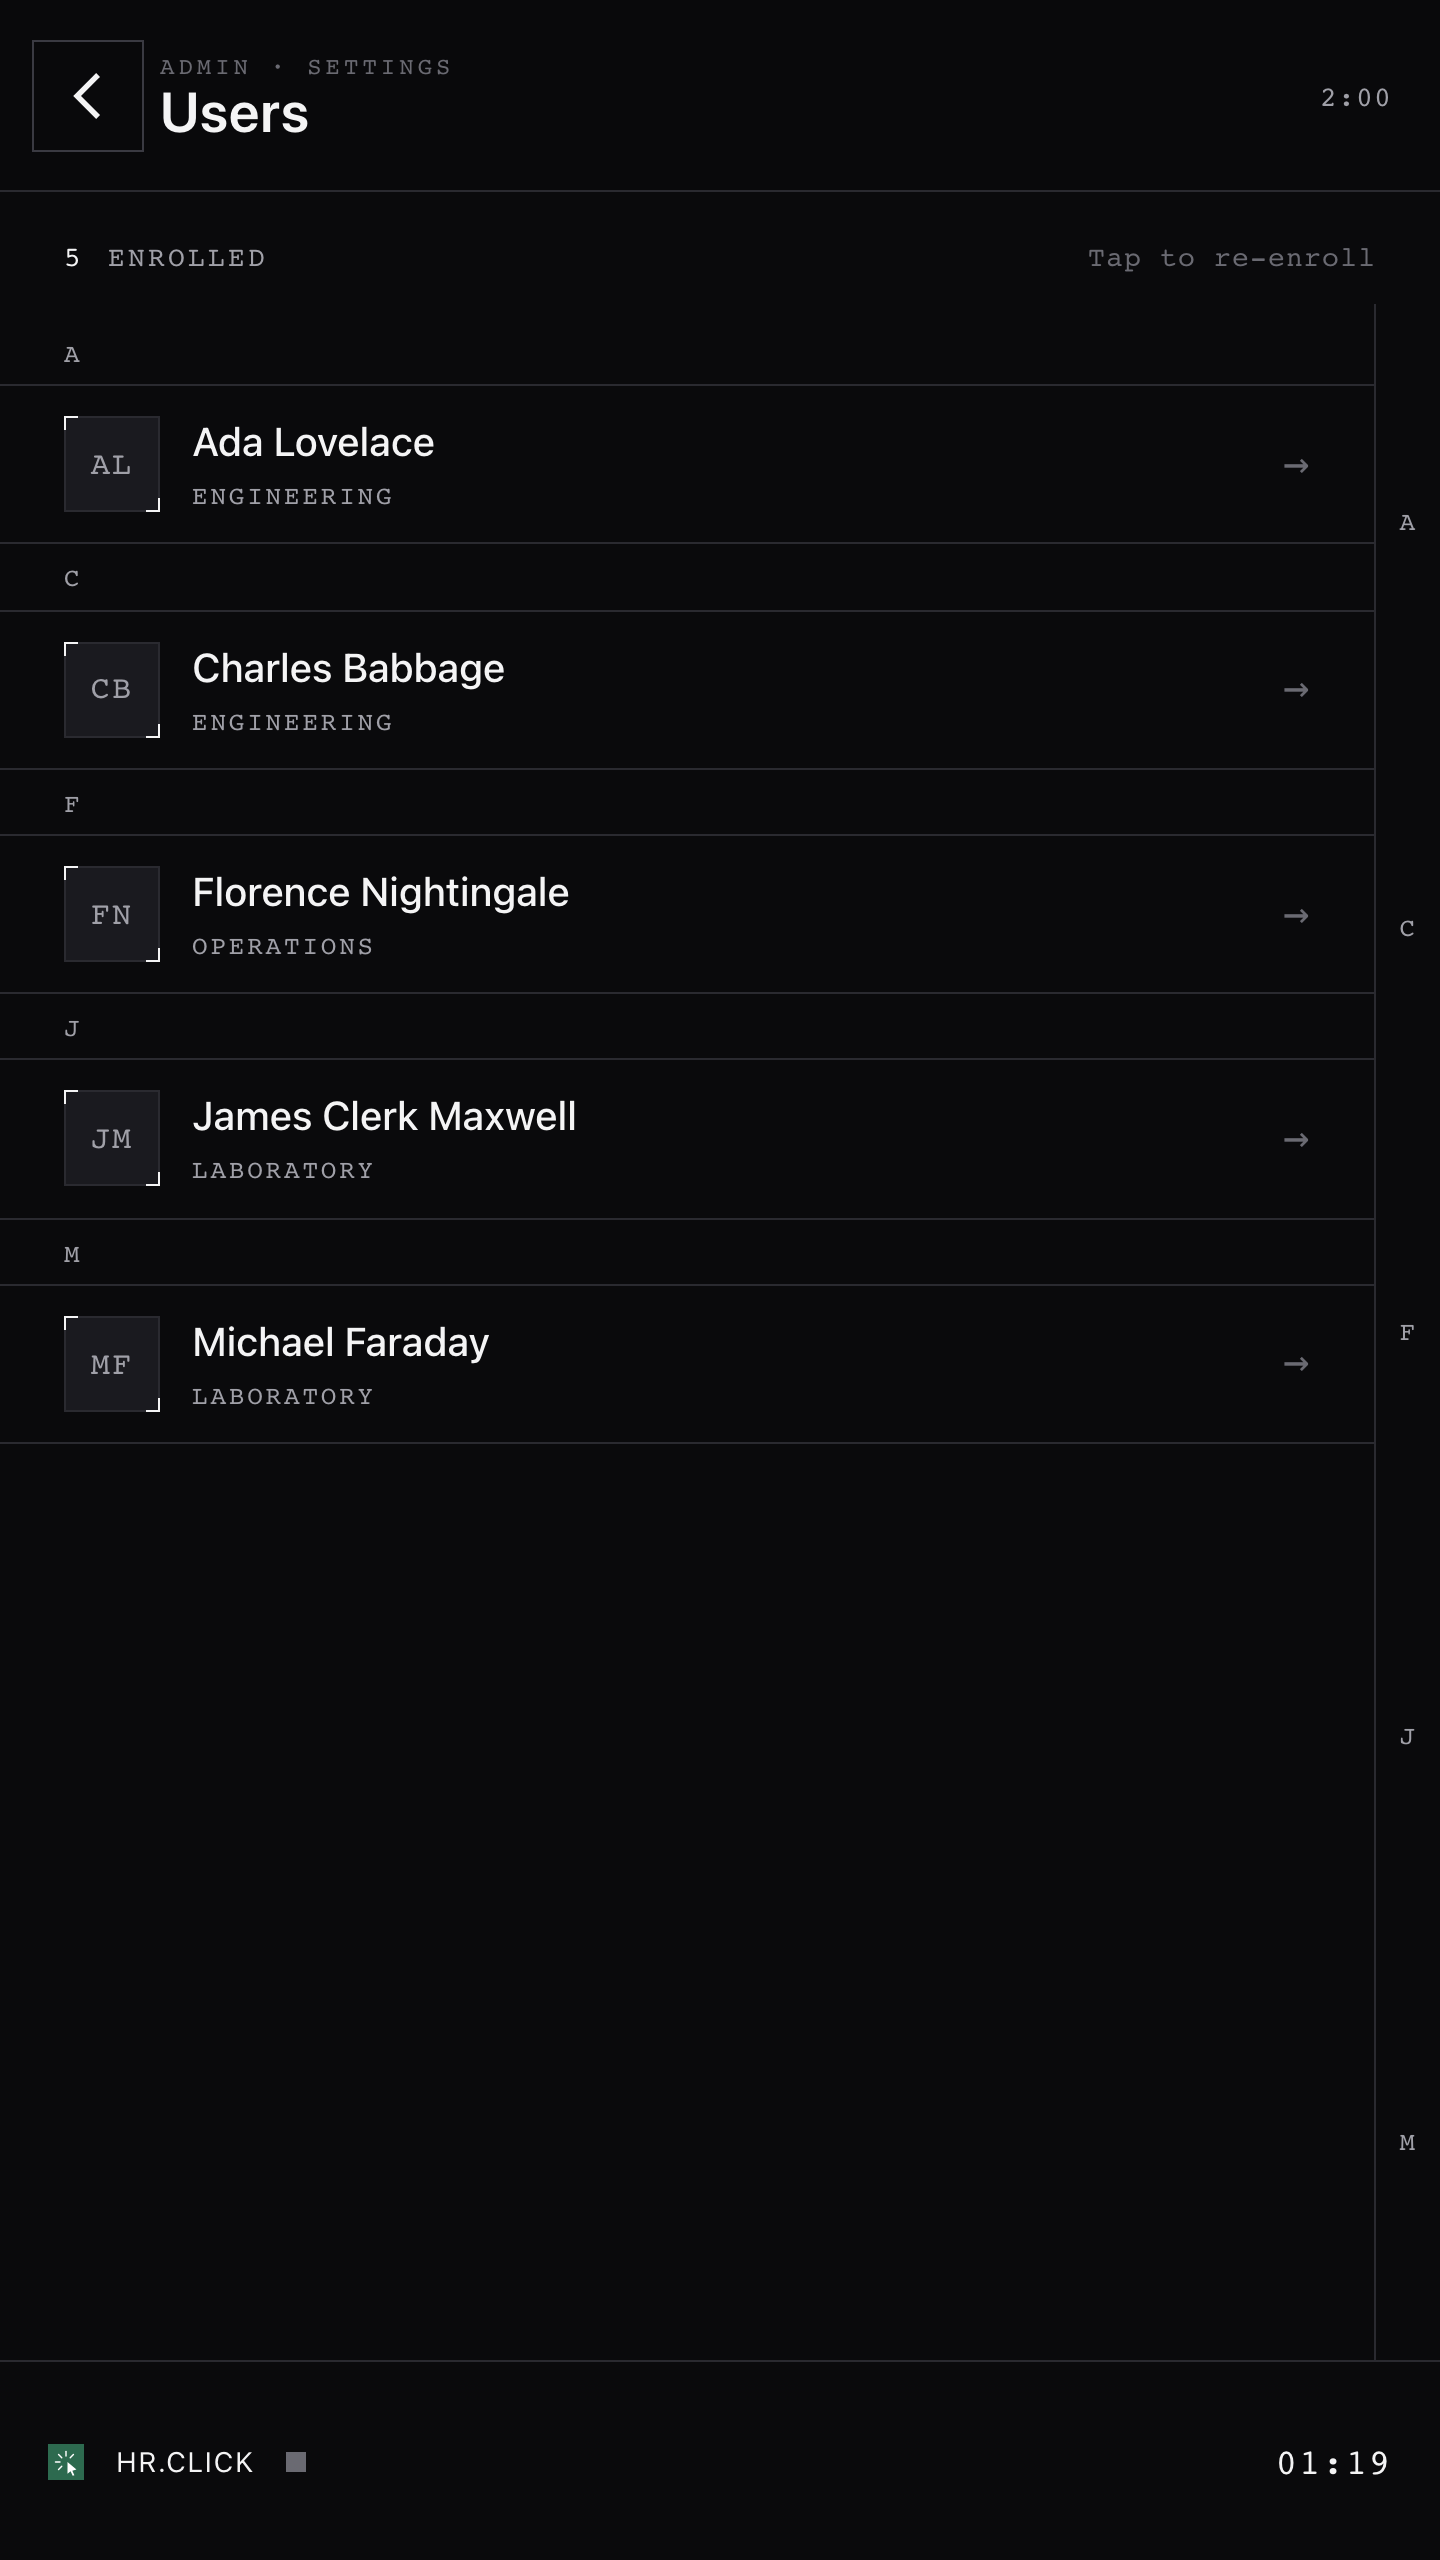
| Users | Directory of enrolled employees. Tap a person to re-enrol them (e.g. after repeated recognition failures). |
| Sync | Pull the latest employee list from the server right now (it also happens automatically every few minutes). |
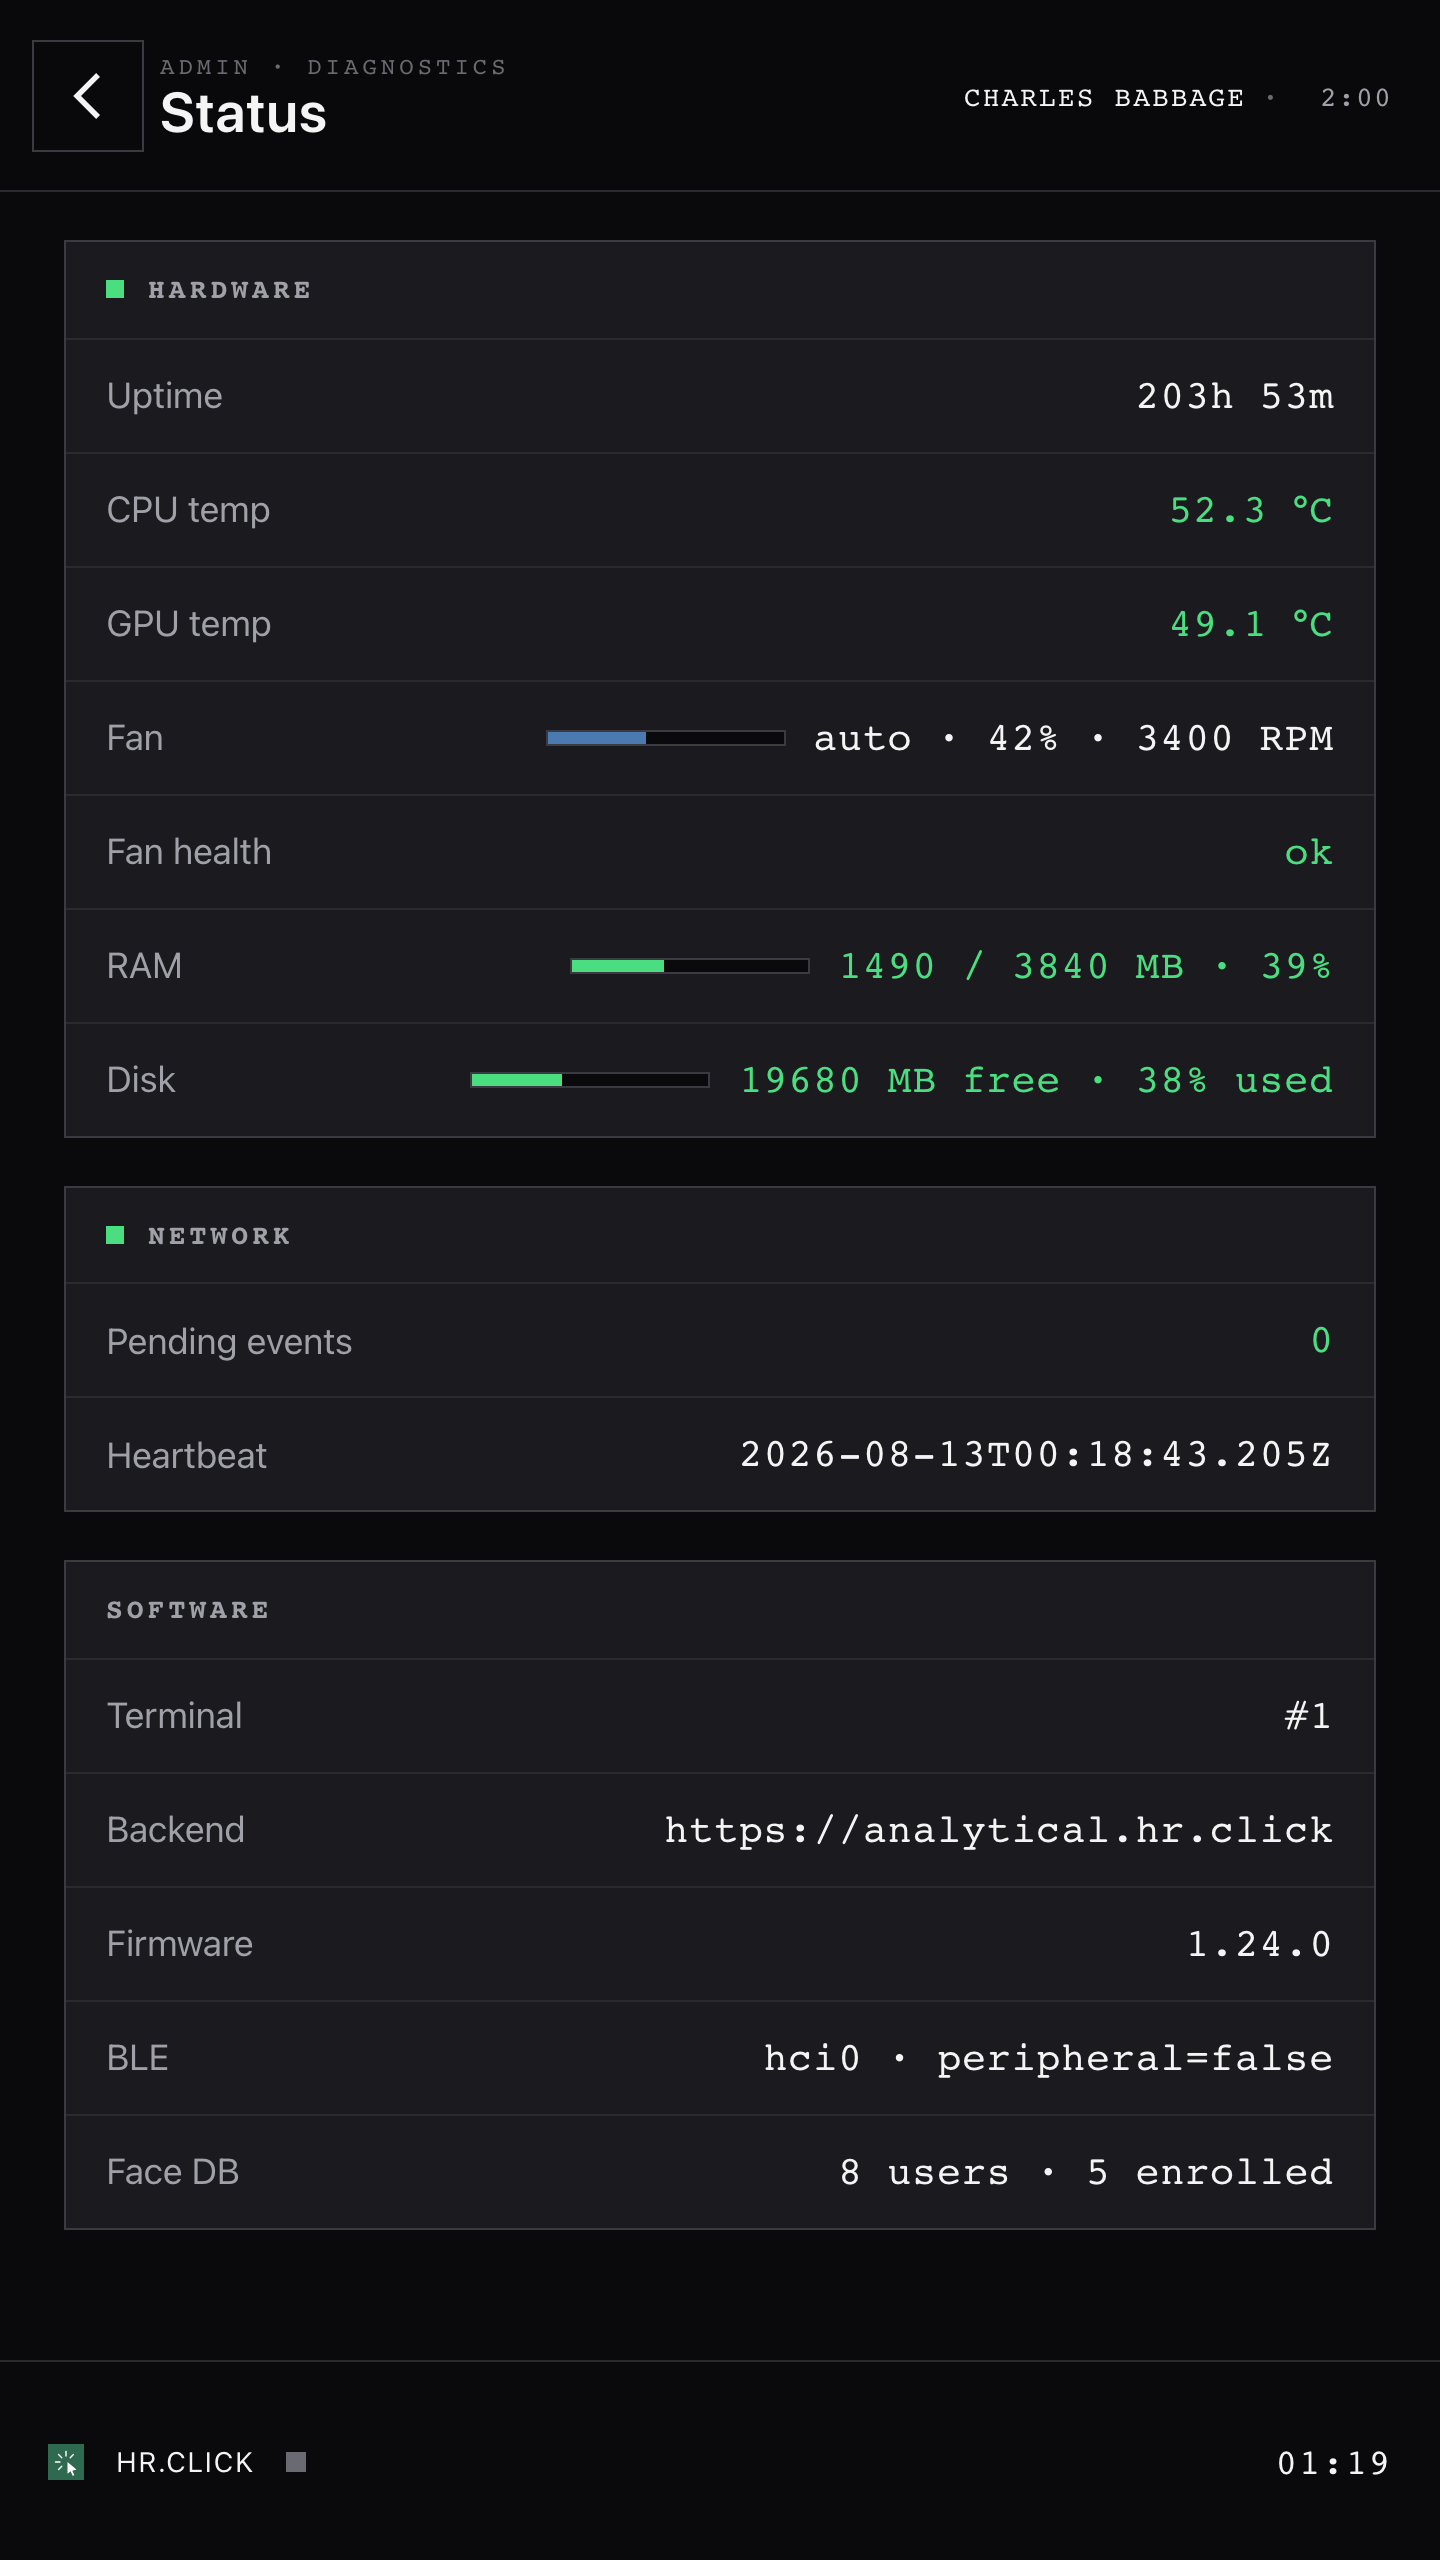
| Status | Diagnostics: network, camera, temperatures, storage, pending events. |
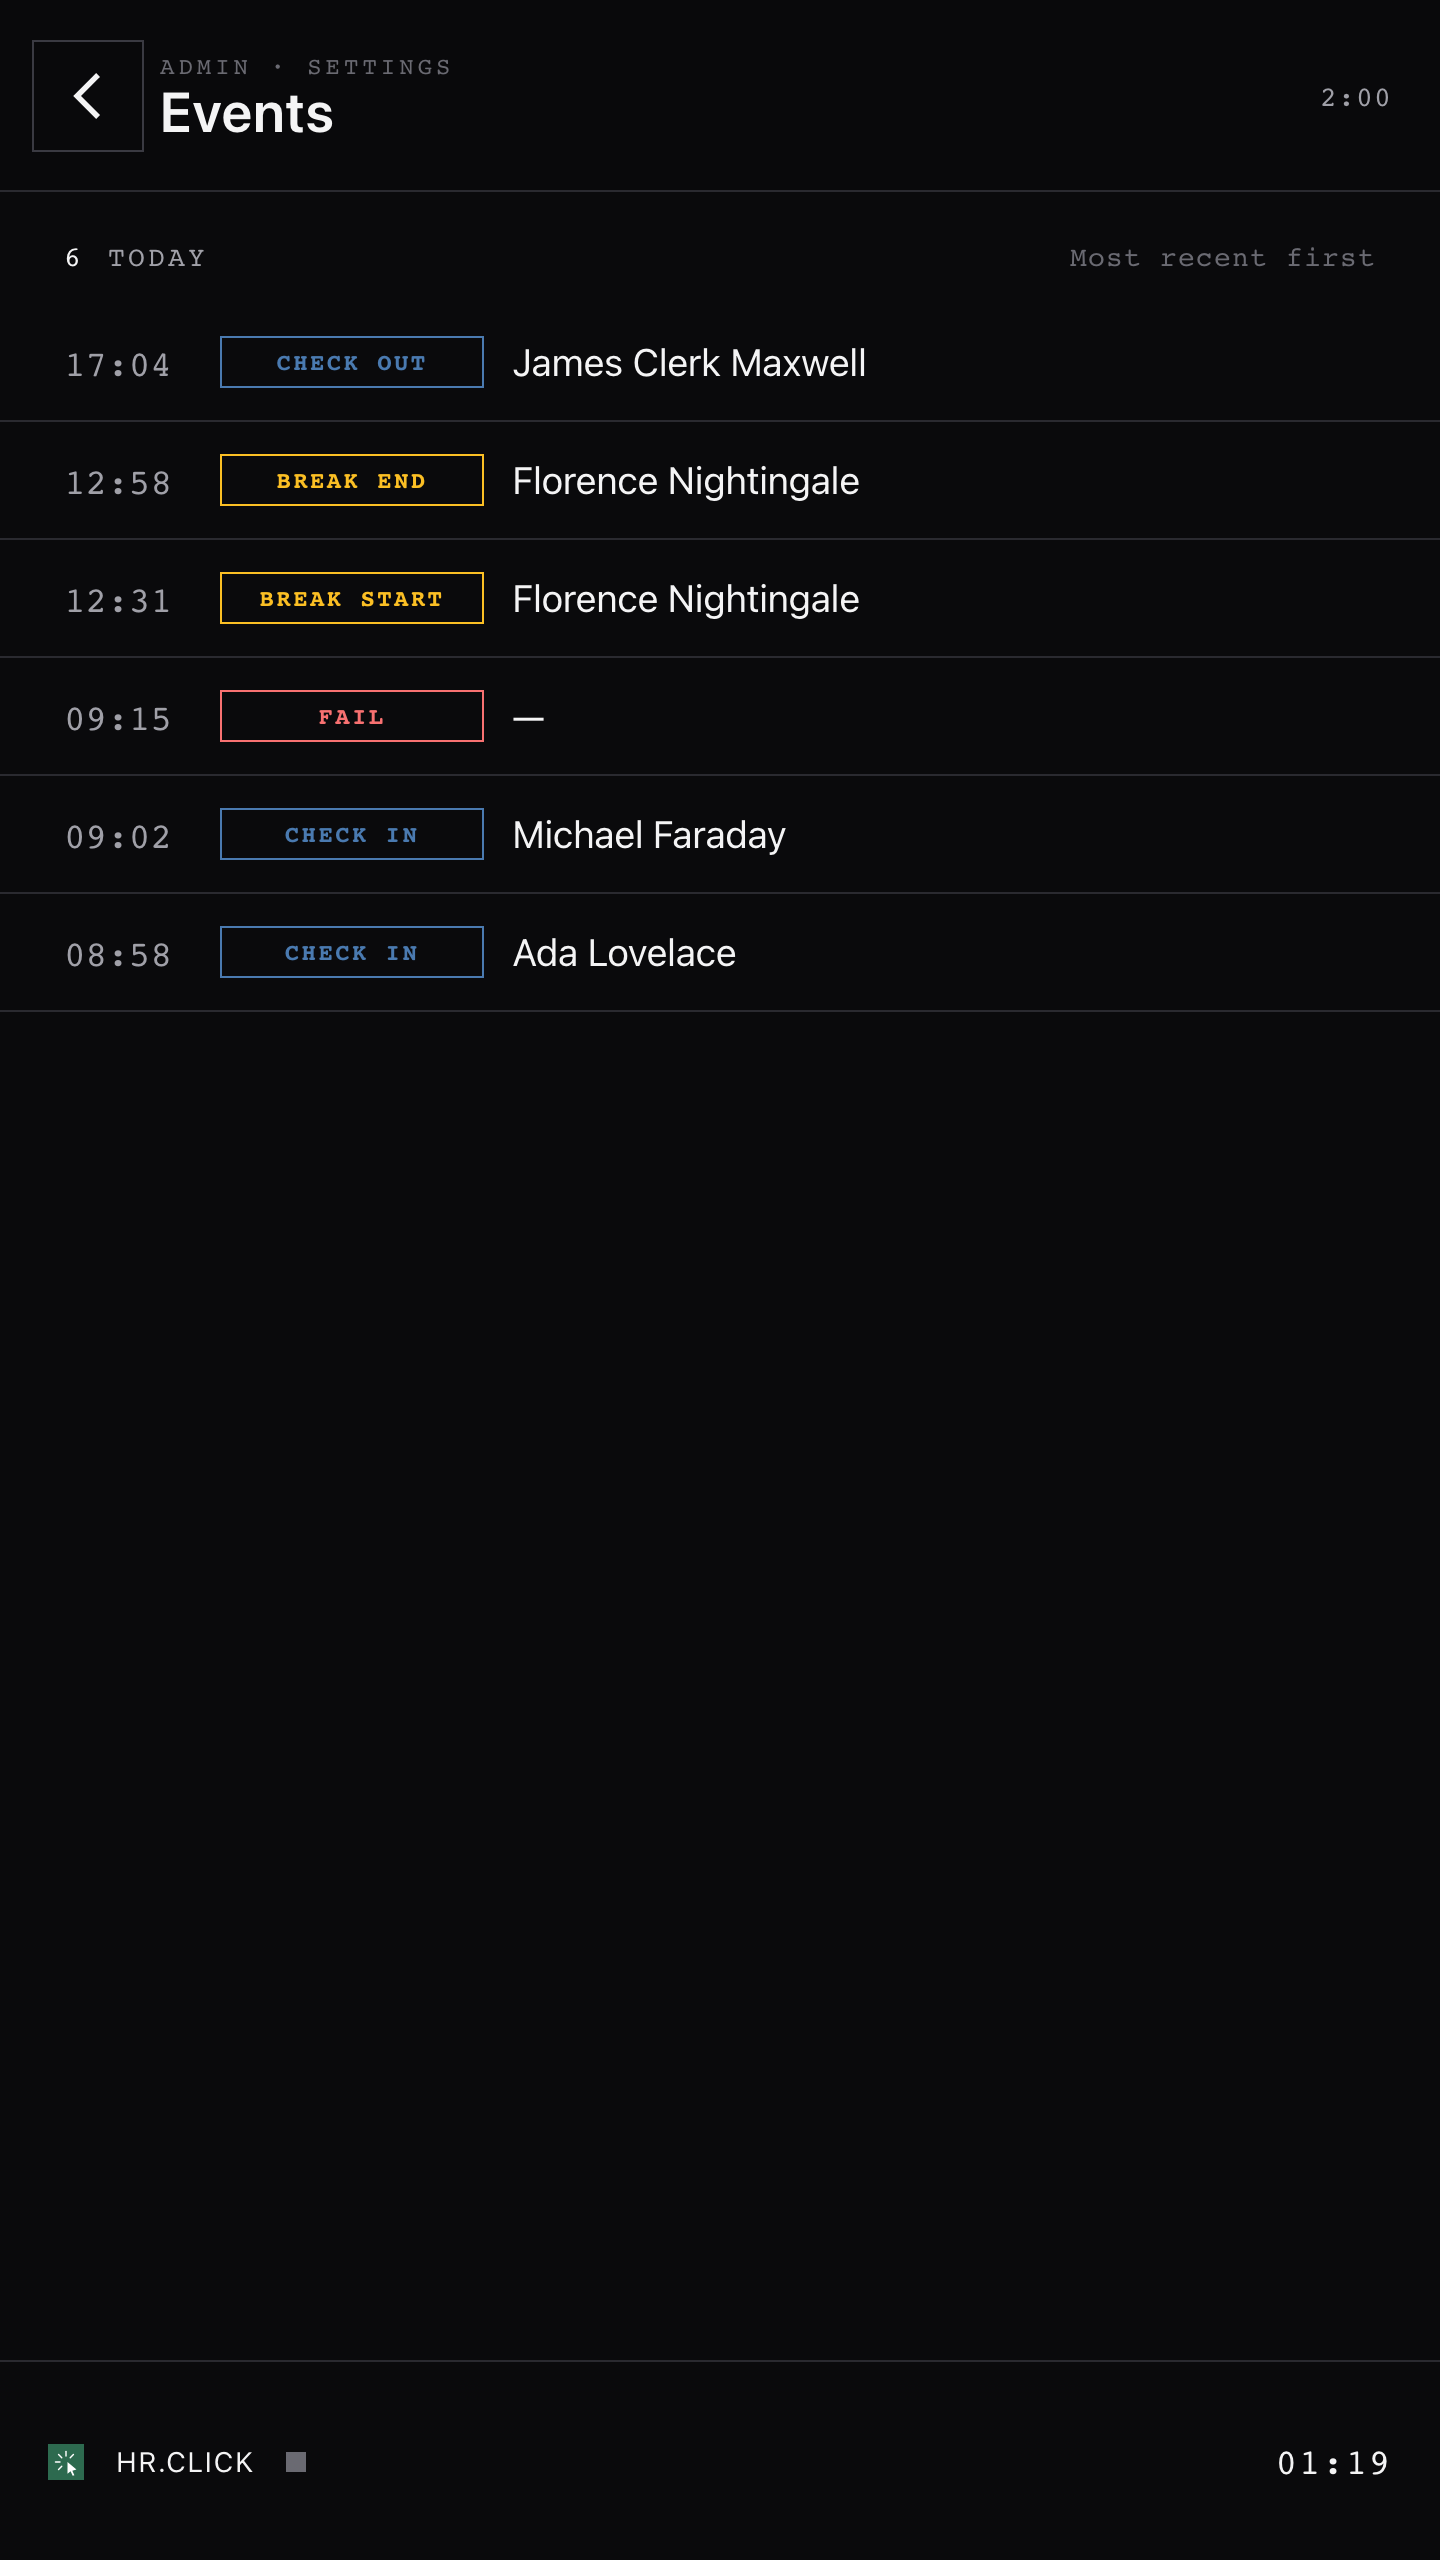
| Events | Today’s check-ins and failed attempts on this terminal. |
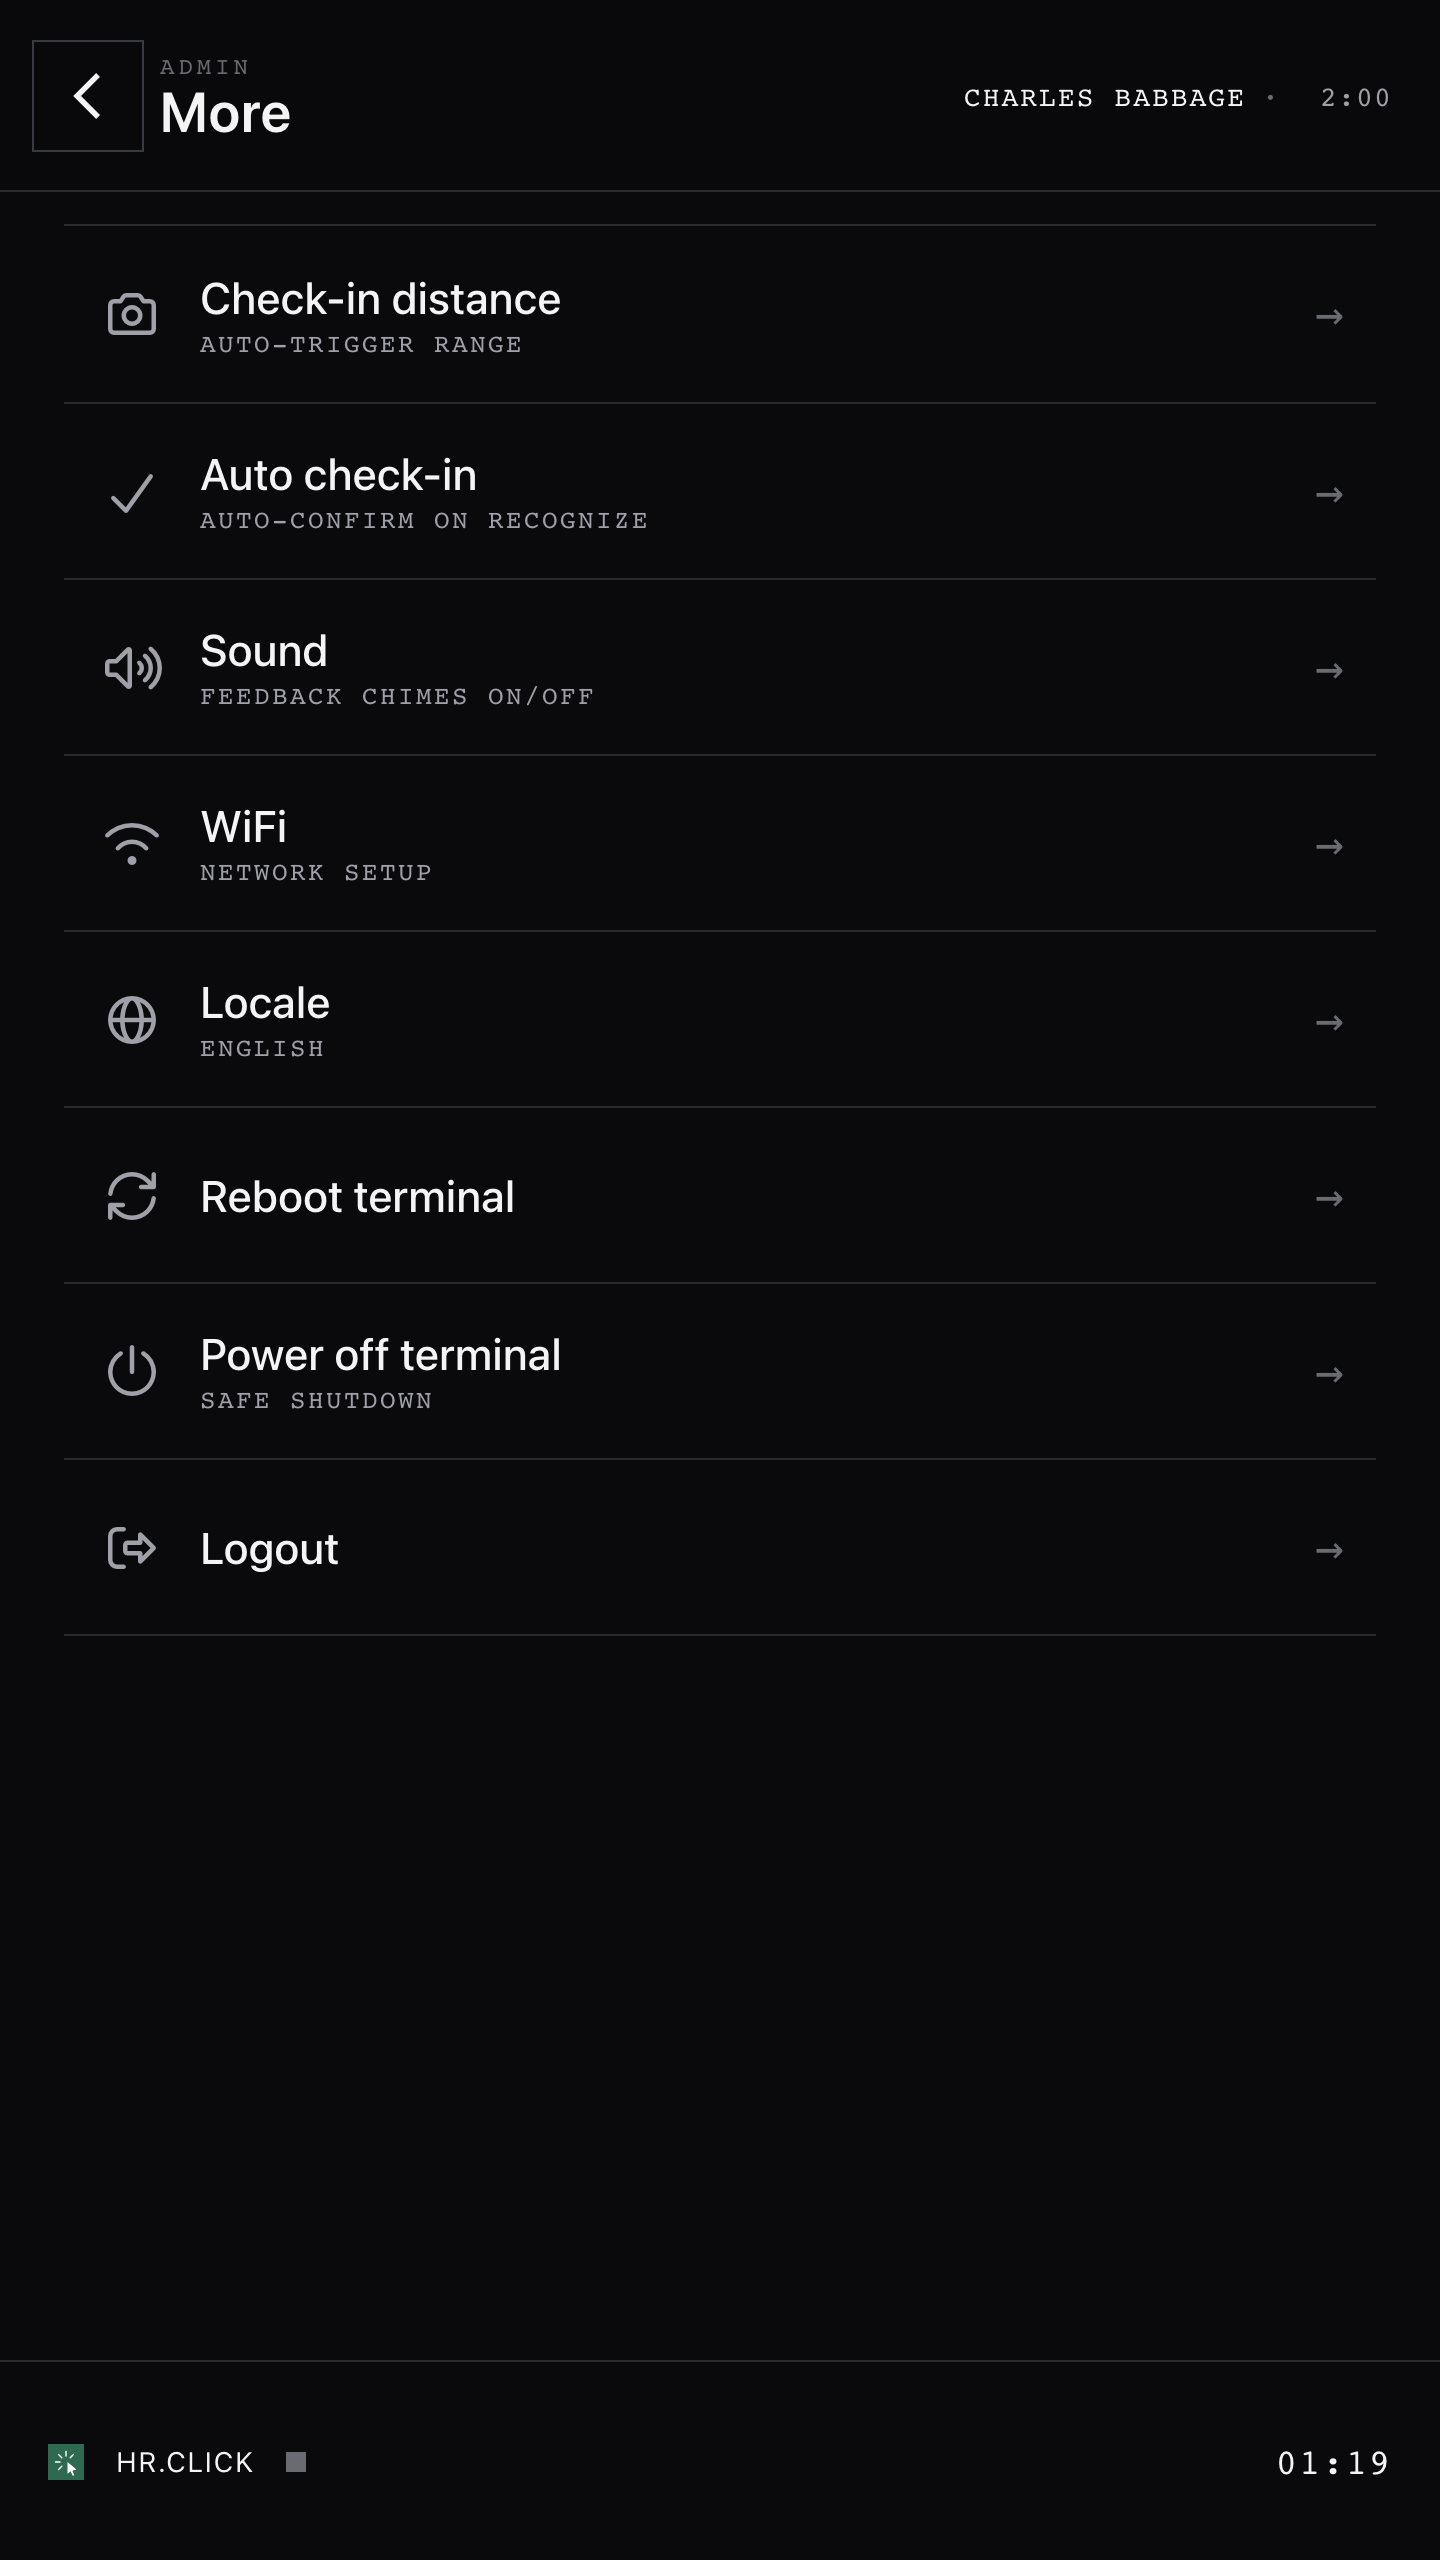
| More | Device settings: check-in distance, auto check-in, sound, Wi-Fi, language, reboot, power off, logout. |
9Managing terminals from the web
The Terminals page shows your whole fleet: which devices are online, how many faces are enrolled, and any alerts. A terminal is shown offline if it hasn’t reported for about 5 minutes.
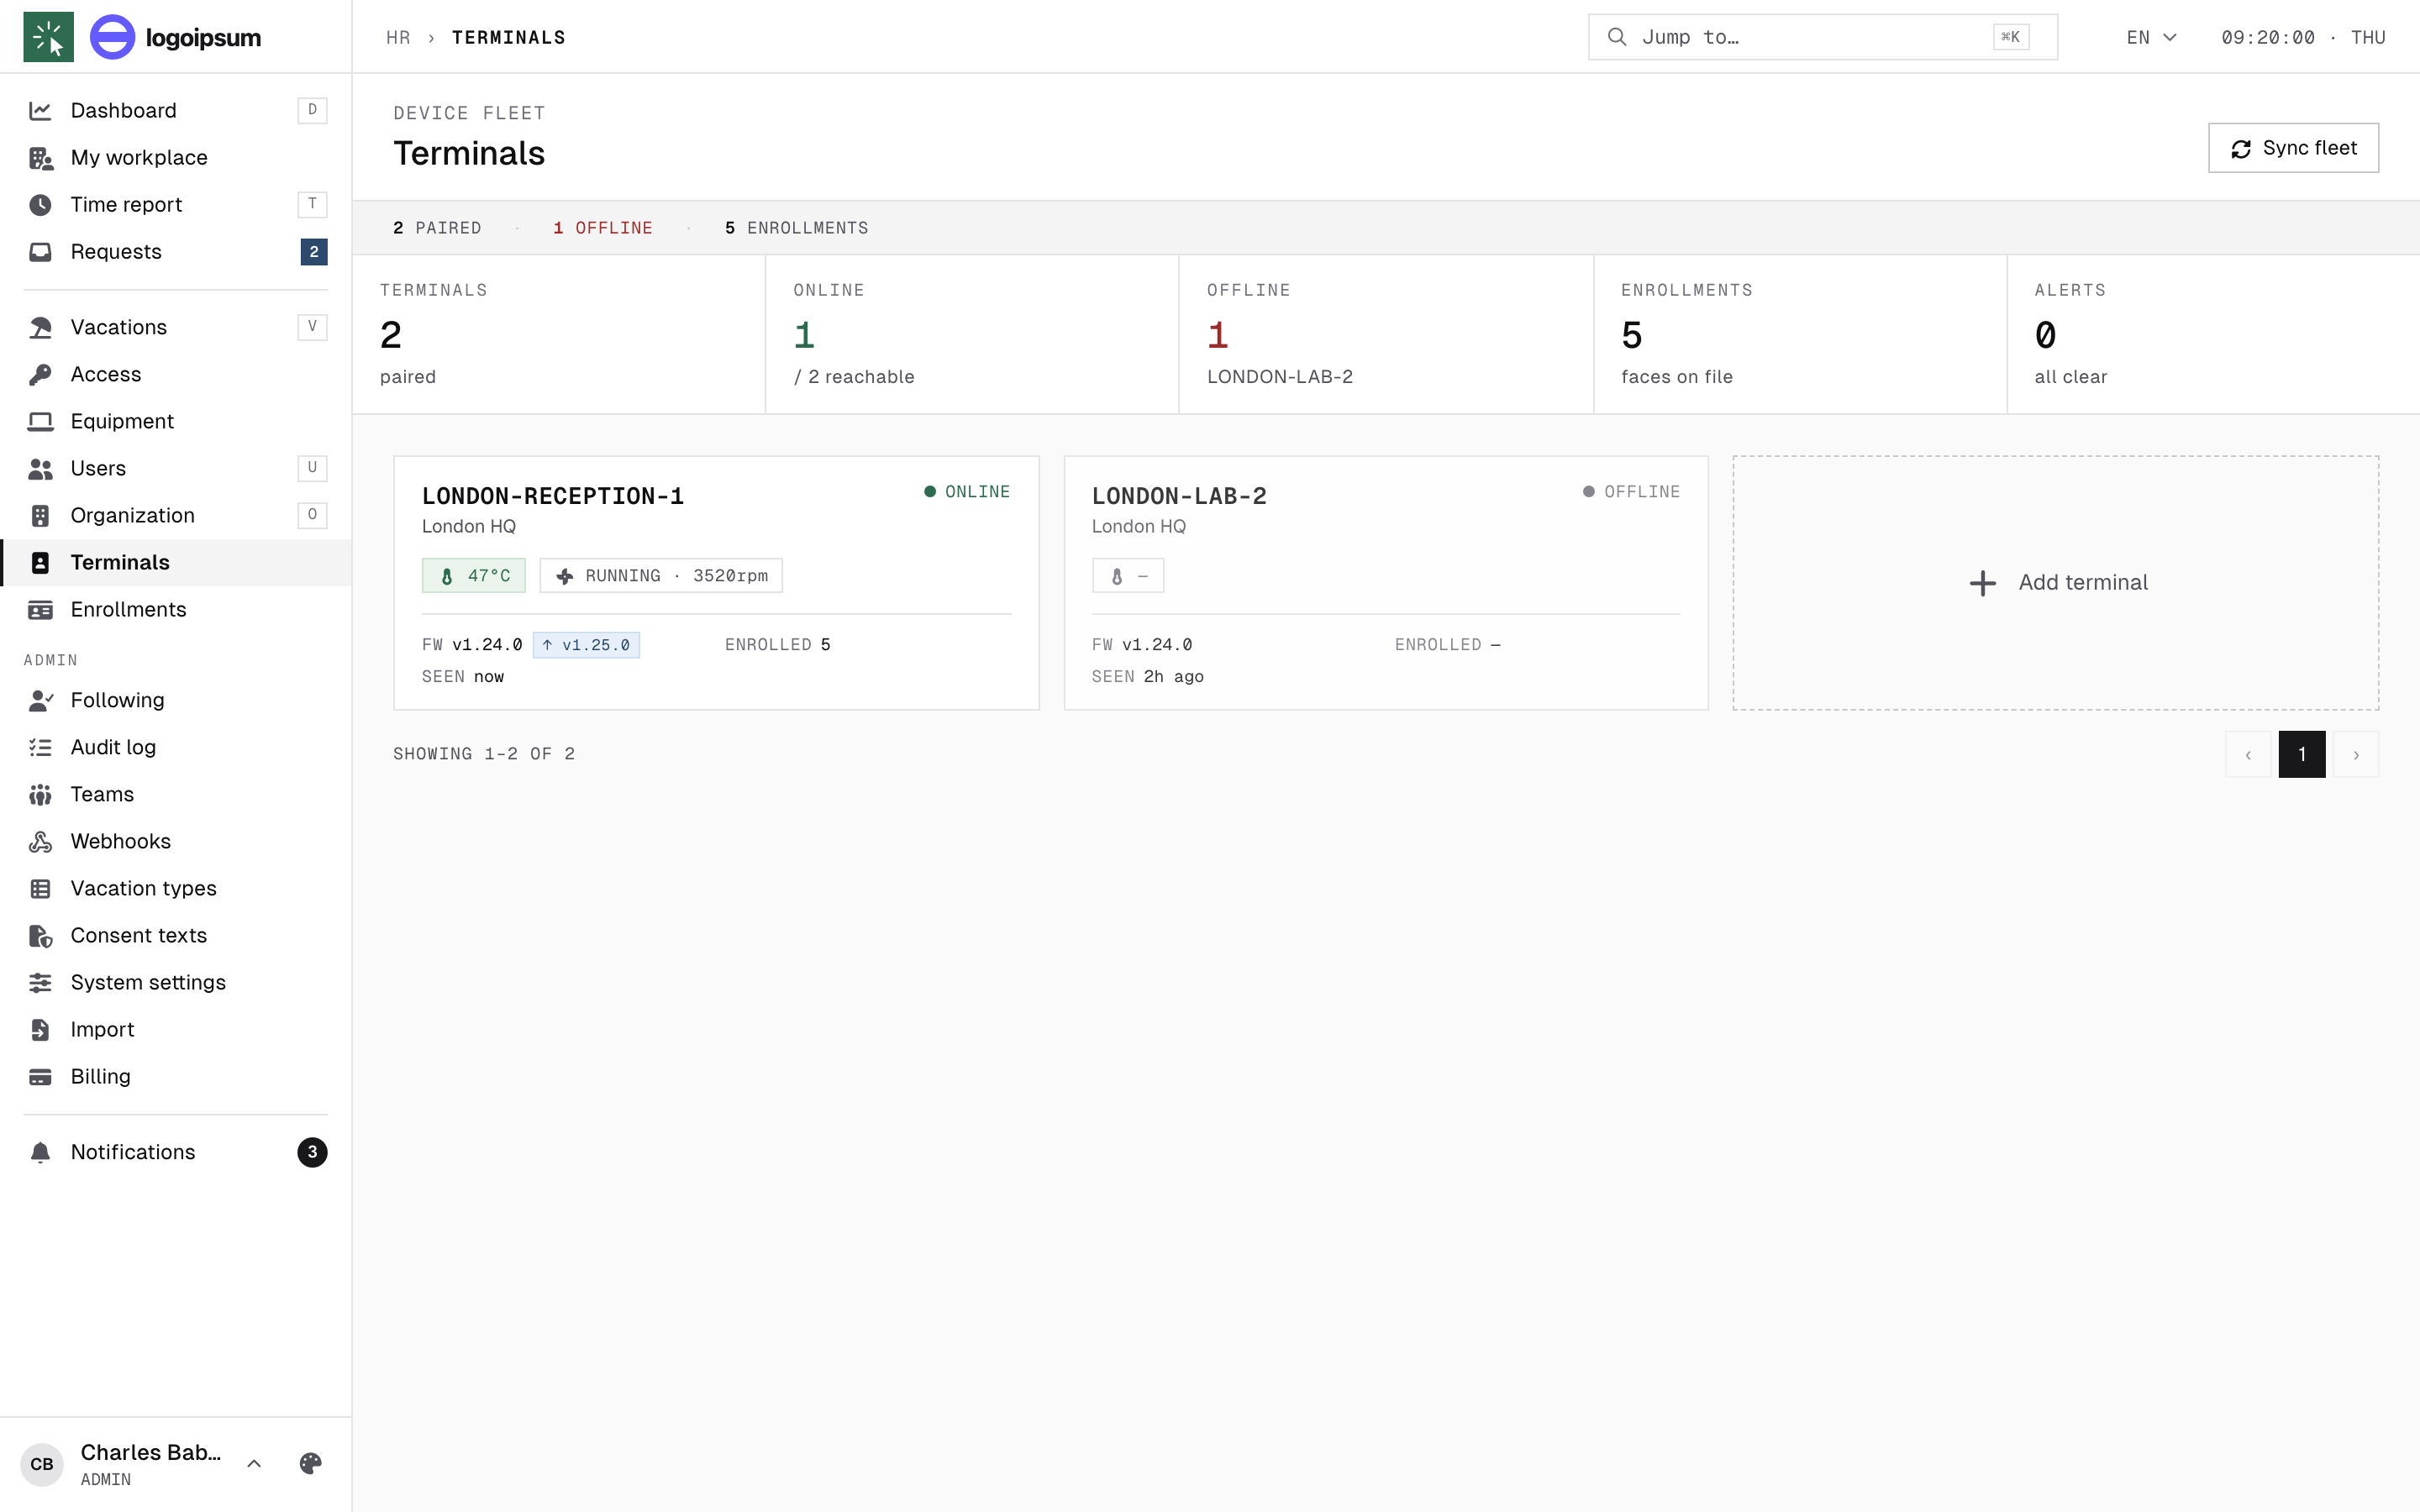
Click a terminal to open its detail page:
- Overview — status, firmware (with an update badge when a new version is available), enrolled count, last seen; plus remote actions: Sync now, Collect logs (the terminal uploads its logs for support), Reboot, Update firmware, Rename, and — for support sessions — remote screen access (RustDesk) and SSH credentials.
- Live view — watch the terminal’s camera in near-real time (for checking placement and lighting). Streaming runs only while you keep the panel open, and every start is recorded in the audit log.
- Logs — recognition events, sync activity and errors.
- Enrollments — who this device can recognise (section 7).
- Thermal — temperature and fan history of the device.
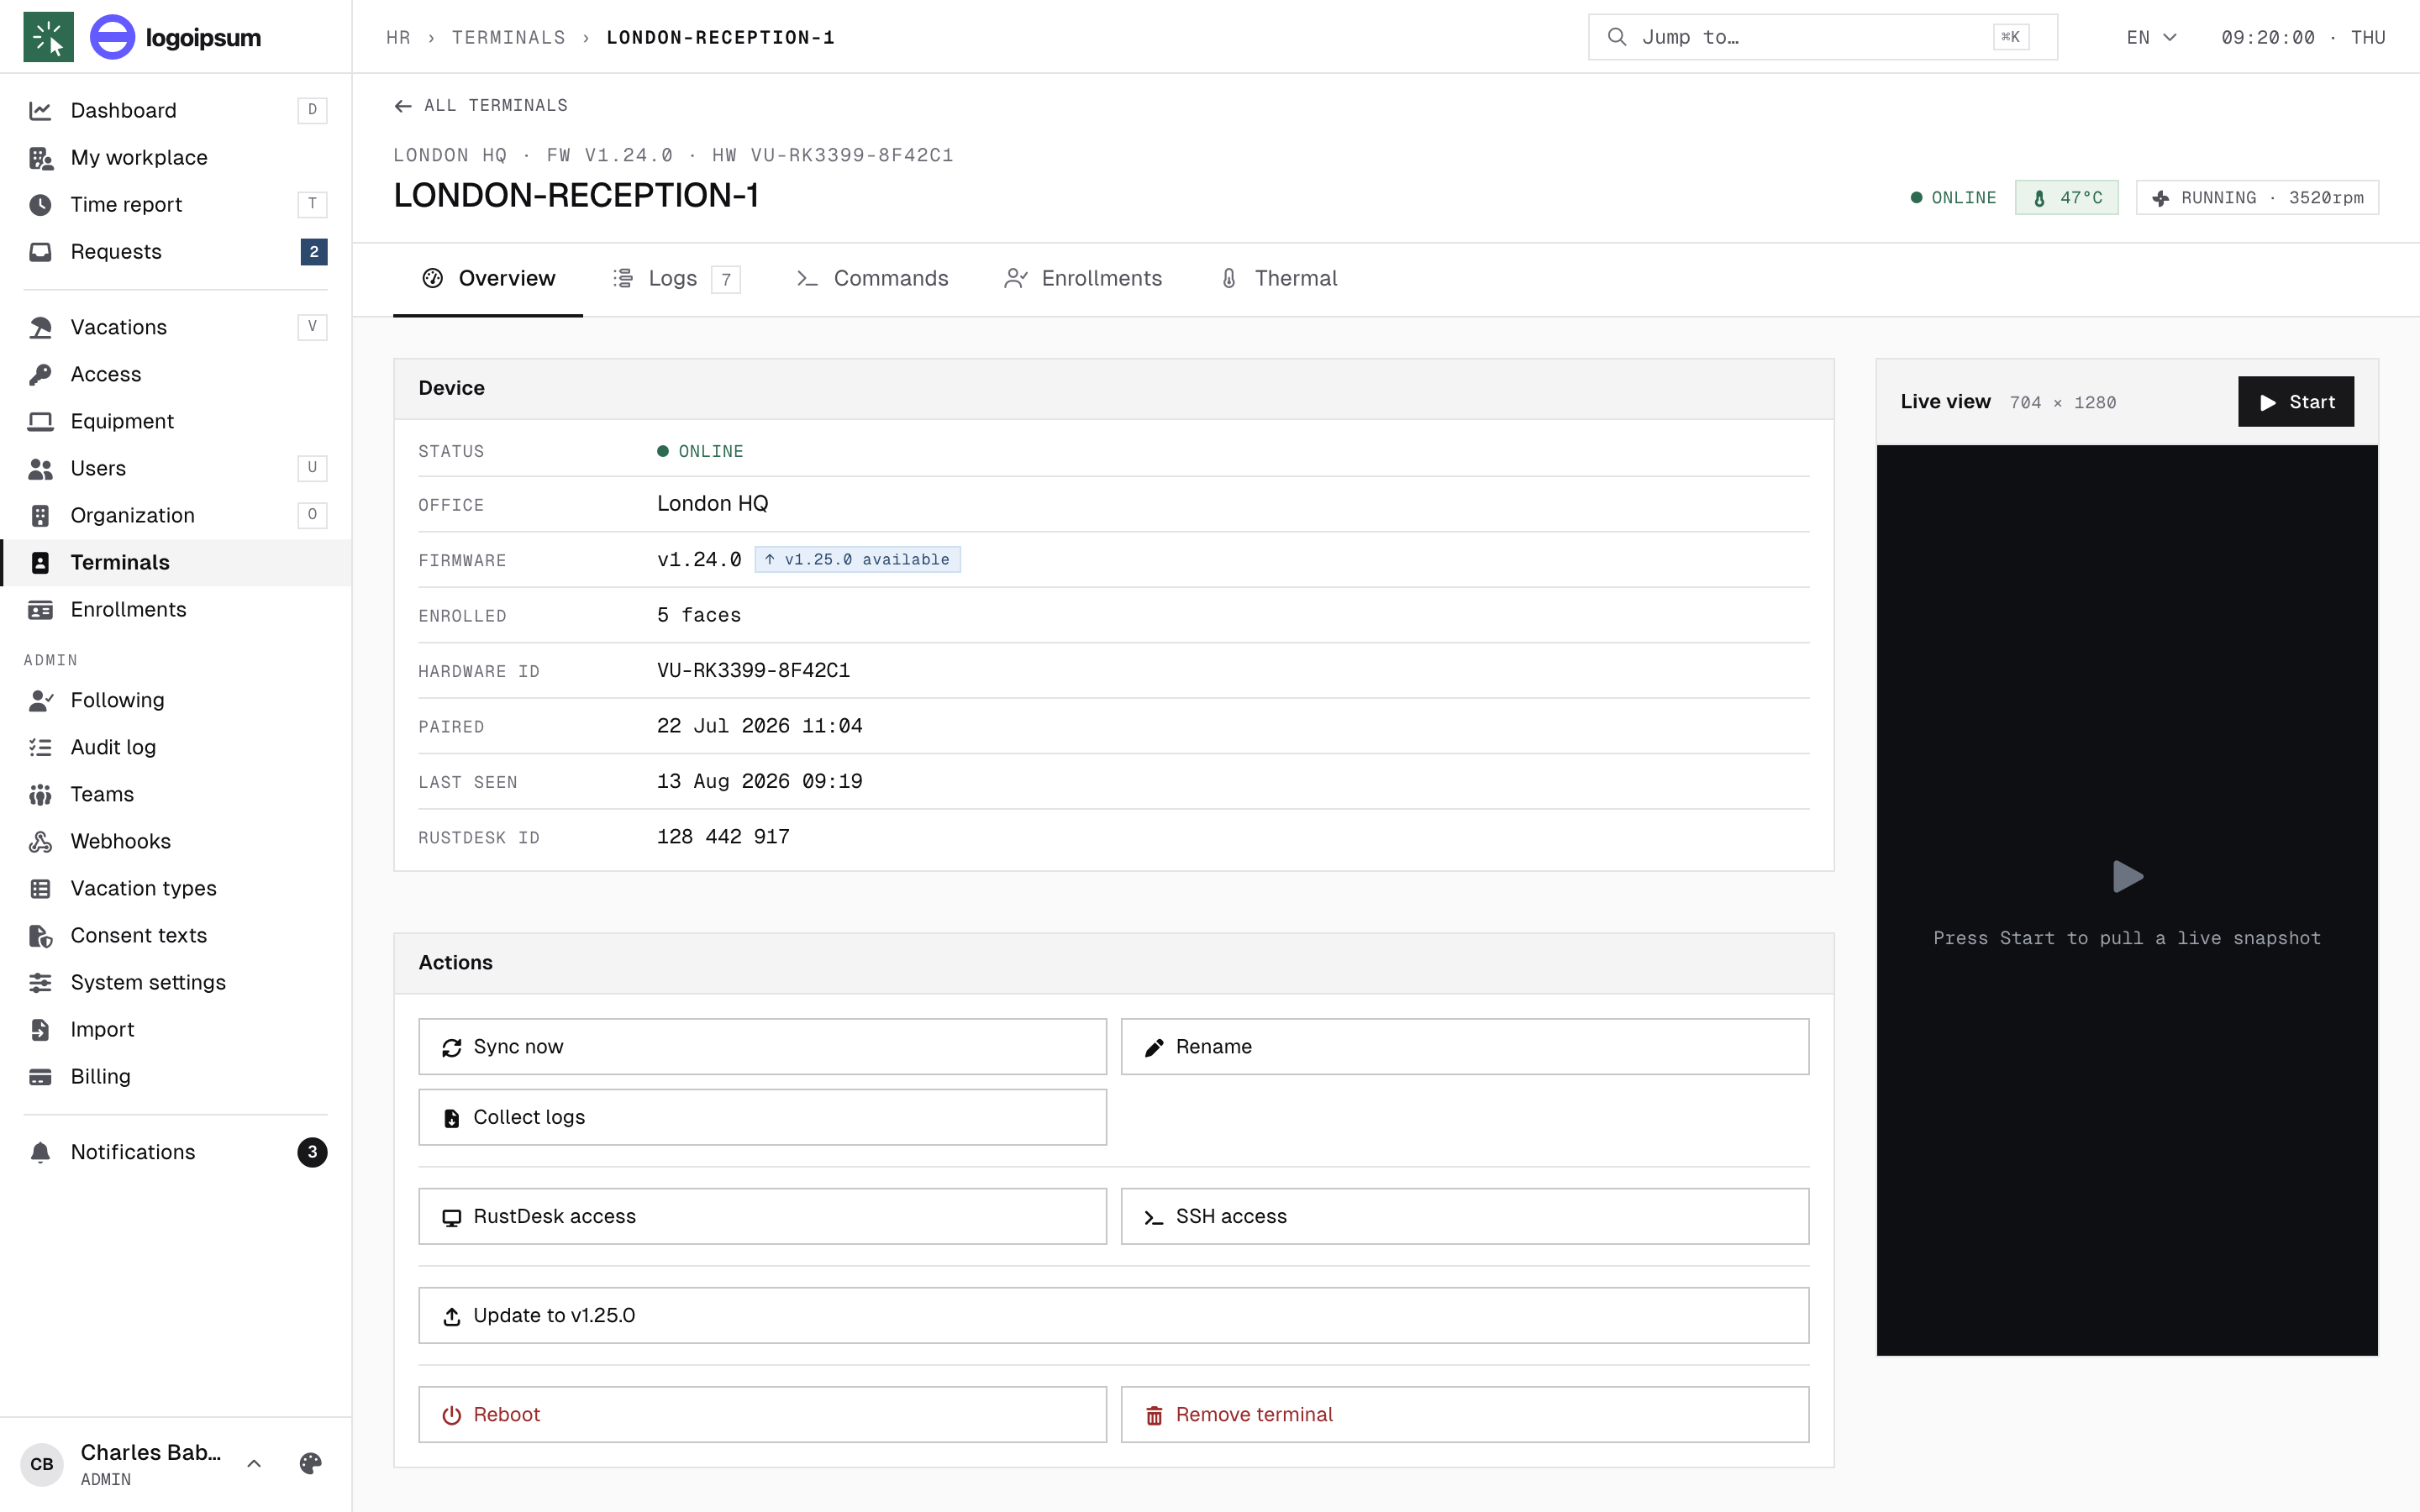
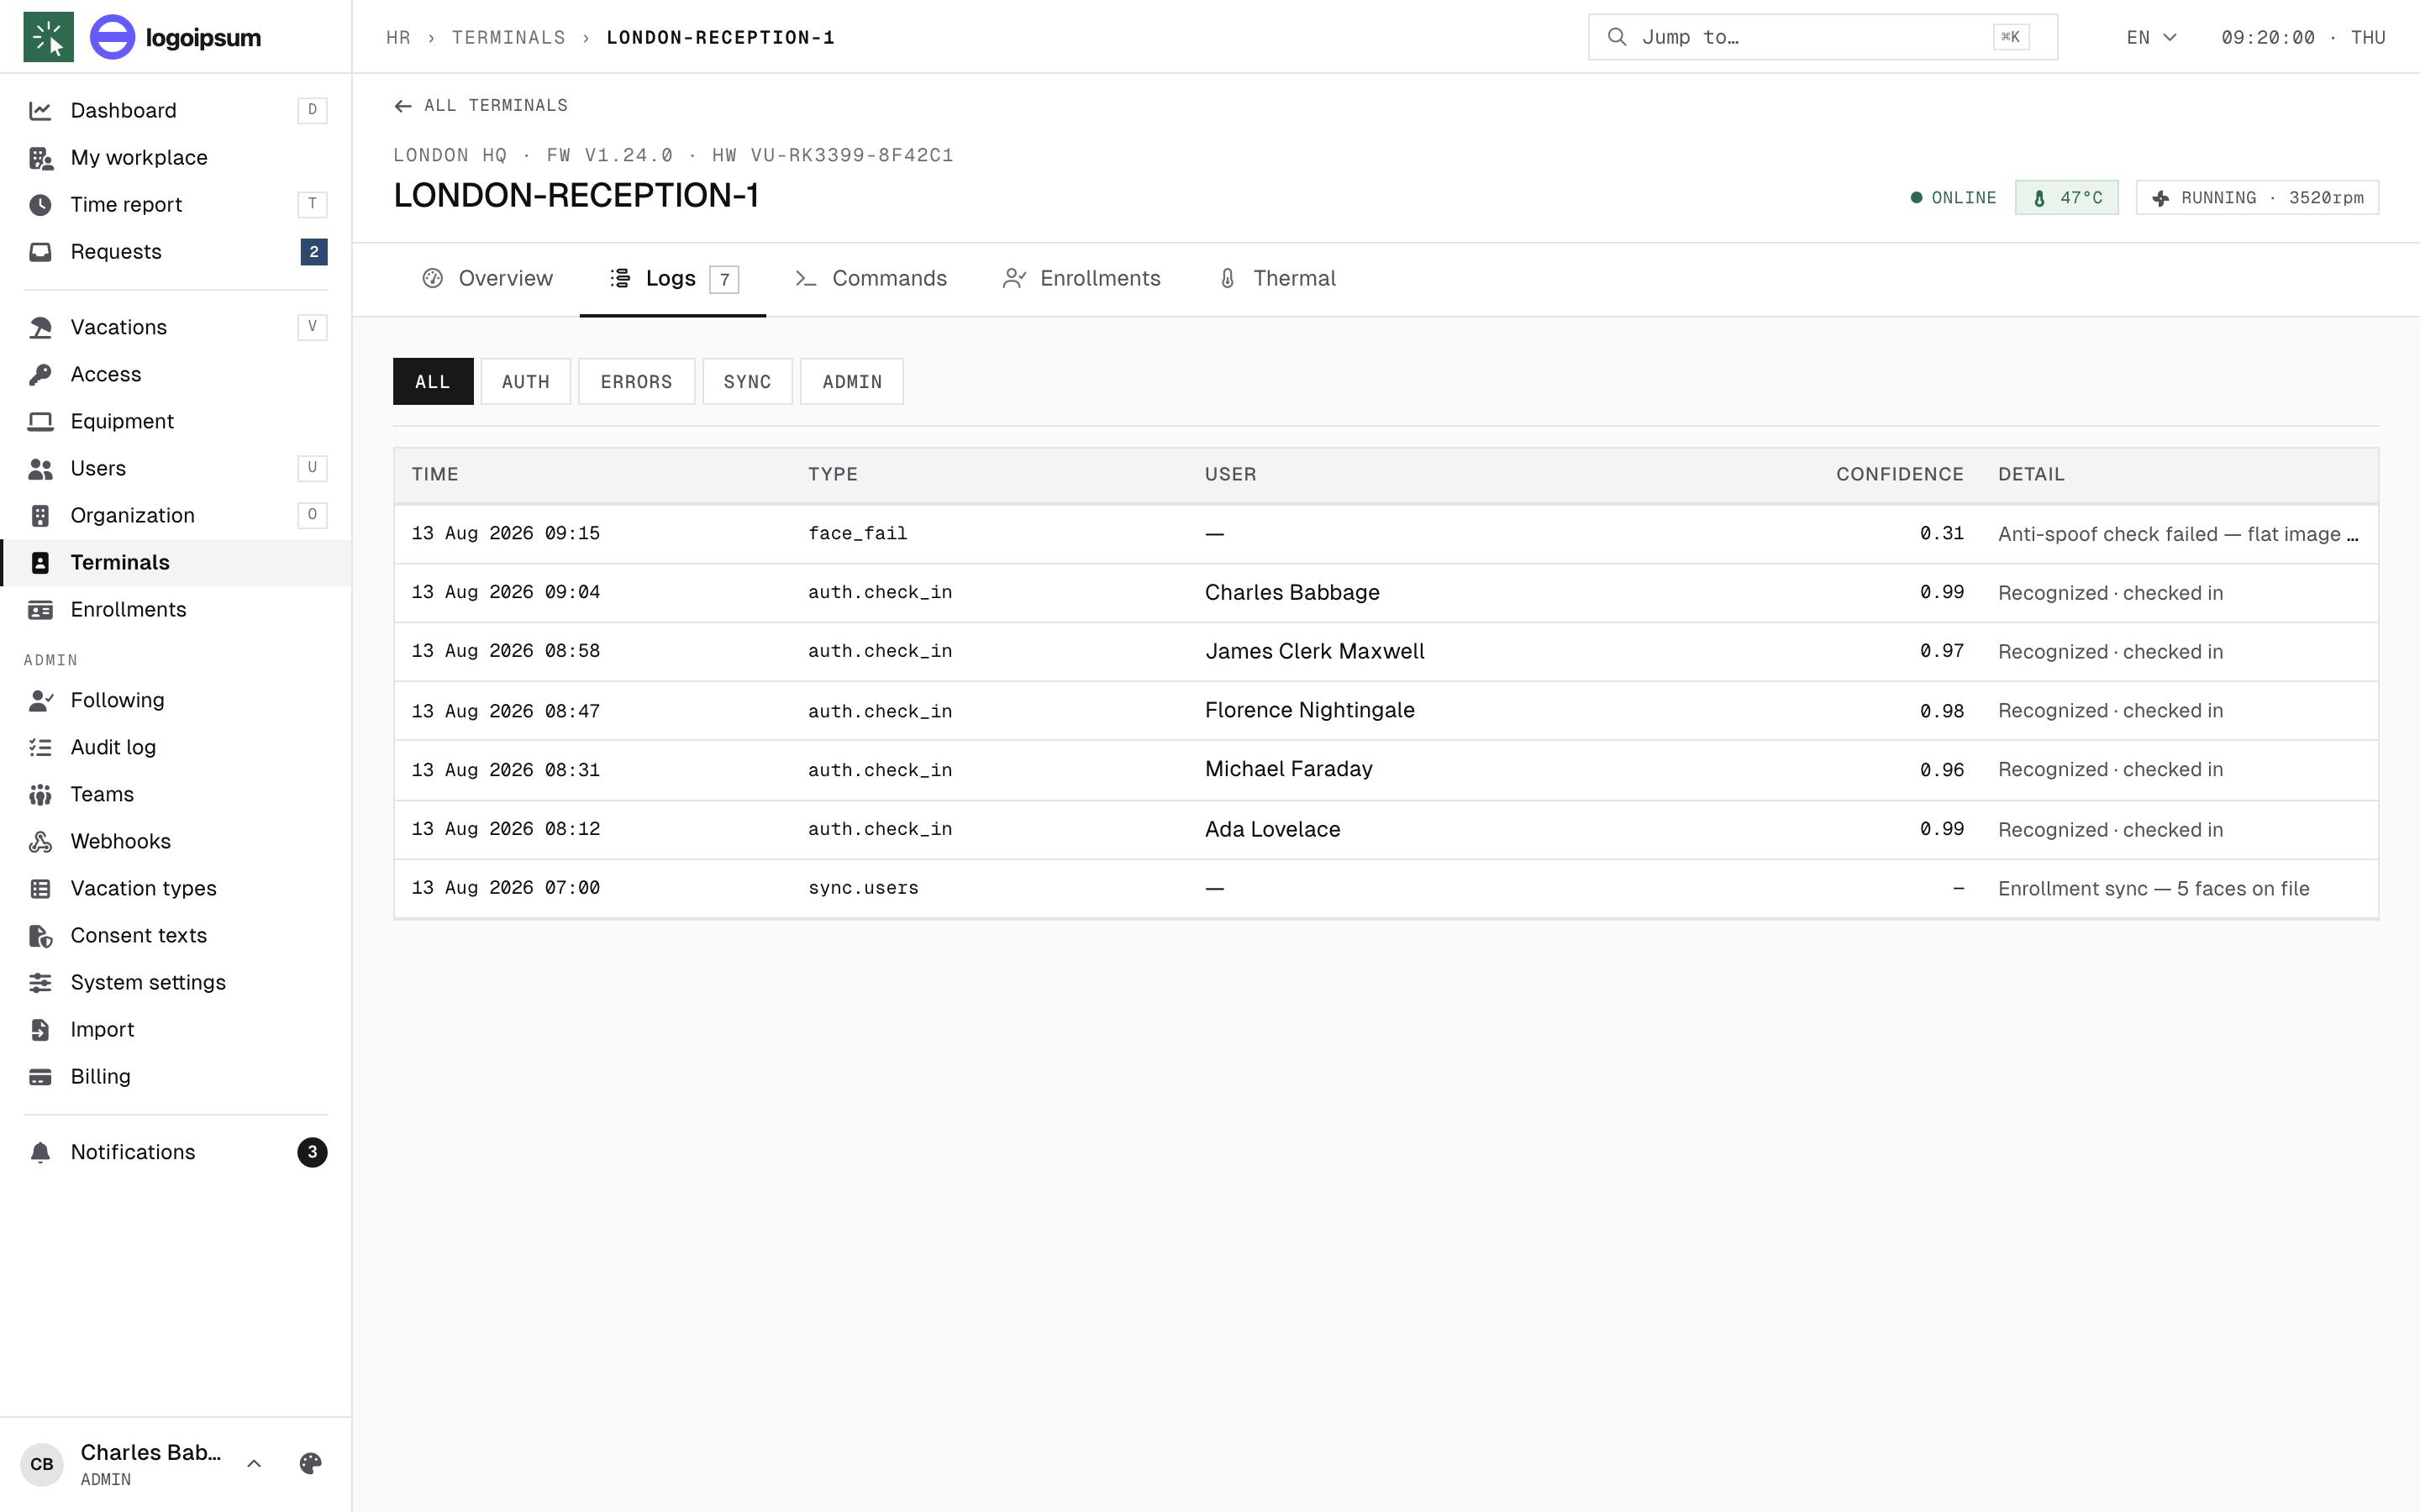
Remove terminal permanently decommissions the device: on its next contact it erases all local data — face templates, settings and any queued events — and returns to the pairing screen. This cannot be undone; re-installing means pairing and enrolling from scratch.
10Software updates
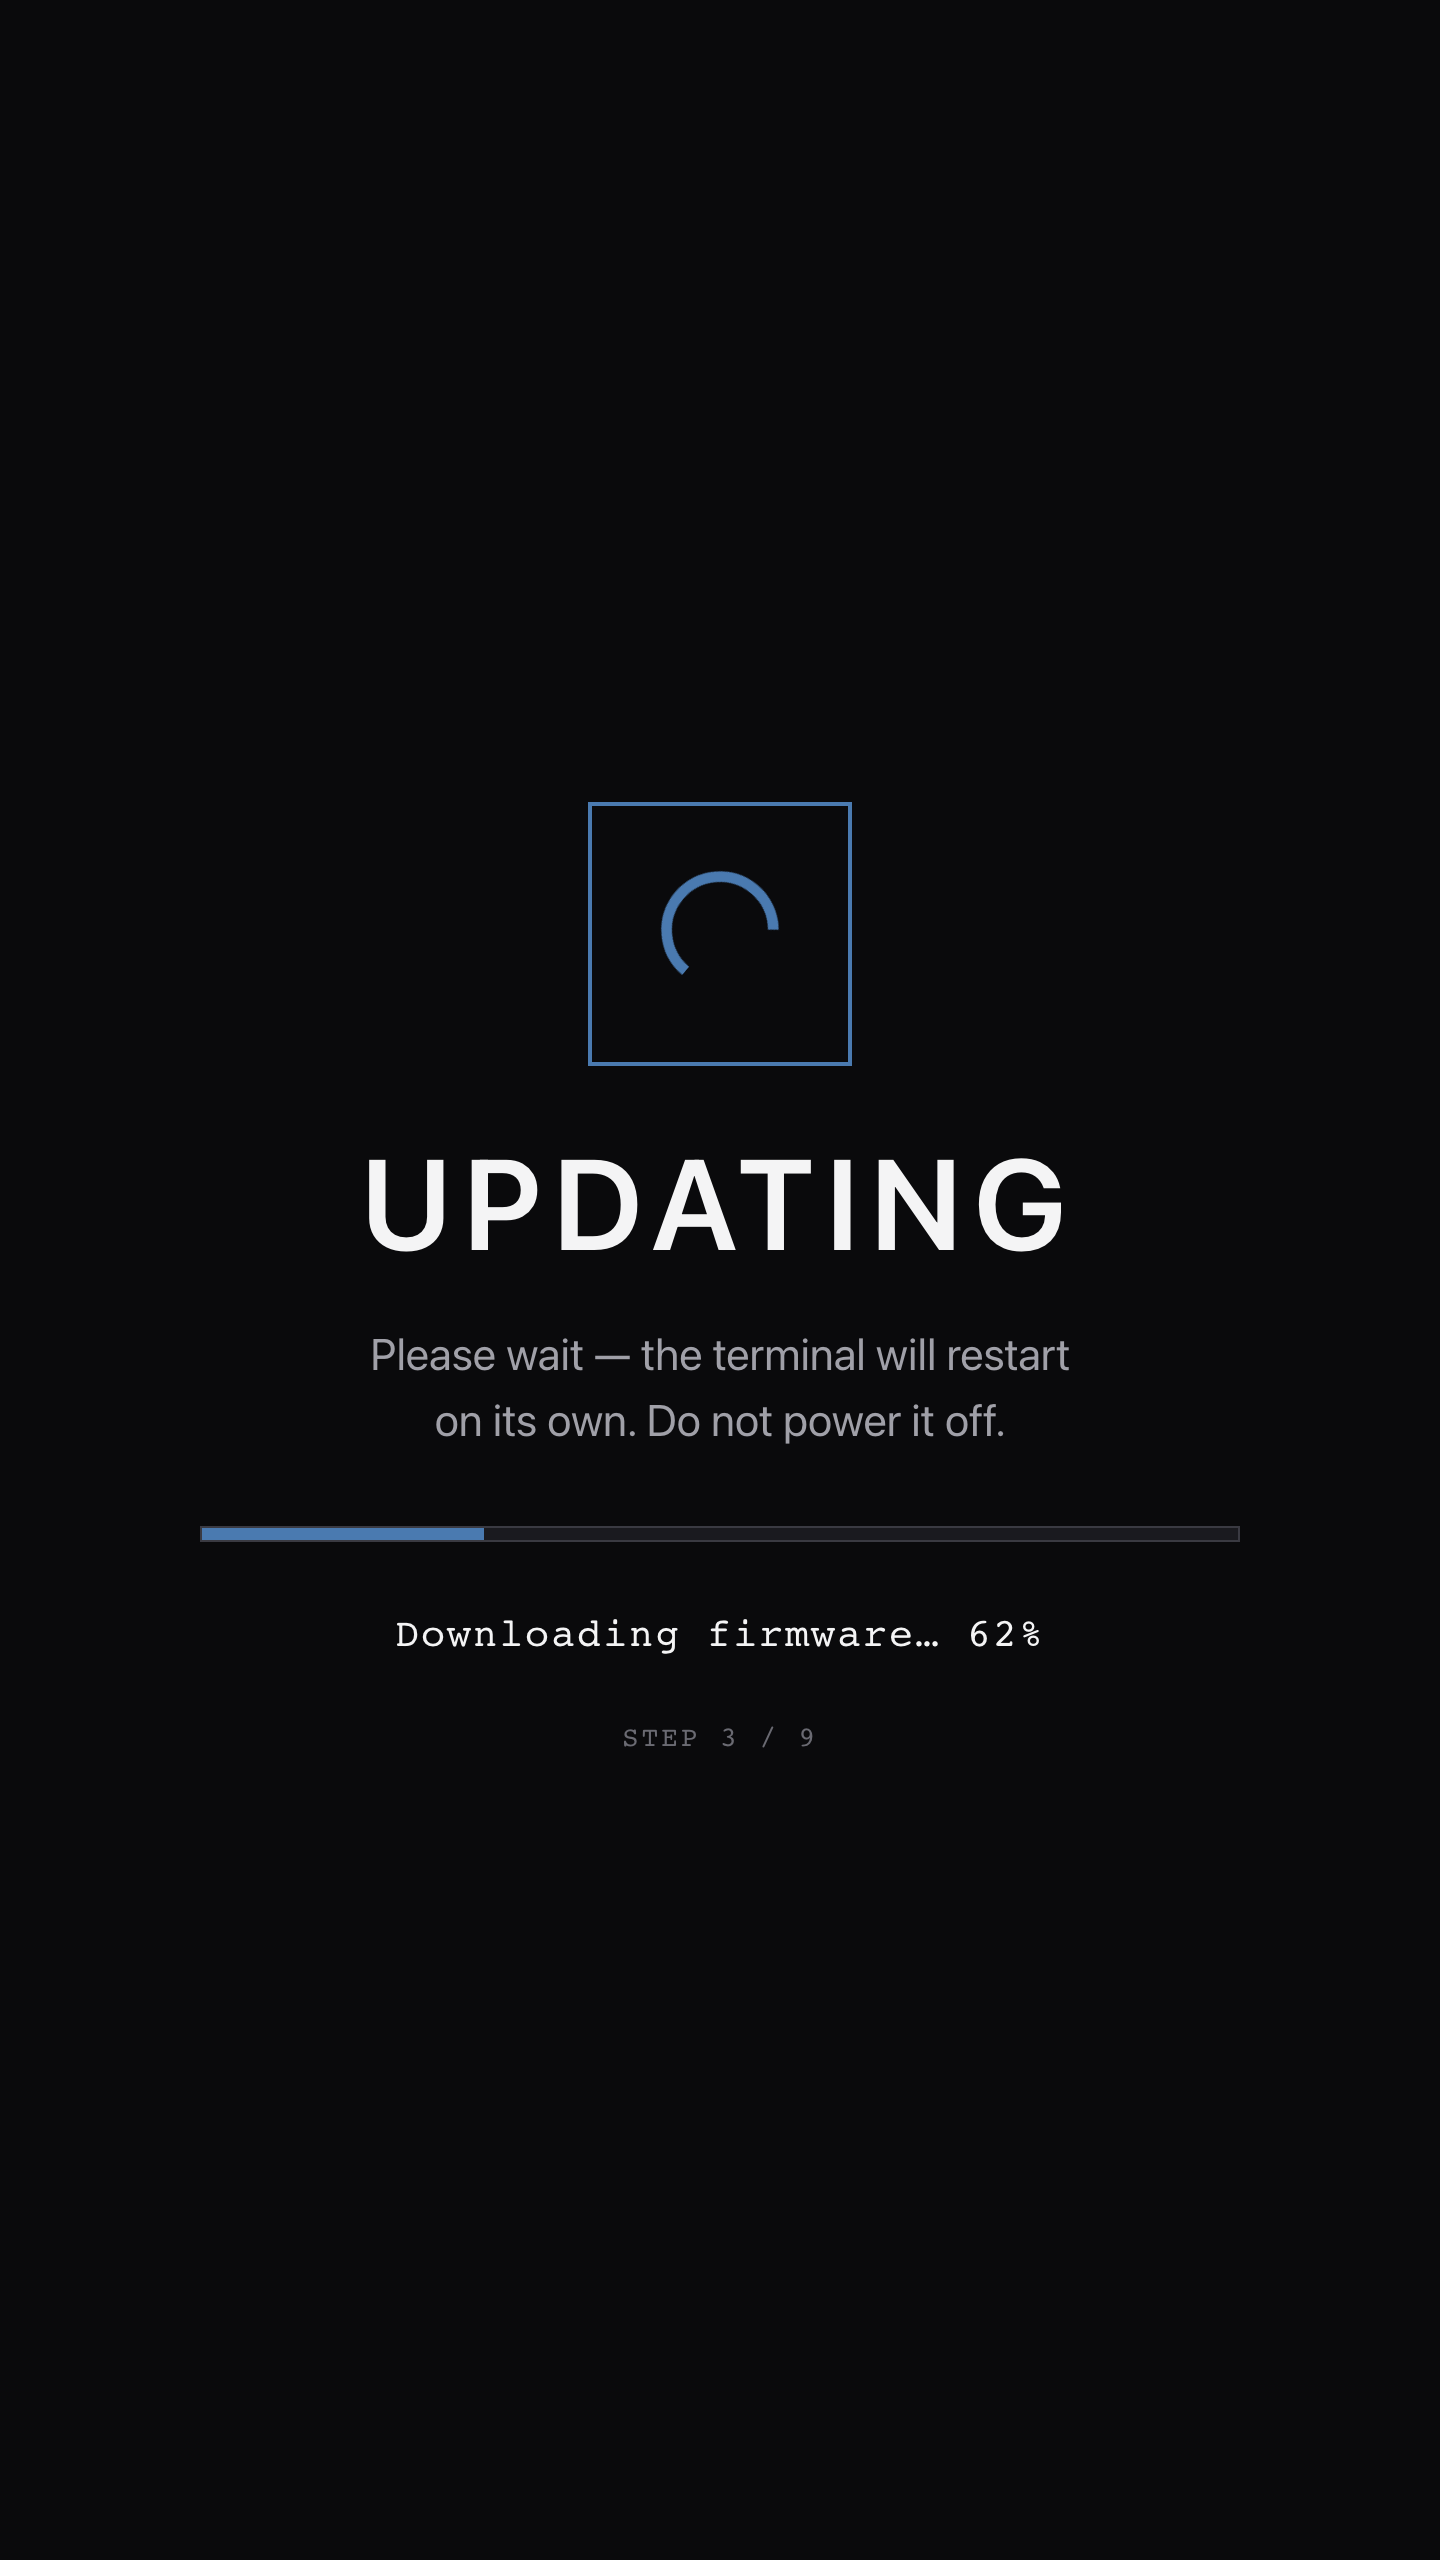
Terminals update over the air. When a new firmware version is available you’ll see it in two places: an Update firmware button on the terminal’s page in the web, and an update banner in the on-device admin menu. Trigger it from either — the device downloads the update, verifies its signature, and applies it.
During the update the terminal shows a progress screen. Small updates finish in seconds; larger ones restart the device once and take a few minutes.
Never cut power during an update. The terminal restarts by itself. If an update fails, the device rolls back to the previous version automatically and reports the failure to the web.
Updates never lose data: any check-ins waiting to be synced survive updates and reboots.
11Offline behaviour and data safety
- Check-ins work offline. If the internet or the server is unreachable (footer dot blinks yellow), the terminal keeps recognising enrolled employees and stores their punches locally, then delivers them automatically — with the original timestamps — once the connection returns.
- Nothing is silently dropped. If a delayed punch no longer fits (e.g. the person was meanwhile checked out in the web), it is saved as inactive and flagged for a time manager to review, instead of being discarded.
- What needs connectivity: enrolling new faces, syncing the employee list, and reporting status to the web. Day-to-day recognition does not.
- Time: the clock on the screen always shows the office timezone and is synchronised over the network.
- Biometrics are encrypted — the irreversible template is held, encrypted, both on the terminal and in HR.Click (which is how a newly enrolled face reaches every other terminal in the office); the signed consent is stored in HR.Click too. Deleting an enrollment (web → Enrollments) or removing the terminal wipes the templates.
12Troubleshooting
| Symptom | Likely cause | What to do |
|---|---|---|
| Terminal shows OFFLINE in the web | Network or power problem on site | The device is marked offline after ~5 minutes of silence. Check power and the network (is the status dot on the terminal blinking yellow?). Fix Wi-Fi via the admin menu → More → Wi-Fi. Punches made meanwhile are safe and will sync. |
| Status dot blinking yellow | Internet or server unreachable | Normal offline mode: check-ins still work and sync later. Restore the network; the terminal reconnects by itself. |
| “NO CONNECTION” on the terminal screen | The screen lost contact with the terminal’s internal service — a device fault, not an internet outage | The terminal’s watchdog usually recovers this by itself within a few minutes. If it persists: web → Reboot (if online), or power-cycle it (see the note below the table). |
| An employee is repeatedly not recognised | Poor enrollment or changed appearance | Admin menu → Users → tap the person → re-enrol. Check lighting: avoid strong light directly behind the person. |
| “NO FACES IN DB” | No enrollments on this device | Run Sync from the admin menu; verify the terminal is paired to the right office and that employees are enrolled (section 7). |
| “FACE SCAN UNAVAILABLE” | Anti-spoofing lock: someone tried to use a photo/video of a face | Open the admin menu — an Unlock banner sits at the top. Review today’s Events to see the attempts. |
| “NOT AUTHORIZED” when opening the admin menu | The recognised person has no admin rights here | Check the person’s role and office in HR.Click, or use a 6-digit/backup code (set up under web → Settings → Terminal). |
| Code entry LOCKED | Too many wrong codes | Wait for the on-screen countdown (5 minutes), or authorise by face. |
| Pairing code expired or rejected | Codes are valid for 10 minutes | Click Regenerate code in the web wizard and pair again. |
| “Couldn’t reach HR.Click” while pairing | Wrong address or blocked network | Check the instance address (https://yourcompany.hr.click) and that the network allows ordinary outbound HTTPS. |
| Screen dark / frozen, device has power | Temporary software hang | The terminal detects hangs and recovers itself within a few minutes. If not: web → Reboot (if online), or power-cycle it (see the note below the table). |
| Update failed | Download or installation problem | The device rolls back to the previous version automatically. Retry later; if it fails repeatedly, use Collect logs and contact support. |
| Red status dot / fan warning | Cooling problem | Admin menu → Reset fan banner. Make sure the vents aren’t blocked and the unit isn’t in direct sun. If the warning returns, contact support. |
| Wrong time on the screen | Timezone or clock sync | The terminal shows its office’s timezone (set in HR.Click) and syncs the clock over the internet — check the office setting and connectivity. |
After unplugging the power, wait at least 30 seconds before plugging it back in — the terminal then starts automatically. If it was plugged back sooner and doesn’t start by itself, press the recessed power button: it sits in a small hole on the bottom edge, next to the Ethernet port and the status lights. Press it gently with something thin, like a straightened paper clip.
Use Collect logs on the terminal’s web page before writing in — it attaches the device logs your support contact will ask for.
13Quick reference
HR.Click Face Terminal — User & Administrator Manual · v1.1 · August 2026. Product screens shown with sample data; names of persons are fictitious examples.